
Integrating Meta Ads (Facebook Ads) with Mixpanel gives product and marketing teams a powerful, unified view of campaign performance and downstream user behavior. This enables better attribution, clearer ROI measurement, and tighter feedback loops between acquisition and engagement.
This guide explains how to set up a Google Cloud Function that automatically exports Meta Ads performance metrics and imports them into Mixpanel every day. It includes required credentials, Cloud Function setup, code snippets, and scheduler configuration.
Note:
If you have multiple Meta Ads accounts, create one Cloud Function per account.
Only the Facebook Ad Account ID and associated credentials will differ between them.
Overview: How the Integration Works
Once deployed, the Cloud Function will:
- Run daily at 8 AM UTC
- Fetch the previous day’s Meta Ads campaign metrics
- Transform the data into Mixpanel event format
- Import the events into your Mixpanel project
               ┌────────────────────────────┐
               │        Meta Ads API        │
               │  (Campaign Insights:       │
               │  spend, clicks, CPM, etc)  │
               └──────────────┬─────────────┘
                              │
                              │ Daily @ 8 AM UTC
                              ▼
                 ┌──────────────────────────┐
                 │   Google Cloud Scheduler │
                 └──────────────┬───────────┘
                              Triggers
                              ▼
               ┌────────────────────────────────┐
               │     Google Cloud Function      │
               │  Node.js Runtime (FunctionCode)│
               │   - Fetch Meta Ads metrics     │
               │   - Transform to Mixpanel      │
               │       Ad Data  structure       │
               │   - Add UTM fields             │
               │   - Import batch events        │
               └──────────────────┬─────────────┘
                                  │
                                  ▼
                     ┌─────────────────────┐
                     │      Mixpanel       │
                     │   (Ad Data Event)   │
                     │  Properties includes│
                     │   - impressions     │
                     │   - clicks          │
                     │   - cost            │
                     │   - campaign_id     │
                     │   - utm_source      │
                     │   - utm_campaign    │
                     └─────────────────────┘
This ensures that Mixpanel always contains up-to-date advertising data.
Step 1: Create the Google Cloud Function
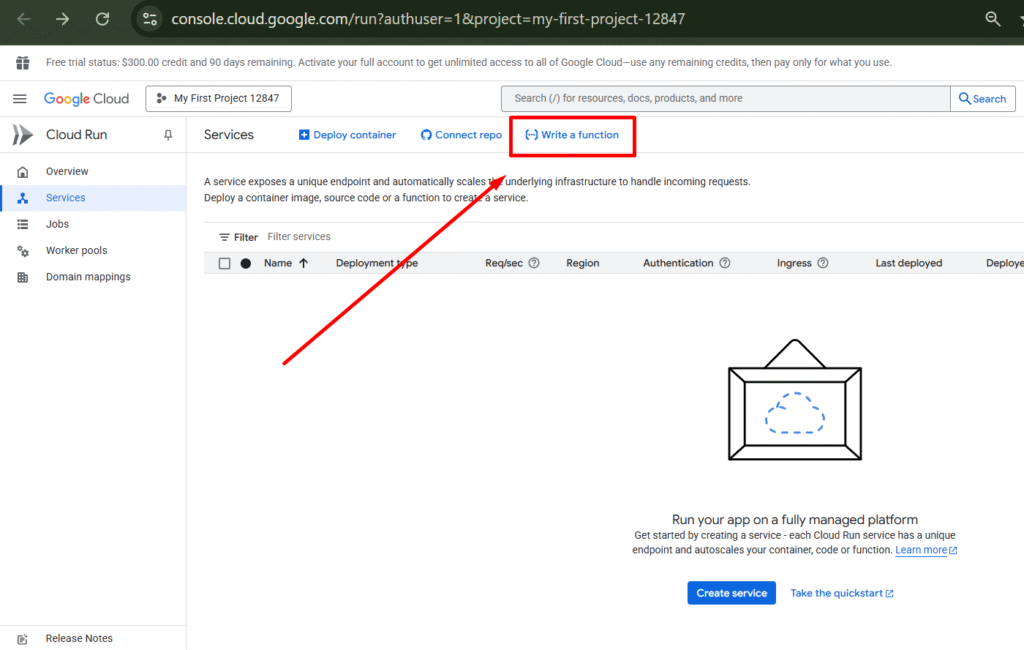
1. Navigate to Cloud Functions
In your Google Cloud project:
- Go to Cloud Functions
- Click Create Function → Write a function
2. Configure the Function
Use these settings:
| Setting | Value |
|---|---|
| Service name | mixpanelfbads |
| Function name | e.g., mixpanel-fb-ads-importer |
| Region | Choose nearest region |
| Runtime | Node.js 22 |
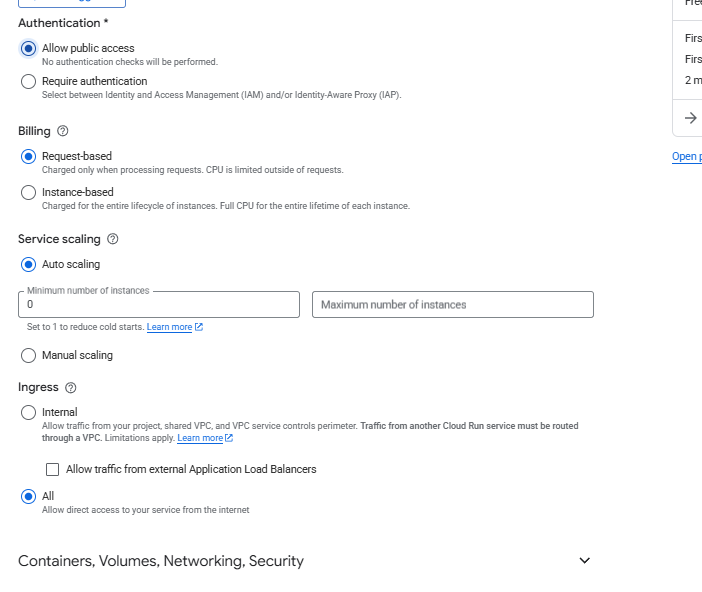
| Authentication | Allow public access |
| Billing | Request-based |
| Autoscaling | Enabled |
| Ingress | Allow all |
| Execution environment | 2nd Gen (under Containers tab) |
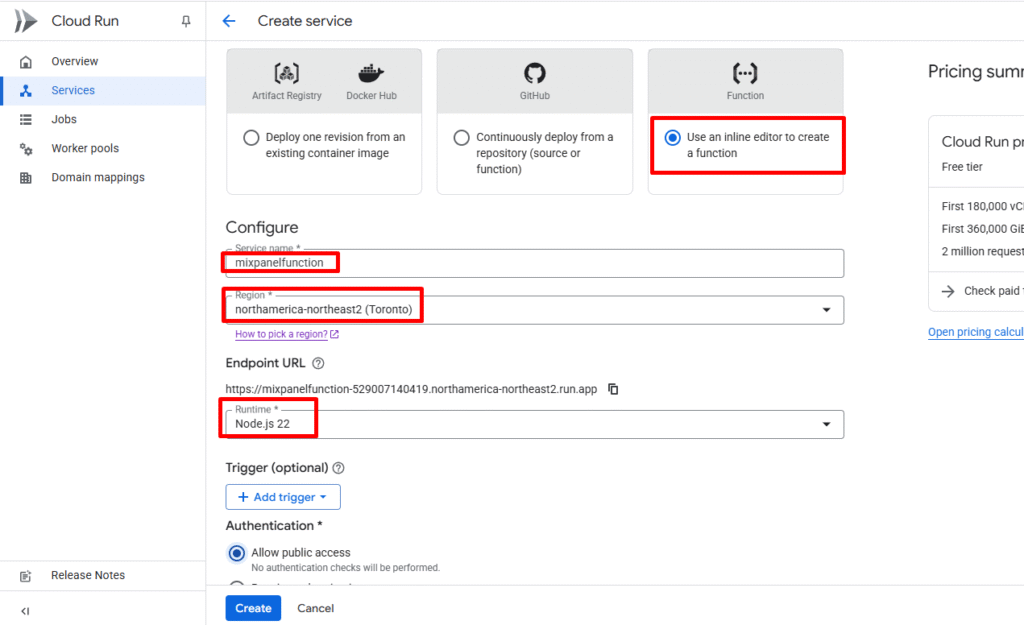
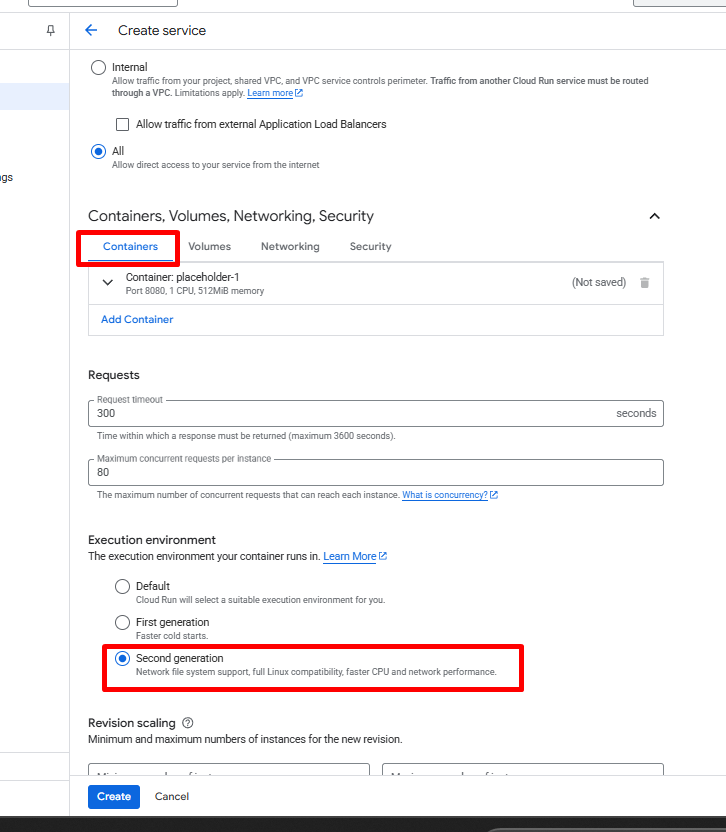
Click Create to open the code editor.
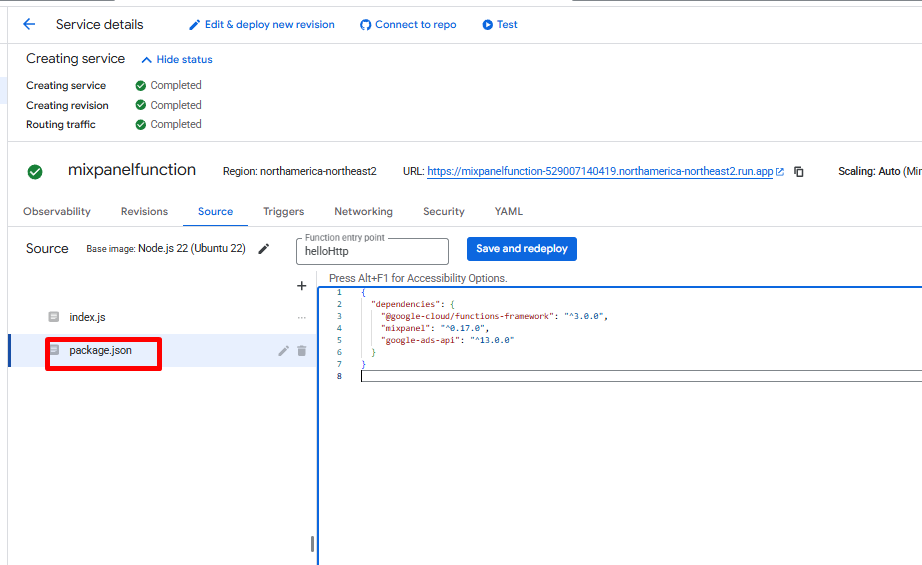
Step 2: Add Function Code & Dependencies
Inside the editor, replace the contents of both files: package.json and index.js.
Update package.json
{
  "dependencies": {
    "@google-cloud/functions-framework": "^3.0.0",
    "mixpanel": "^0.17.0",
    "facebook-nodejs-business-sdk": "^16.0.2"
  }
}
Update index.js
⚠️ Remember to replace placeholder values (tokens, secrets, account IDs) with your actual credentials before deployment.
const functions = require('@google-cloud/functions-framework');
const adsSdk = require('facebook-nodejs-business-sdk');
const Mixpanel = require('mixpanel');

// Configuration
const MIXPANEL_TOKEN = 'MIXPANEL TOKEN';
const MIXPANEL_SECRET = 'MIXPANEL SECRET';

// Mixpanel data residency options
const MIXPANEL_HOST = 'api.mixpanel.com';
// EU: const MIXPANEL_HOST = 'api-eu.mixpanel.com';
// India: const MIXPANEL_HOST = 'api-in.mixpanel.com';

const FACEBOOK_TOKEN = 'FACEBOOK DEVELOPER APP TOKEN';
const FACEBOOK_AD_ACCOUNT_ID = 12345678901234;
const FACEBOOK_AD_API_ACCOUNT = 'act_' + FACEBOOK_AD_ACCOUNT_ID;

// Initialize SDKs
const mixpanel = Mixpanel.init(MIXPANEL_TOKEN, {
    host: MIXPANEL_HOST,
    secret: MIXPANEL_SECRET
});

adsSdk.FacebookAdsApi.init(FACEBOOK_TOKEN);

// Fetch Meta Ads campaign metrics
function fetchFacebookCampaigns() {
    const account = new adsSdk.AdAccount(FACEBOOK_AD_API_ACCOUNT);

    return account.getInsights([
        'campaign_id',
        'campaign_name',
        'spend',
        'impressions',
        'clicks'
    ], {
        level: 'campaign',
        date_preset: 'yesterday',
        filtering: [
            {
                field: 'spend',
                operator: 'GREATER_THAN',
                value: 0
            }
        ]
    });
}

// Transform metrics → Mixpanel event format
function transformCampaignToEvent(campaign) {
    return {
        event: 'Ad Data',
        properties: {
            $insert_id: `FB-${campaign.date_start}-${campaign.campaign_id}`,
            time: new Date(campaign.date_start).getTime(),
            source: 'Facebook',
            campaign_id: campaign.campaign_id,
            utm_source: "facebook",
            utm_campaign: campaign.campaign_name,
            cost: campaign.spend,
            impressions: campaign.impressions,
            clicks: campaign.clicks
        }
    };
}

// HTTP Cloud Function handler
functions.http('handler', async (req, res) => {
  try {
    const campaigns = await fetchFacebookCampaigns();
    const events = campaigns.map(transformCampaignToEvent);

    mixpanel.import_batch(events, (err) => {
        if (err) throw err;
        res.status(200).send(`Imported ${events.length} events.`);
    });
  } catch (err) {
    res.status(500).send(err);
  }
});
Set the Entry Point to:
handler
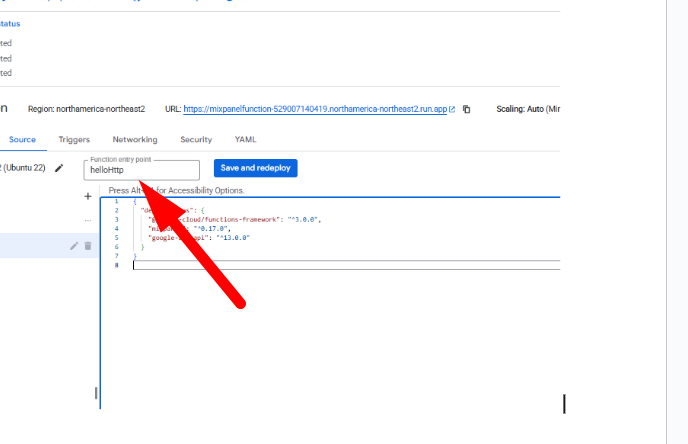
Deploy the function.
Copy the trigger URL after deployment — you’ll need it for scheduling.
Step 2: Schedule the Daily Sync
Use Cloud Scheduler to run the function once per day.
1. Enable Cloud Scheduler
Go to:
https://console.cloud.google.com/cloudscheduler
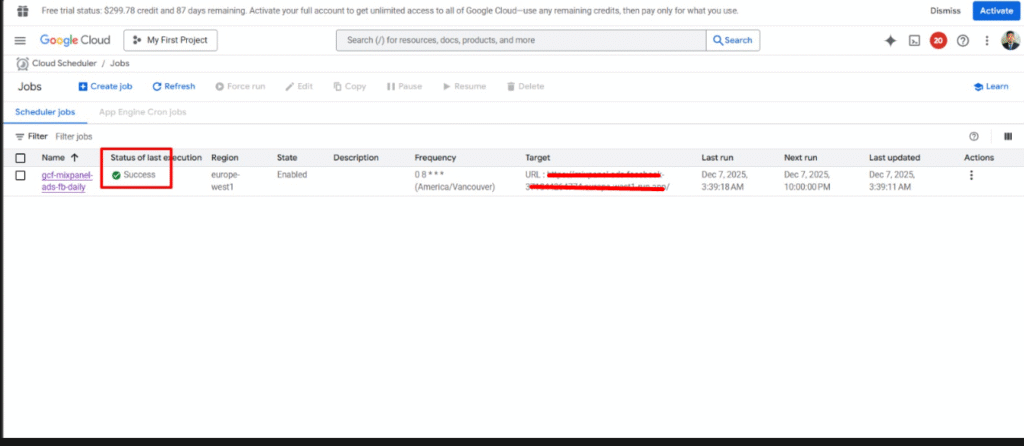
2. Create your scheduled job
Click Schedule a job and configure:
| Field | Value |
|---|---|
| Name | gcf-mixpanel-ads-fb-daily |
| Region | Same as your Cloud Function |
| Frequency | 0 8 * * * (8:00 AM UTC daily) |
| Timezone | UTC (or your preferred timezone) |
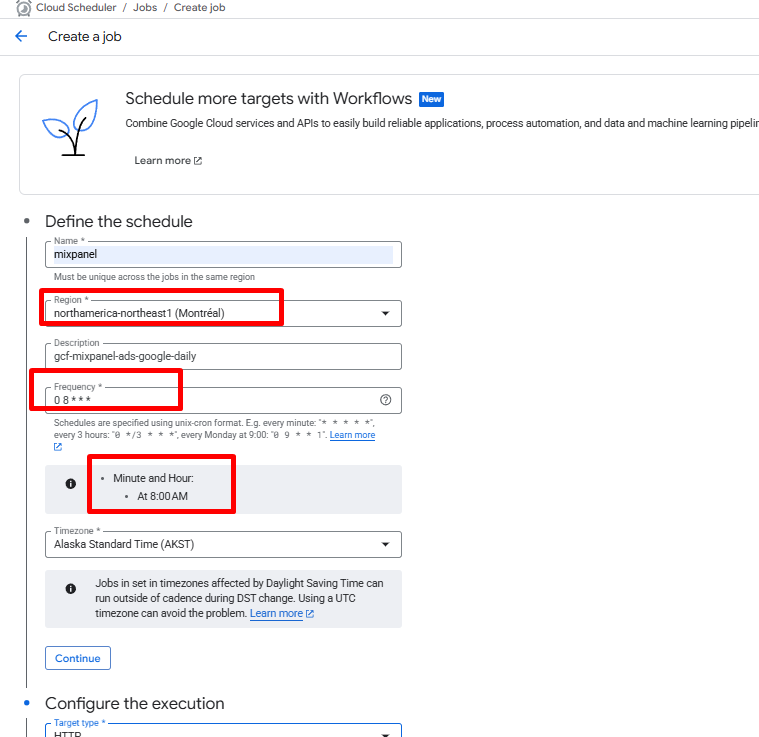
Click Continue.
3. Configure the execution
| Setting | Value |
|---|---|
| Target type | HTTP |
| URL | Paste Cloud Function URL |
| HTTP method | GET |
| Auth header | Add OIDC token |
| Service account | Any account allowed to invoke Cloud Functions |
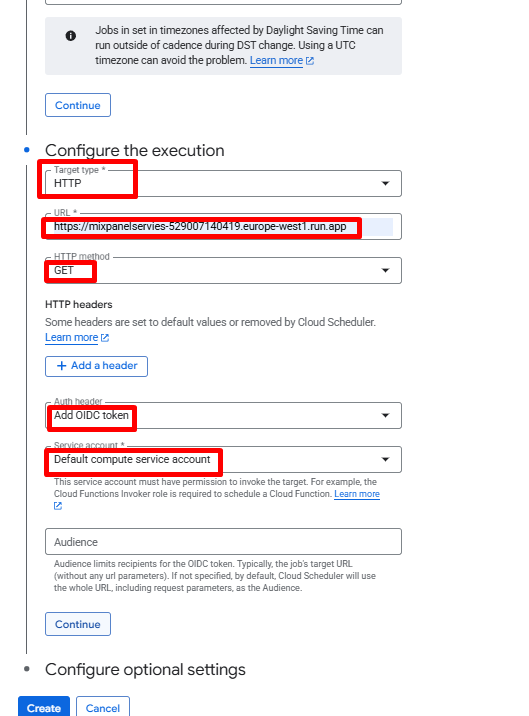
Click Create.
That’s it! Google Cloud Function is set up. It will sync Meta Ads data to Mixpanel every morning.
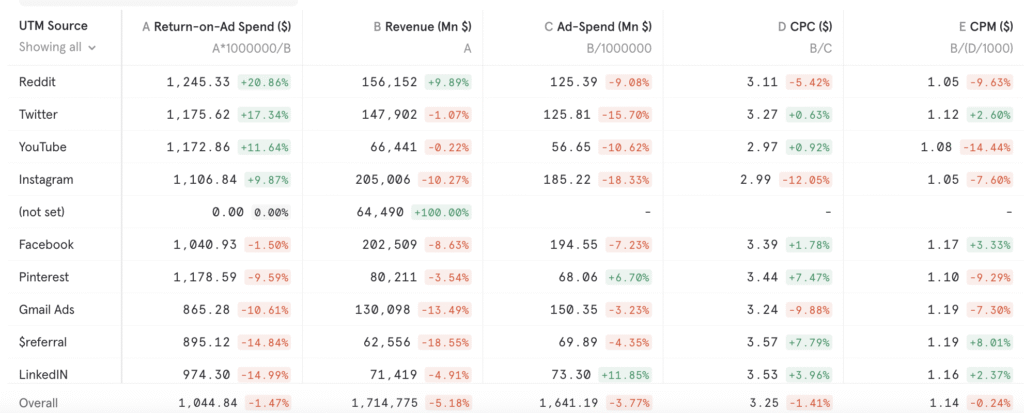
Example of the Imported Meta Ads Data Looks Like in Mixpanel
Every morning, the Google Cloud Function sends a batch of fresh “Ad Data” events to Mixpanel. Each event represents one campaign’s performance for the previous day.
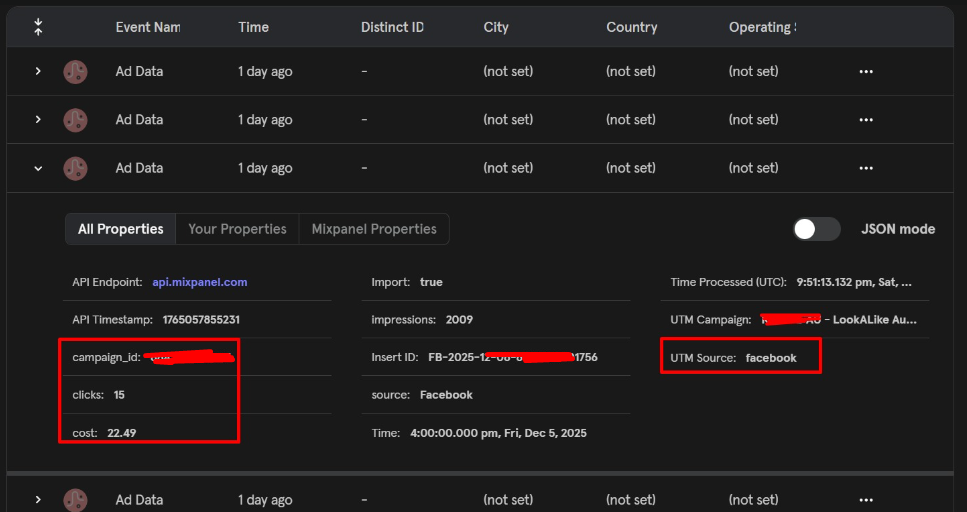
| Property | Source | Description |
|---|---|---|
campaign_id | Meta Ads | Unique campaign identifier |
impressions | Meta Ads | Number of ad views |
clicks | Meta Ads | Total click count |
cost | Meta Ads | Daily spend |
utm_source | Static | Always "facebook" |
utm_campaign | Meta Ads | Campaign name |
$insert_id | Generated | Ensures deduplication |
time | Meta Ads | Derived from campaign date_start |
Conclusion
By integrating Meta Ads with Mixpanel through Google Cloud Functions, you create a fully automated and reliable pipeline that delivers fresh advertising performance data every morning. This setup eliminates manual exports, ensures consistent campaign tracking, and unlocks deeper insights by combining ad spend, impressions, and clicks with in-product user behavior already captured in Mixpanel.
Need help with Mixpanel Ad Spend Integration? Email us at support@optizent.com or fill out the contact us form.