
Chat widgets are powerful lead generation tools, but many businesses struggle to properly track user engagement and conversions coming from them. If you are using the Lead Connector (Go High Level) Chat Widget, tracking interactions like widget opens and closes can help you measure engagement, optimize marketing campaigns, and improve conversion tracking.
In this guide, you will learn how to track LeadConnector chat widget events using Google Tag Manager (GTM) — even when the widget is loaded inside an iframe.
Why Tracking Chat Widget Events Matters
Tracking chat interactions allows you to:
- Measure user engagement with your website
- Track micro-conversions like chat opens
- Improve Google Ads and Meta Ads optimization
- Understand visitor behavior
- Build remarketing audiences
- Improve attribution accuracy
The Challenge with LeadConnector Chat Tracking
LeadConnector chat widgets are usually loaded inside an iframe, which creates a limitation.
Due to browser security restrictions:
- You cannot access chat widget DOM elements
- You cannot detect internal button clicks directly
- Mutation observers do not work inside iframes
However, LeadConnector provides a public JavaScript API that allows us to monitor the widget’s state.
The Best Solution: Tracking Using LeadConnector API
LeadConnector provides a method called:
window.leadConnector.chatWidget.isActive()
This method tells us whether the widget is open or closed.
We can use this method to send events into the GTM dataLayer, which allows us to track interactions across analytics and advertising platforms.
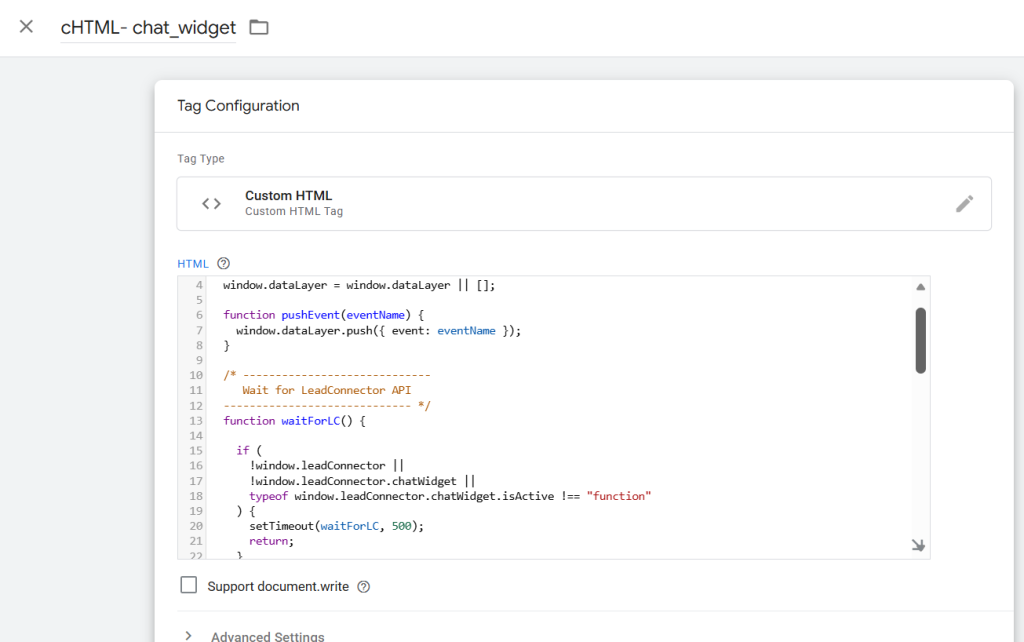
Step 1: Create a Custom HTML Tag in GTM
Inside Google Tag Manager:
- Go to Tags
- Click New
- Select Custom HTML
- Paste the following listener code
LeadConnector Chat Widget Tracking Listener Code
<script>
(function () {
window.dataLayer = window.dataLayer || [];
function pushEvent(eventName) {
window.dataLayer.push({ event: eventName });
}
function waitForLC() {
if (
!window.leadConnector ||
!window.leadConnector.chatWidget ||
typeof window.leadConnector.chatWidget.isActive !== “function”
) {
setTimeout(waitForLC, 500);
return;
}
pushEvent(‘lc_chat_widget_loaded’);
var lastState = window.leadConnector.chatWidget.isActive();
setInterval(function () {
try {
var currentState =
window.leadConnector.chatWidget.isActive();
if (currentState !== lastState) {
lastState = currentState;
if (currentState) {
pushEvent(‘lc_chat_widget_opened’);
} else {
pushEvent(‘lc_chat_widget_closed’);
}
}
} catch (err) {}
}, 700);
}
waitForLC();
})();
</script>
Step 2: Set the Trigger
Attach the tag to:
Trigger:
👉 All Pages – Window Loaded
Step 3: Create GTM Custom Event Triggers
Create three custom event triggers:
Widget Loaded
chat_widget_loaded
Chat Opened
chat_widget_opened
Chat Closed
chat_widget_closed
Step 4: Send Events to GA4 or Advertising Platforms
You can now use these triggers to fire:
- GA4 Events
- Google Ads Conversions
- Meta Pixel Events
- Server-side tracking events
Example GA4 Event Setup
Event Name:
chat_widget_opened
Trigger:
chat_widget_opened
Why This Method Works
This approach works because it:
- Uses official LeadConnector API
- Works with iframe-based widgets
- Does not rely on DOM scraping
- Avoids browser security issues
- Provides reliable event tracking
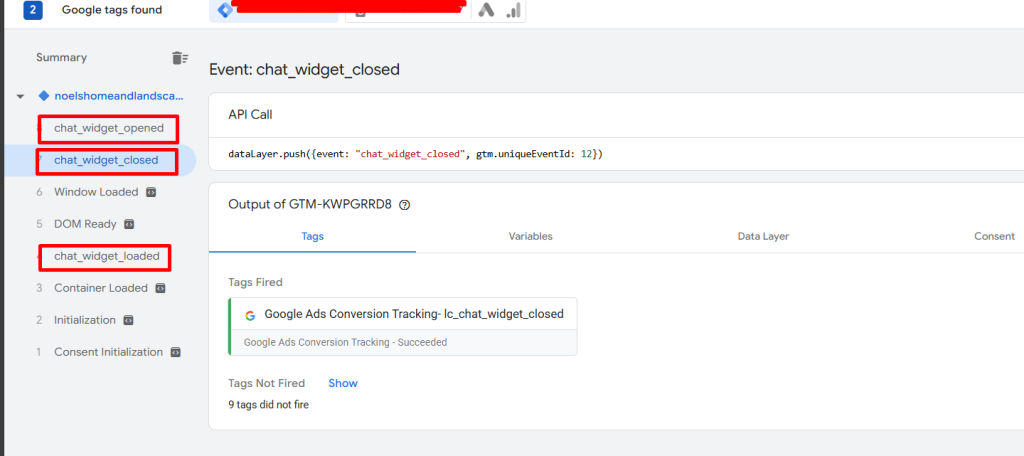
Debugging Tips
You can verify tracking by:
- Opening GTM Preview Mode
- Opening or closing the chat widget
- Checking whether custom events appear in the GTM event timeline
Final Thoughts
Tracking chat widget engagement is essential for modern marketing analytics. Since LeadConnector uses iframe technology, traditional DOM tracking methods do not work. Using the LeadConnector JavaScript API combined with Google Tag Manager provides a reliable and scalable solution.
Implementing this tracking allows businesses to better understand user engagement, improve ad performance, and accurately measure conversions.