
Shopify is one of the most widely used eCommerce platforms. Many store owners rely on Google Ads to drive traffic and increase sales.
For Google Ads campaigns to perform well, accurate conversion tracking is essential. When conversions are not tracked properly, bidding strategies receive incomplete data, which may affect campaign performance.
Server-side tracking helps improve conversion accuracy by reducing the impact of browser restrictions, cookie limitations, and ad blockers.
In this article, we will explain how to set up server-side Google Ads conversion tracking for Shopify using:
- Google Tag Manager (web + server container)
- Google Analytics 4
- Stape Conversion Tracking app for Shopify
Why transitioning to server-side tracking is important
Server-side tracking has become more relevant due to changes in browser behavior and privacy regulations.
Below are common situations where server-side tracking improves data accuracy.
1. Third-party cookie limitations
Most major browsers restrict third-party cookies. Chrome is also moving toward phasing them out.
Marketing platforms traditionally depend on third-party cookies for attribution and conversion tracking. With server-side tracking, you can:
- Use first-party cookies
- Set cookies via your own domain
- Improve attribution stability
In addition, Safari may block first-party cookies if they are set from third-party IP addresses. Using a custom domain with server GTM reduces this issue.
2. Ad blockers
The number of users with ad blockers has increased significantly.
Ad blockers can prevent:
- Google Tag Manager from loading
- Google Analytics from sending hits
- Google Ads scripts from firing
When using server-side GTM with a custom domain, tracking scripts are less likely to be blocked, which improves conversion capture.
3. Blocking of tracking scripts
Browsers like Safari and Brave may block tracking scripts entirely.
If the web GTM container is blocked, all tags inside it are also blocked.
With server-side GTM hosted on a custom subdomain, the GTM script loads from your own domain, which increases reliability.
Important note about cookies in Shopify
In some Shopify configurations, especially when using Checkout Extensibility, cookie headers may be removed from requests.
This creates a problem:
- Attribution parameters may be lost
- Referral information may not reach advertising platforms
One solution is to manually send cookie values inside the event payload and reconstruct them inside the server container.
If you use Stape’s Data Tag, enabling “Send common cookies” automatically includes standard cookies in the payload, simplifying the setup.
How to set up server-side Google Ads conversion tracking for Shopify
Below is the general implementation flow.
1. Create a server Google Tag Manager container
Inside Google Tag Manager:
- Create a new Server container
- Deploy it using Stape or any server
- Add a custom subdomain (for example, tracking.yourstore.com)

Using a custom domain is necessary for first-party cookies to work correctly.
2. Install Stape Conversion Tracking app in Shopify
In Shopify:
Sales Channels → Online Store → Customize → App Embeds → Enable Stape Conversion Tracking → Save
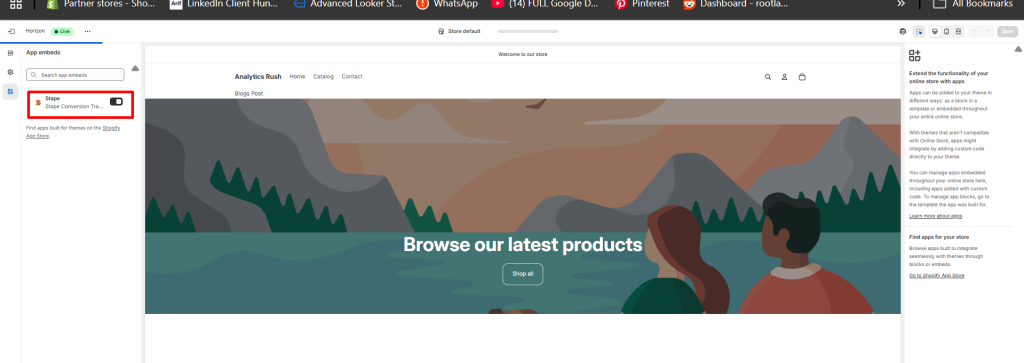
This app helps:
- Install the GTM snippet automatically
- Generate eCommerce Data Layer events
- Route events to the server container
3. Configure settings
GTM Web Container ID
Enter your web GTM container ID.
Custom Domain
Add the same custom subdomain you configured in the server container.
This ensures proper first-party cookie handling.
Custom Loader (recommended)
Custom Loader allows loading GTM from your own domain instead of directly from googletagmanager.com.
This improves protection against ad blockers.
To enable it, specify your Stape container identifier.
Cookie Keeper (optional)
Cookie Keeper helps extend cookie lifespan and reduce the impact of ITP restrictions.
Make sure it is enabled in your Stape container before activating it here.
GTM Snippet Block
If you have pages outside your Shopify theme (for example, third-party landing page builders), you can manually insert the GTM snippet there.
4. Enable Data Layer events
Go to the Data Layer tab:
- Activate “Add ecommerce Data Layer events”
- Save change

- Add the custom pixel snippet in customer events section

- Important:
The snippet only generates Data Layer events. It does not send data to third-party platforms directly.
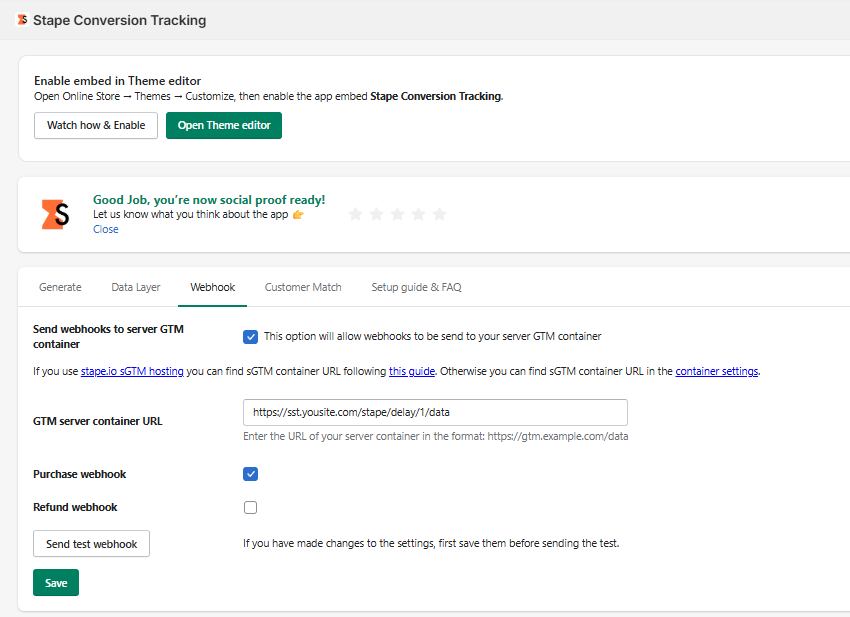
5. Configure webhooks
In the Webhook tab, you can subscribe to:
- Purchase events
- Refund events
Note:
Shopify webhooks do not include browser cookie data.
This means that when a purchase webhook arrives in your Server GTM container, it typically does not contain:
- _gcl_aw (Google Ads click ID)
- _ga (GA client ID)
- _fbp / _fbc (Meta identifiers)
- Other attribution-related cookies
Without these values, it becomes difficult to attribute webhook-based purchase events back to advertising platforms.
There is a solution.
You can store the cookie data earlier in the user journey, and later retrieve it when the webhook purchase event arrives.
This can be done using Stape Store.
Step 1: Store the Cookie When the User Reaches checkout stage
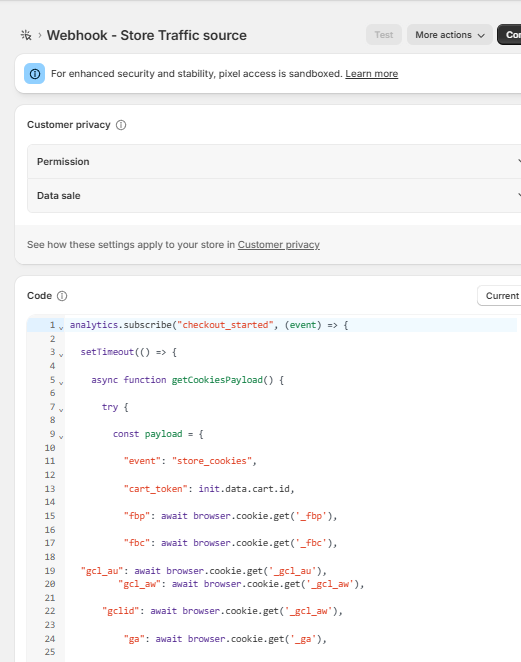
The idea is simple:
Before the webhook fires, capture and store the necessary cookie values while the user is still in the browser.
The best moment to do this is when the user:
- Reaches checkout
- Begins checkout
At that stage:
- The browser still has full access to first-party cookies.
- Attribution parameters are still available.
What to Send to Stape Store
From your Web GTM container, send:
- Order identifier (temporary ID, cart token, or checkout token)
- _gcl_aw
- _ga
- _fbp
- _fbc
- Any additional attribution parameters
Use your Stape Server endpoint as the destination.
Step 2: Save Cookie Data in Stape Store (Server container)
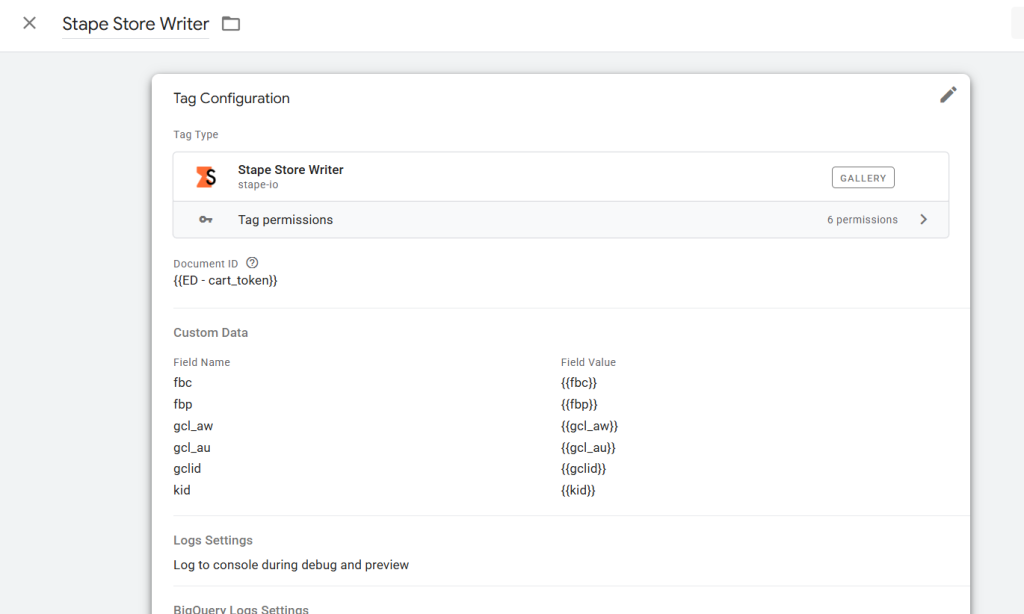
Inside the Server GTM container:
- Create a Stape Store Write Tag
- Trigger it on the checkout event
- Use a unique key (for example, checkout token or order ID)
- Save the cookie values inside Stape Store
The structure inside Stape Store may look like this:

Key: checkout_ABC123
Value:
{
“gclid”: “EAIaIQobChMI…”,
“ga_client_id”: “GA1.1.1234567890.1234567890”,
“fbp”: “fb.1.1690000000000.123456789”,
“fbc”: “fb.1.1690000000000.AbCdEfGh”
}
At this stage, you have safely stored attribution data before Shopify removes cookie headers.
Step 3: Webhook Purchase Arrives (Without Cookies)
Later, Shopify sends the Purchase webhook.
This webhook:
- Contains order details
- Does NOT contain cookies
- Does NOT contain browser attribution identifiers
But it contains:
- Order ID
- Checkout token
- Customer data
This is enough to perform a lookup.
Step 4: Retrieve Cookie Data with Stape Store Lookup Variable

Inside your Server GTM container:
- Create a Stape Store Lookup Variable
- Use the same key format you used when saving the data
- Example: checkout_{{checkout_token}}
- Example: checkout_{{checkout_token}}
- Retrieve the stored attribution values
Now your server container has access to:
- gclid
- GA client ID
- fbp
- fbc
Even though the webhook itself did not send them.
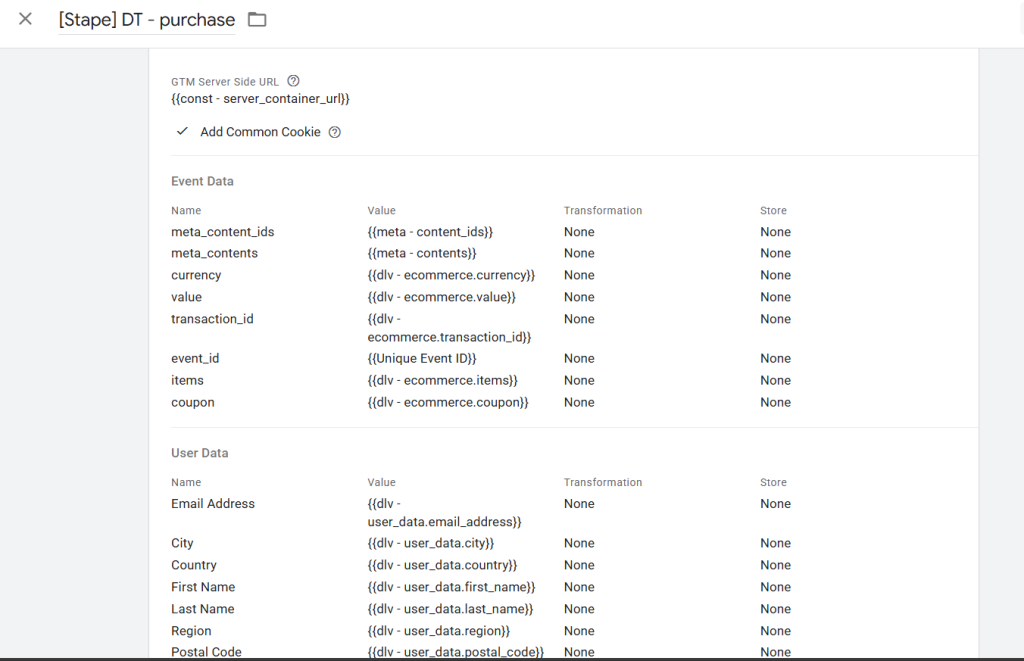
Step 5: Attach Retrieved Data to Webhook Purchase Event
Finally:
- Modify your purchase event inside Server GTM
- Attach the looked-up cookie values
- Forward the enriched event to:
- Google Ads Conversion Tracking tag
- GA4
- Meta CAPI
- Google Ads Conversion Tracking tag
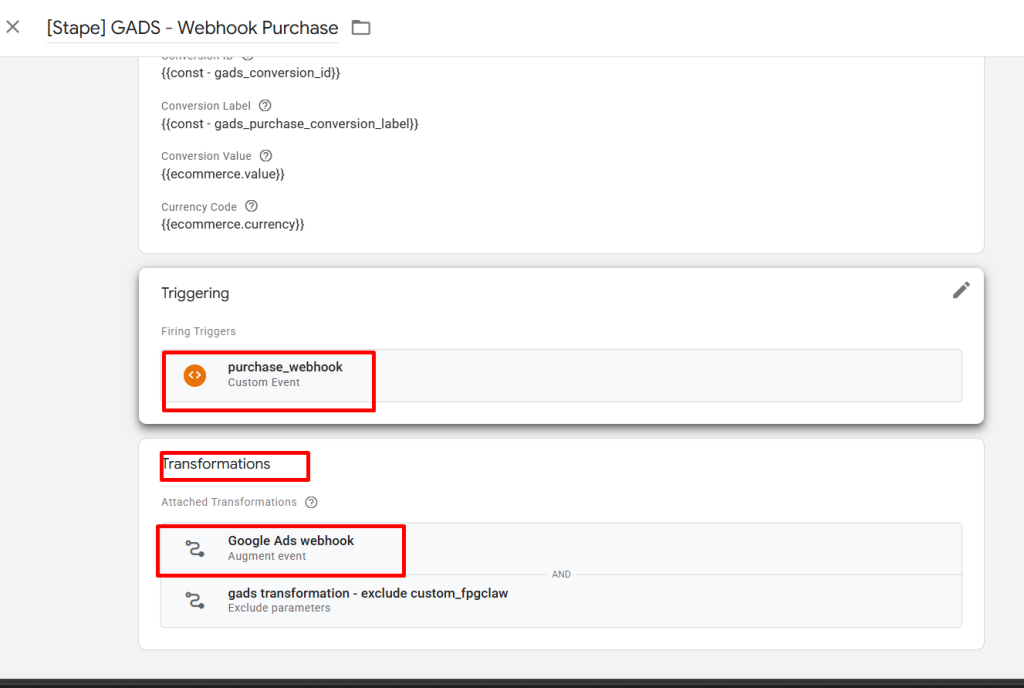

At this point, your webhook purchase event contains full attribution data.
From the platform’s perspective, it behaves like a properly attributed browser conversion.
Sending data to Server through Google Analytics 4
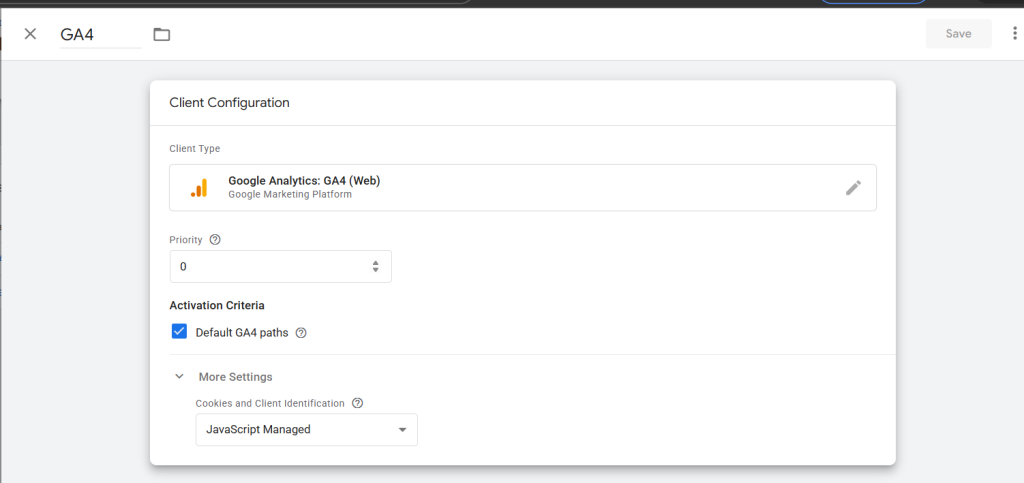
Step 1: Setup GA4 Client in Server GTM
Inside the server container:
- Create a GA4 Client (if not already present).
- Create a GA4 tag.
- Leave Measurement ID empty
- Add a trigger where Client Name equals GA4.
Inside the web container:
Add a configuration parameter:
Name: server_container_url
Value: your server container URL
This routes GA4 events through the server container.
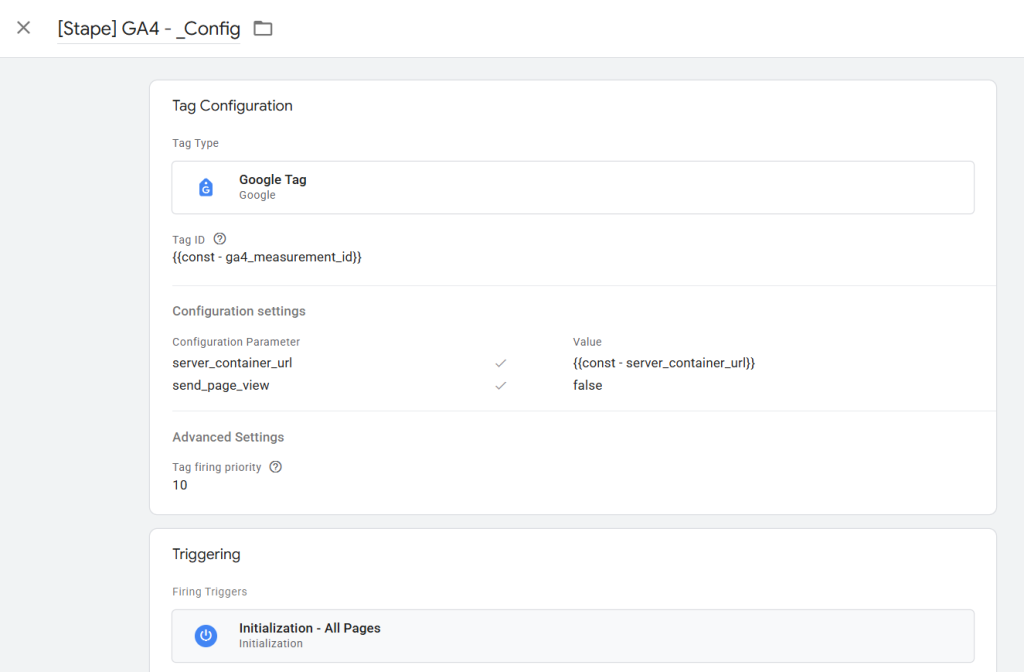
Step 2 : Setup the Config tag
In the web container:
- Create a new Google Tag.
- Add your Measurement ID.
- Add configuration parameter:
server_container_url = your tracking domain
Trigger on all pages.
Then create separate GA4 event tags for eCommerce events such as:
add to cart

begin checkout

purchase

Each eCommerce event should include at minimum:
- value
- currency
- items
Create Data Layer Variables:
- ecommerce.value
- ecommerce.currency
- ecommerce.items
Use them in your GA4 Event tags.
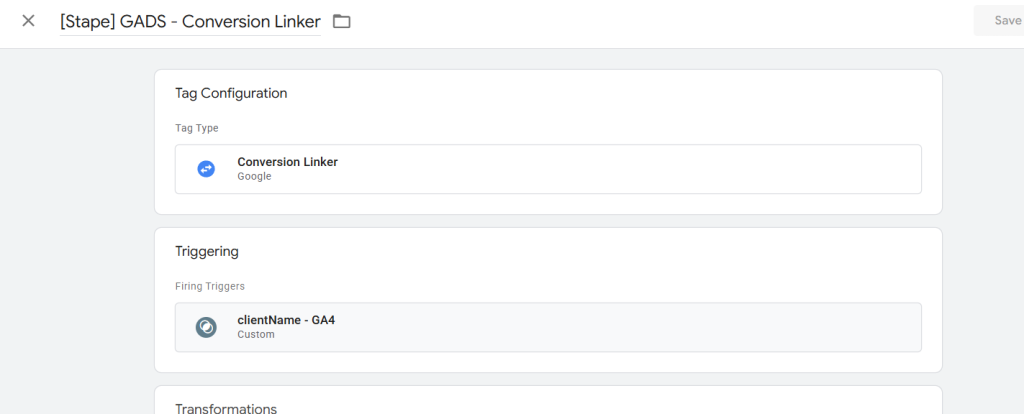
Setting up Google Ads Conversion Tracking (Server Side)
Inside the Server GTM container:
1. Create Conversion Linker tag
Trigger it on all events claimed by the GA4 client.
2. Create Google Ads Purchase Conversion Tracking tag
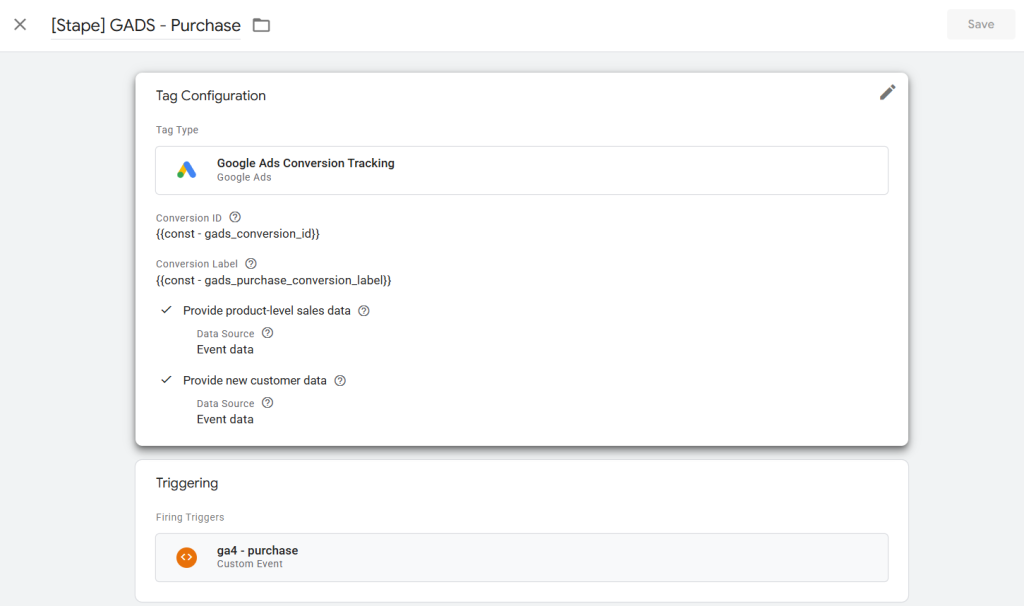
Add:
- Conversion ID
- Conversion Label
Trigger: purchase event.
If user and product data are available in event data, you can enable corresponding options to send enhanced conversion data automatically.
The server tag will process this information and report conversions to Google Ads.
Accurate conversion tracking in Shopify is becoming more complex due to cookie restrictions, browser limitations, and Shopify’s checkout changes. While webhooks provide reliable order data, they do not include cookie information, which is essential for proper attribution.
By combining:
- Web GTM
- Server GTM
- A custom tracking domain
- Google Ads server-side conversion tag
- And Stape Store for saving and restoring cookies
you create a resilient tracking infrastructure.
Storing cookie data at checkout and retrieving it when the webhook arrives ensures that every purchase — even those processed outside the browser context — is properly attributed to the correct traffic source.
This approach:
- Restores missing attribution signals
- Improves Smart Bidding performance
- Reduces discrepancies between Shopify and ad platforms
- Protects ROAS accuracy
Server-side tracking is no longer just an advanced setup. For Shopify stores relying on paid traffic, it is a necessary foundation for stable and scalable performance.
If implemented correctly, it ensures that every conversion is counted — and every advertising decision is based on complete data.