
This article teaches how to track what items users are adding to their cart. When a user on the site adds an item or multiple items to the cart, that's when it has to trigger the "Add to Cart" event in GA4. Add to Cart event requires only one parameter, and that's the Items array.
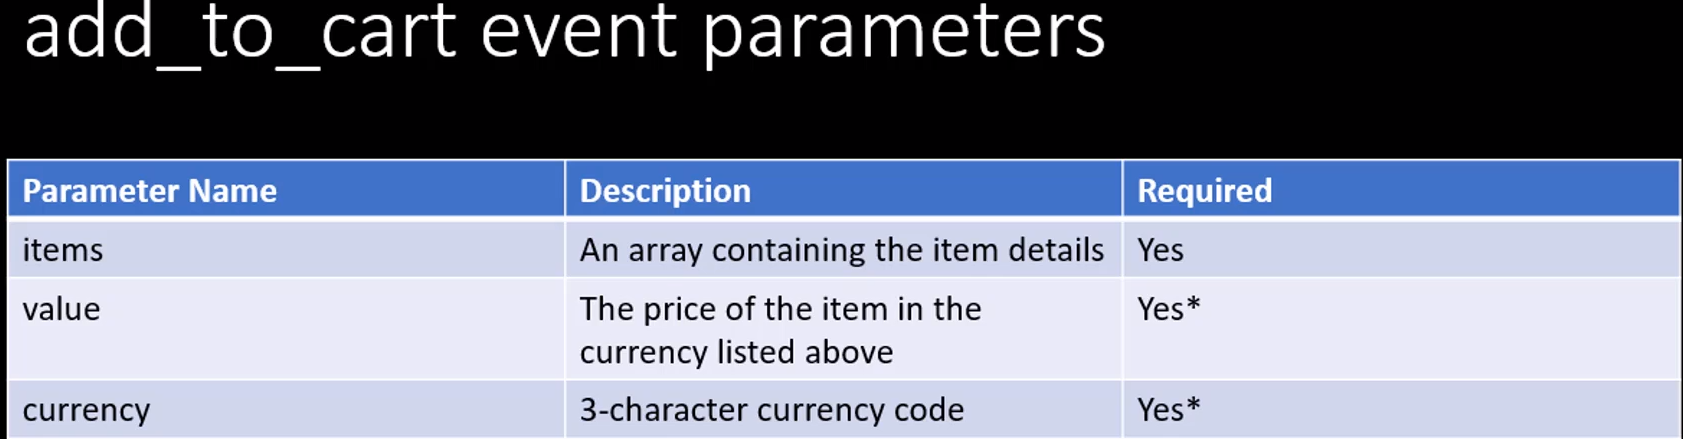
The Items array needs to contain the information about the item or items being added to the cart, even though Items is the only required parameter. It's also recommended to use value and currency parameters. We will get more meaningful reporting using these two parameters, particularly if marked "Add to Cart Event" as a conversion event.
Whenever we set the value parameter, we also have to set the currency parameter, so it is recommended that we use these two parameters. The value will contain the total value of the items being added, and the currency is the currency of the transaction. To send this data to Google Analytics 4, we can either use gtag call directly from the page or use Google Tag Manager. The syntax for the gtag code has to be created by the developers when someone adds an item to the cart that looks like the gtag (given below), which is the function's name followed by the command.
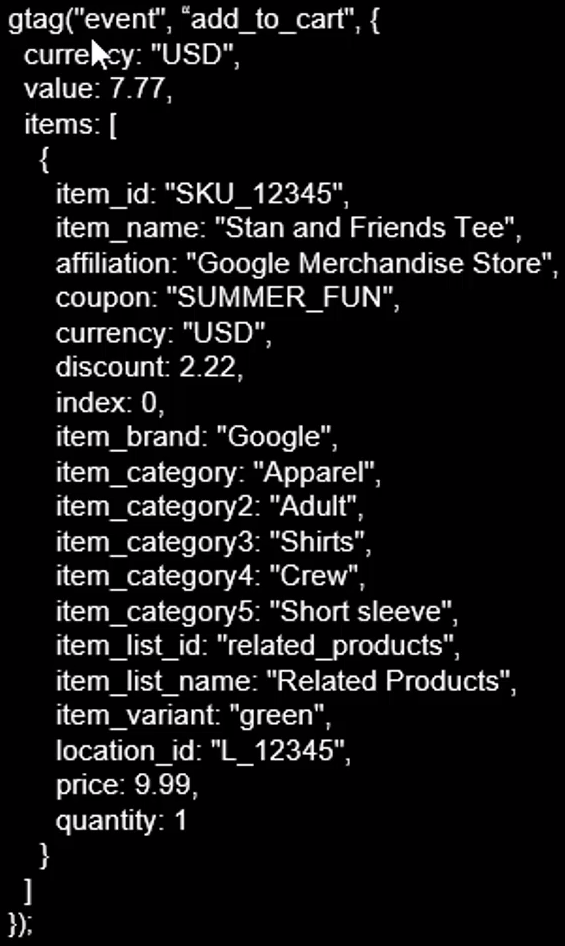
In the above code, we are firing an event, the name of the event, and the parameters for that event. In this case, we have currency, value, and Items array. In this Items array, there is only one item. If there are multiple items, they will be listed in this item array. The total value listed here is the value of all those items. Since there is only one item with a price of 9.99 and a discount of 2.22, the total value is 7.77 ($9.99 - $2.22), and the currency is USD.
If the currency is missing here, then the currency from the first item in the Items array is used. Now let's see how we can implement the "Add to Cart" event using Google Tag Manager. To enable the tracking using Google Tag Manager, we need two things - the information about the item being added to the shopping cart and a trigger condition. Generally, the best practice is to have the item information in a data layer and a custom event in the data layer that you can use as a trigger. It is a common practice across all the events for eCommerce tracking. If you are not familiar with data layers and custom events, check out the Google Tag Manager course, which provides details on data layers and custom events in that course.
It'll clarify any doubts about tracking with Google Tag Manager as well. This is a best practice to track all the eCommerce events. Below is an example of a data layer, custom event, and how to set up Add to Cart tracking in Google Tag Manager. Here is the Google Tag Manager account of the Ecommerce Demo Shop.
First, go to preview mode and open the eCommerce demo shop (website) so that I can show the data layer and the custom event that gets created. After that, we will set the tag and the Trigger, so let's put this in preview mode and click on connect. Now the eCommerce shop is loaded.
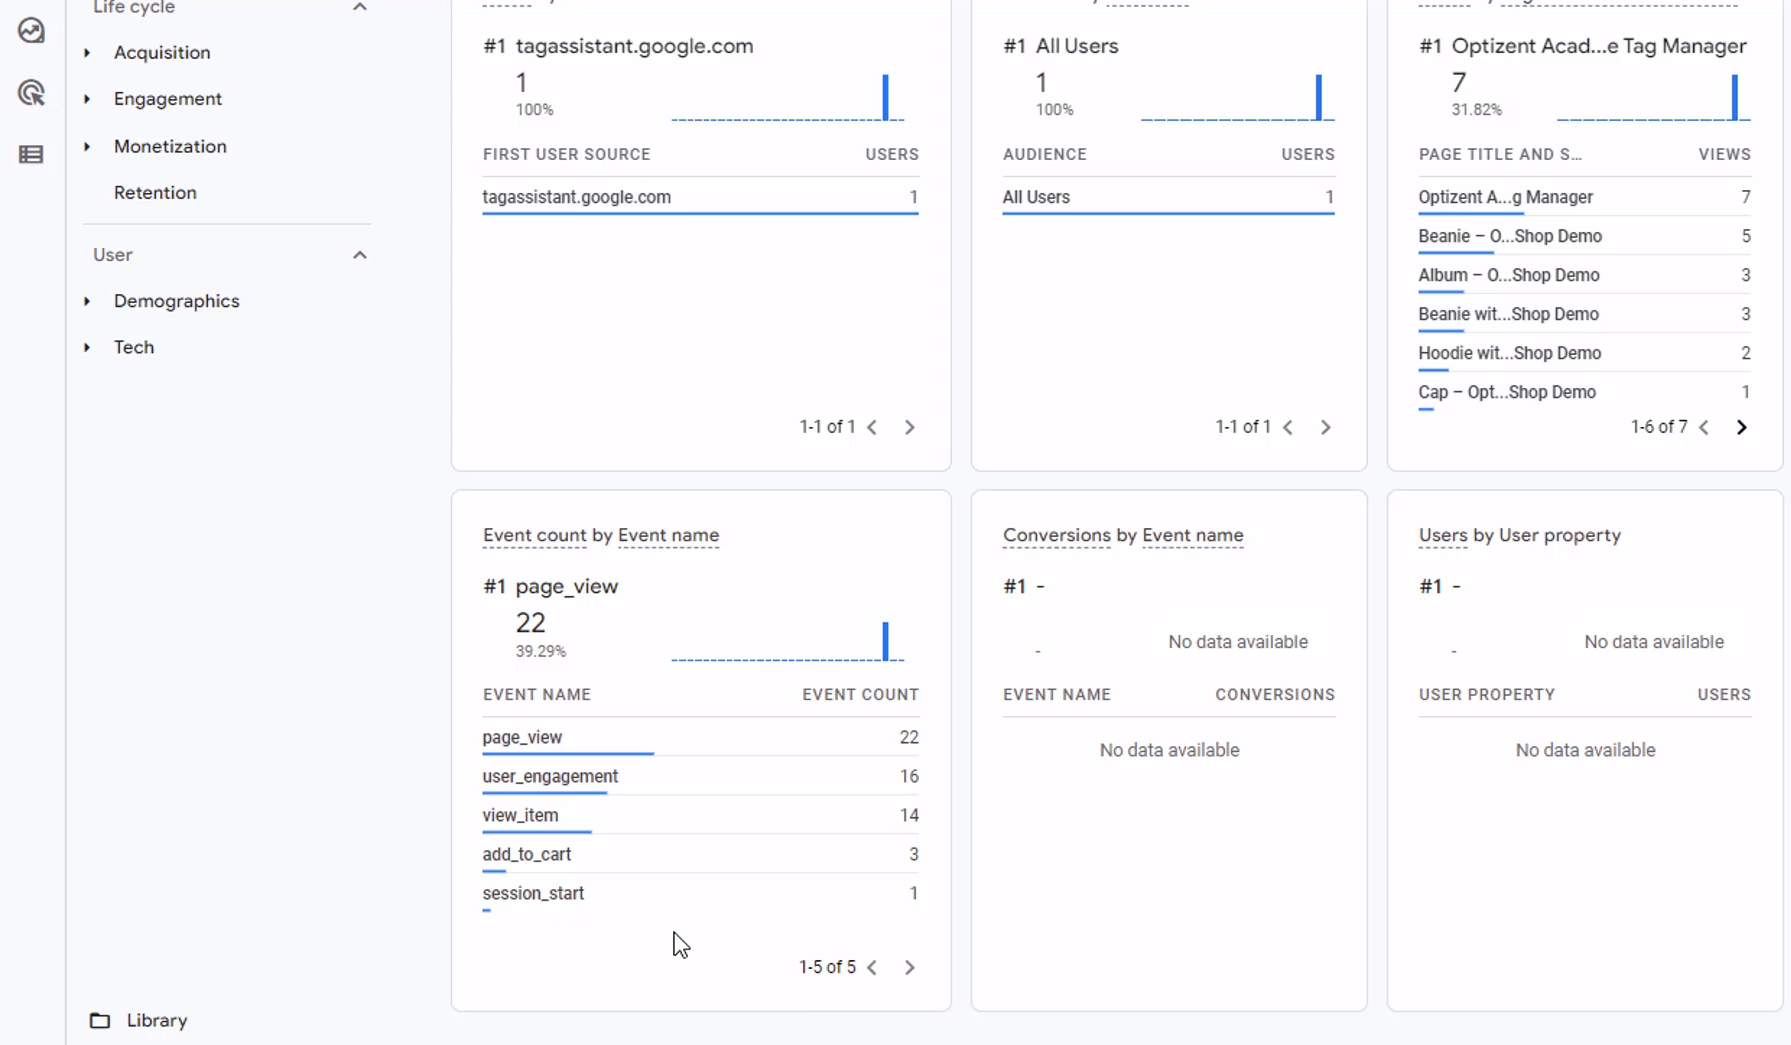
Tag Assistant is connected, which means we are in the debug mode. Go to the Tag Assistant window and click on Continue. Here it will show all the events that are happening on the site. So let's go back to the site and click on "Add to Cart." When clicked, the product is added to the cart. When the button is clicked, the code on the site creates a data layer and a custom event. Use that data layer and custom event to track Add to Cart event in GA4.
As mentioned before, this data layer and the custom event has to be coded by the developers. In this case, a WordPress plugin creates the data layer and the custom event. Go to Tag Assistant and see what happens when we click on this button. In Tag Assistant, notice there is an "Add to Cart" event that got fired.
This is the name of the custom event. Don't confuse it with the "Add to Cart" event that we will be tracking for GA4. In this case, the WP plugin created the "Add to Cart" custom event. Keep in mind that the name of the custom event does not matter. In this case, the developer decided to call it the same name we will use in GA4.
You can see a data layer was pushed when this event happened. Then it will show the name of the event, which is the custom event and eCommerce object that contains the currency, value, and items array. This item array has one item. This is the item that was added to the cart. So when we go to Google Tag Manager, all we have to do is pull these values from the data layer and trigger the GA4 Add to Cart event whenever a custom event called "Add to Cart" fires.
Go to Google Tag Manager and set our tag and Trigger. First, create the tag, click on Tags and click on new. Let's name this tag "Ecommerce Add to Cart." Click in the middle and pick GA4 Event. Pick the base configuration and "Add to Cart" event. This name has to be exactly like this. This is what GA4 is expecting for Add to Cart. If we make any mistake in the spelling or write it differently, it's not going to work.
Click on Event Parameters and Add three rows: currency, value, and items. These are the three parameters that are required for Add to Cart Event. Now for the values. In the previous article, in View Item Event, we already pulled the values for currency, value, and items from the data layer, so we can use the same variables because those variables get populated with the current values in the data layer. We can reuse them in the parameters. Add dlv_currency, dlv_value, and dlv_items. The next thing we need is the Trigger. So let's go ahead and Add Trigger.
![]()
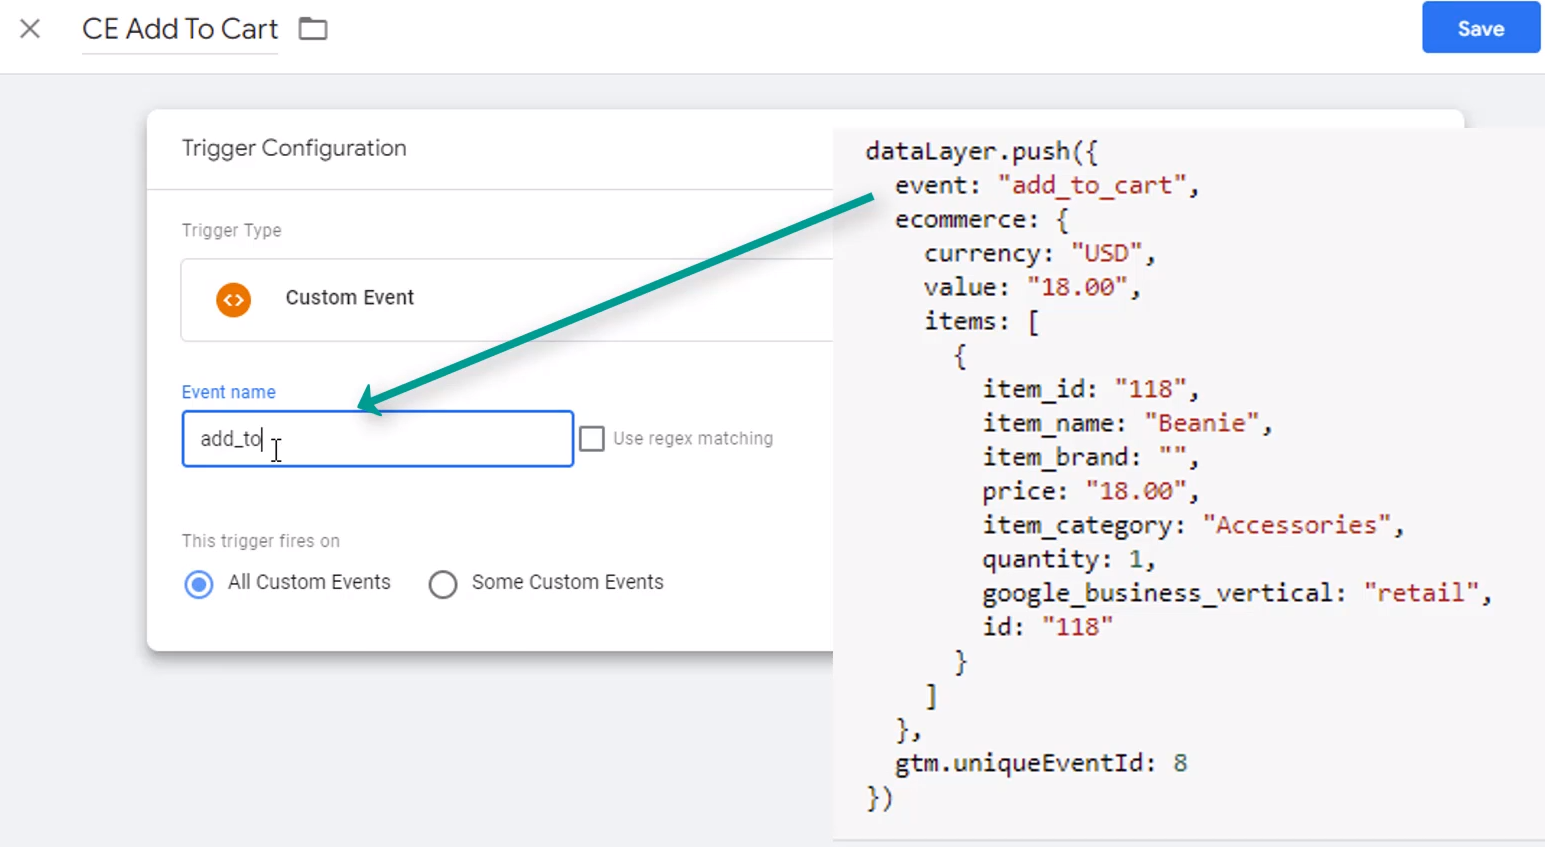
So click on plus to create a new trigger and call this trigger "CE Add to Cart." Click in the middle and pick Custom Event and give the name of that custom event. It is the same name that the developer used when creating that custom event. In this case, it's the same name as what GA4 expects for the GA4 event, and that's all we need. Go ahead and save it. Put the Tag Manager in preview mode again, and click on connect. The Tag Assistant is disconnected. Go back to Tag Assistant and click on Continue. Then go back to the site and click on Add to Cart. Once again, go back to Tag Assistant and see what happened. Now we can see the eCommerce Add to Cart tag got fired.
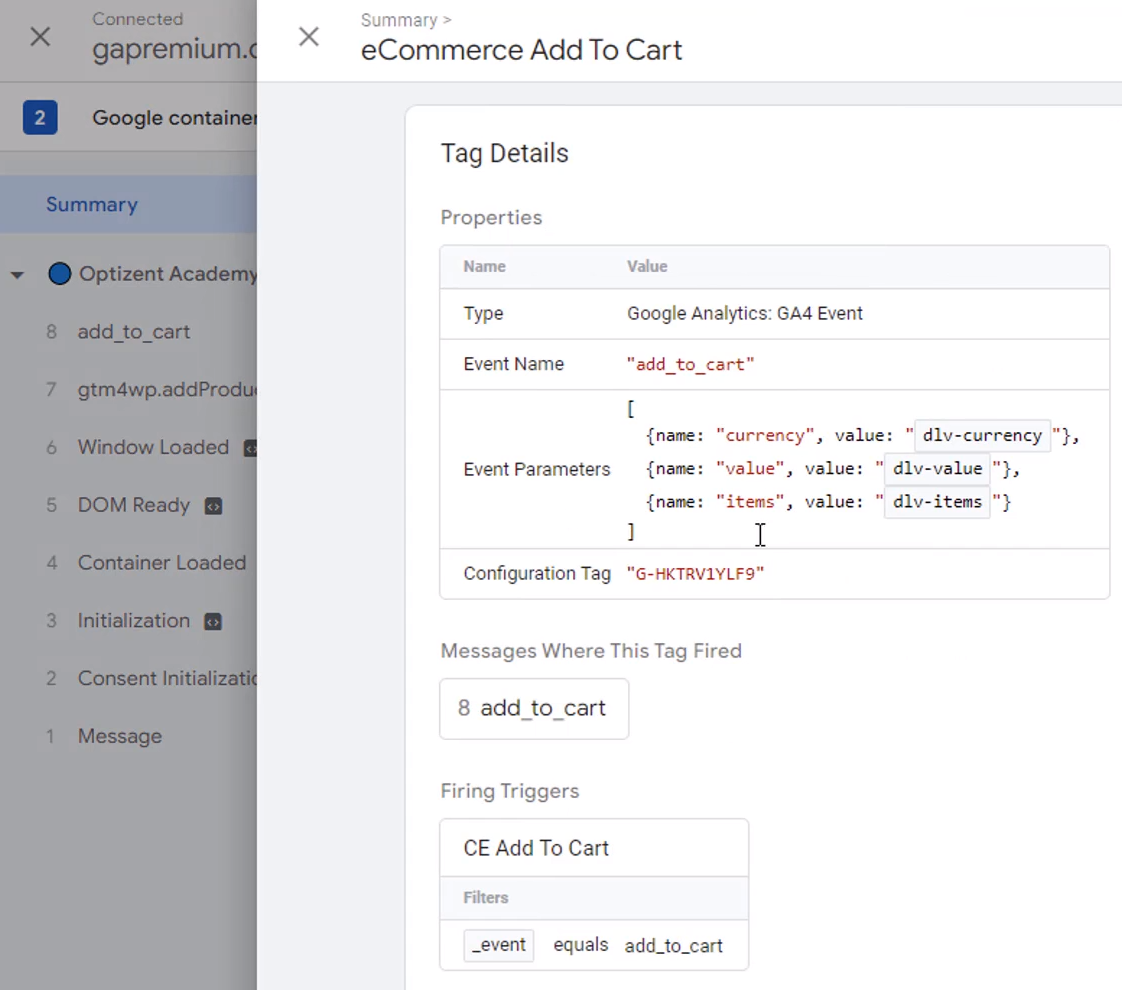
Clicking on the tag will show you the event name and the event parameters. So now it's ready. Go ahead and publish it. Go back to Google Tag Manager and click on Submit. Now the tag is live. As soon as the tag is live, check the real-time reports in GA4 to see the data.
However, the eCommerce purchases report under Monetization won't show you the data for a few hours. After a few hours, we will start to see the data in this report. We can see Add to Carts and Item Views. Underneath these two charts, the data is in a table format. Item Views is the number of times any particular item was viewed. (See the image below)
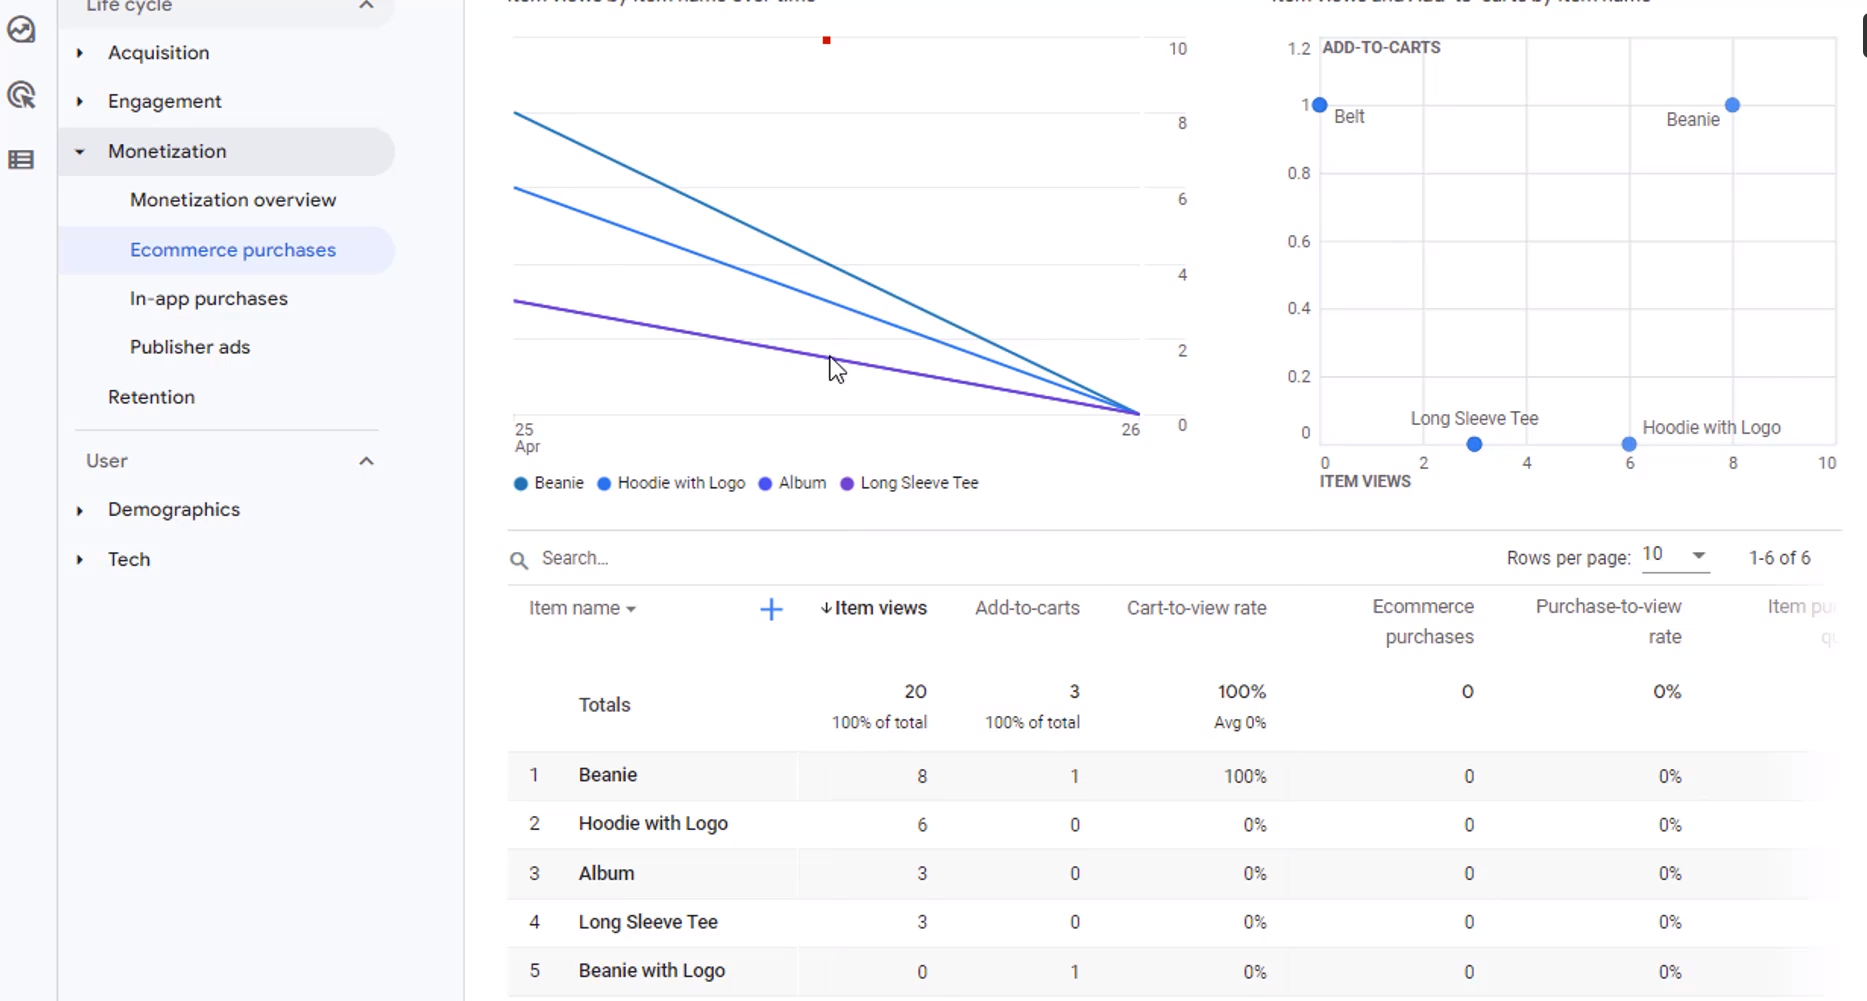
It's the total of View Item events. Add to carts is also the total of add to cart events. While item views and add to carts are calculated based on the event count, cart to view rate is calculated by users. It's calculated by taking the total number of users who added the product to their cart and dividing it by the total users who viewed that product. This ratio is expressed as a percentage, which we see in the above image.
Google Analytics 4 help and support
We are here to help you with all your Google Analytics needs. Our team can get you up and running in no time and also train you and your team to save you a lot of time so that you can focus on driving the business outcomes rather than configuring Google Analytics 4.
Online Course - If you want to learn on your own then check out Google Analytics 4 Masterclass
Workshop - We conduct the onsite customized workshop. Reach out to us for more details.
Consulting - Reach out to us for more details.