
A client of mine had three different development teams shipping features independently. No shared tracking plan. No review process. Just engineers adding events whenever they needed them and GTM tags going live without a data team signoff.
By the time they came to me, their Mixpanel project had 47 events with names like test_event_2, DEBUG_purchase, and new_checkout_FINAL_v2. These weren’t in any report. Nobody knew who created them. Some were still firing in production. Their analysts had stopped trusting the event list entirely and were just hardcoding the three events they knew were clean.
That entire class of problem is what Event Approval is designed to prevent. Not fix after the fact — prevent from the start.
What Is Event Approval?
Event Approval is a data governance feature that flips the default behavior for new events in your Mixpanel project. Normally, any new event that gets sent to your project becomes immediately visible to everyone — analysts, product managers, whoever has access to the query builder. It shows up in the dropdown, it’s queryable, and unless someone actively hides or blocks it, it just lives there.
With Event Approval turned on, every new event that arrives in your project is hidden by default. Admins get notified that something new came in, they review it, and they decide whether to make it visible. Until they do, it exists in the project but nobody else can see it or accidentally use it in a report.
It’s the difference between an open-door policy and a review process. Both approaches work in small, disciplined teams. At any meaningful scale, only one of them keeps your data clean.
Event Approval is available on Enterprise plans only, and only Project Admins or Owners can enable or configure it.
Step 1: Enable Event Approval in Lexicon
To turn it on, navigate to Lexicon in your Mixpanel project. Scroll down the left-hand menu to the Data Governance section and find the Event Approval toggle. Click it to enable. (Note: It is now moved to Data Rules)
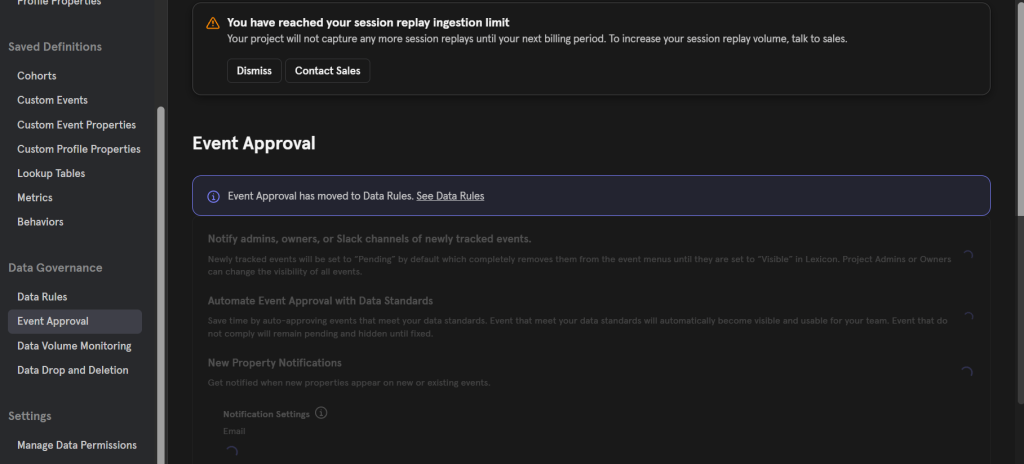
That toggle alone changes the behavior for your entire project immediately. Any new event that hits Mixpanel after this point will be hidden by default rather than visible.
Step 2: Add Your Notification Recipients and Slack Channel
Once you enable Event Approval, you’ll be prompted to add the email addresses or aliases that should receive notifications when new events are ingested.
The same constraint as Data Volume Monitoring applies here: only project admin and owner email addresses are accepted. You can’t route alerts to a general inbox or an analyst account that doesn’t have admin permissions in the project.
In practice, set up a shared alias tied to an admin account if you can. Something like data-governance@yourcompany.com that routes to everyone who should be reviewing new events. This prevents the situation where one person’s inbox becomes the single point of failure for your review process.
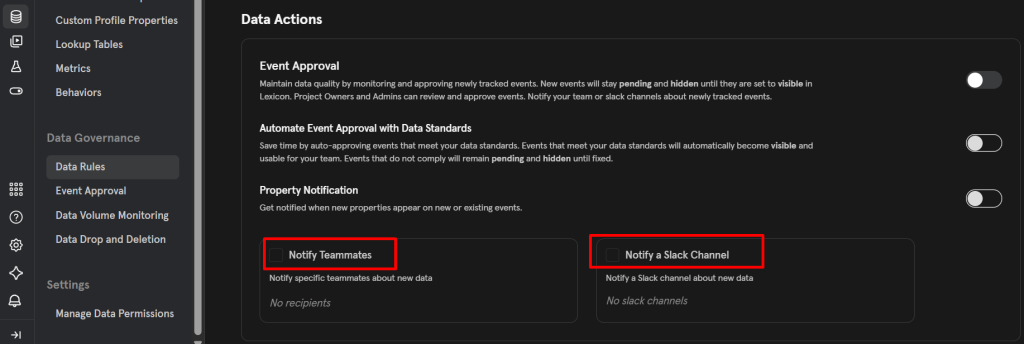
You can also connect a Slack channel. For most teams I work with, this is the better primary alert mechanism. A dedicated #mixpanel-event-approval or #tracking-review channel means the notification is visible to the whole data team as soon as it arrives, not buried in someone’s email.
Notifications are sent once per day and are batched — if multiple new events arrived in the same day, you’ll get one notification covering all of them, not one per event.
Step 3: Decide Whether to Enable New Property Detection
When you set up Event Approval, you’ll see an option to also enable new property detection. This extends the monitoring beyond just new events to cover new properties on both new and existing events.
This matters more than it might seem at first. In a lot of implementations, the event structure is relatively stable but properties get added constantly — engineers attach new context to existing events without any formal review. A purchase event that’s been clean for two years can suddenly have a new property called debug_flag or internal_user_test firing on it in production, and without property detection you’d never know.
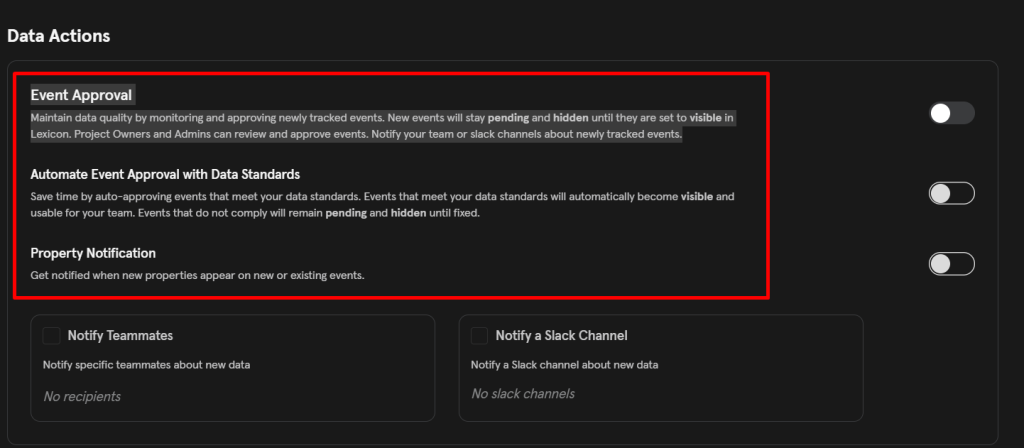
With new property detection enabled, the same email addresses and Slack channels receive a separate notification about new properties, and the Lexicon workflow gets a “View New Properties” button alongside “View New Events.”
My recommendation: enable it. The cost of reviewing one extra daily notification is lower than the cost of discovering three months later that a garbage property has been attaching to your core conversion events.
Step 4: Understand the Lexicon Review Workflow
When an admin receives a notification that new events have come in, they’ll see a “View New Events” button in the notification. Clicking it takes them directly to a filtered Lexicon view showing only the hidden events, with new events tagged as “New” and sorted to the top of the list.
An event keeps its “New” tag as long as three conditions are all true:
- It hasn’t been modified in any way
- It is still hidden
- It was created within the last 30 days
Once any of those conditions changes — you edit it, make it visible, or it ages past 30 days — the “New” tag drops off. This gives you a clean visual queue of everything that’s been detected but not yet reviewed.
From this view, an admin can take several actions on each new event:
Mark as visible — This is the approval action. It makes the event available to everyone in the project through the normal query builder and report interfaces. Do this when you’ve confirmed the event is intentional, correctly named, and appropriate for the project.
Leave it hidden — If you’re not sure what the event is or whether it belongs, leaving it hidden is the right call. It doesn’t disappear; it sits in the hidden events queue while you investigate. You can still query it manually if you need to verify what it contains.
Add a description or tag — Even if you’re making an event visible immediately, take 30 seconds to add a description and a relevant tag. Future you and future teammates will appreciate it. The review moment is the best time to do this because you’re already looking at the event.
Block it — If you recognize the event as a test event, a duplicate, or something that should never have been sent, you can block it directly from this view. Just remember that blocking stops future ingestion of new events with that name — previously ingested data remains.
If new property detection is enabled, the notification also includes a “View New Properties” button that takes you to an equivalent view for new properties. Properties keep their “New” tag for 30 days from creation.
One thing to note: custom properties — the ones you build inside Mixpanel using the custom properties feature — will never be tagged as “New” in this workflow. The “New” tag only applies to properties that arrive via your actual event data.
Step 5: Build a Review Cadence
Event Approval sets up the infrastructure for governance. It doesn’t enforce a cadence on its own. The notifications go out once a day, but whether someone actually reviews and acts on them is entirely up to your team.
What I’ve seen work in practice:
Daily triage, weekly deep review. Someone on the data team checks the Slack notification every morning and handles the obvious ones — clear test events get blocked immediately, clearly intentional events get approved and described. Anything ambiguous gets flagged for the weekly review meeting where the broader team can weigh in.
A written process for engineers. Document somewhere in your engineering handbook or data team wiki that new events will be hidden by default and require admin review before they’re visible in Mixpanel. This prevents the confused “why can’t I see my event?” support request that will otherwise hit your data team repeatedly. Engineers who know the process upfront will either wait for approval or come to you directly, rather than thinking something is broken.
A tracking plan as the companion document. Event Approval is a control mechanism, not a source of truth about what events should exist. It tells you something new arrived; it doesn’t tell you whether it was supposed to. The complement to Event Approval is a tracking plan — a document that specifies which events your team has agreed to track and what properties they should carry. When a new event comes in through the approval queue, you can check it against the tracking plan to determine whether it’s expected or rogue.
What Event Approval Won’t Do
It won’t retroactively clean up the events that were already in your project when you enabled it. Every event that existed before you turned on Event Approval is already visible, already in the query builder, and already being queried (or not). The feature only affects new events going forward.
If you have an existing event cleanup problem, start with a Lexicon audit — export your current event list, identify what should be hidden or blocked, and run that cleanup first. Then enable Event Approval so the project stays clean going forward.
It also won’t catch problems with event properties on existing events unless you’ve enabled new property detection. A new property silently attaching to an established event flies under the radar without that additional toggle turned on.
And there’s a hard limit worth planning around: Event Approval is not available for projects that have more than 3,000 hidden events. If a project exceeds that limit, Event Approval will be automatically disabled. This means if you’re using Event Approval and also accumulating hidden events without reviewing or acting on them, you can eventually hit the ceiling and lose the feature. Build the review process before you enable the feature — don’t let the hidden queue become a graveyard.
The Scenarios Where This Changes Everything
Multi-team engineering organizations. When three or four product teams are shipping independently and there’s no centralized tracking review, Event Approval is the gate that forces every new event through a governance checkpoint. Teams can still implement whatever events they need — they just won’t be visible in Mixpanel until someone with context reviews them.
Agencies and contractors with client Mixpanel projects. If you’re managing a Mixpanel implementation on behalf of a client, Event Approval gives you visibility into anything a developer on their side might be adding without telling you. You find out through the daily notification rather than through a messy surprise during the next audit.
Compliance-sensitive industries. If your team has specific requirements around what data can be collected and stored, Event Approval adds a review layer that can catch a potentially sensitive new event before it accumulates months of history that then needs to be addressed.
Post-audit maintenance. After a thorough Lexicon cleanup — the kind where you go through every event, hide the noise, document the important ones — the last thing you want is for the project to drift back into chaos three months later. Enabling Event Approval immediately after a cleanup is how you protect the work you just did.
Quick Reference: How the “New” Tag Works
An event keeps its “New” tag while all three of these are true: it hasn’t been modified, it’s still hidden, and it was created within the last 30 days. Touch any one of those — edit it, make it visible, or let it age past 30 days — and the tag disappears.
Properties follow the same 30-day rule if new property detection is enabled, but without the hidden or unmodified requirement. Any property created within the last 30 days shows as “New” in the properties view.
The Bottom Line
Every Mixpanel project eventually faces the same problem: too many events, too little context, and nobody quite sure which ones are real versus leftover from a test three quarters ago. Event Approval is how you stop that problem from starting in the first place.
It’s not a heavy process. One daily notification, a few minutes of review, and a clear decision on each new event — visible, leave hidden, or block. That small daily investment is what separates a Mixpanel project your team trusts from one where analysts maintain their own shadow spreadsheet of “the events that actually work.”
If you’re on Enterprise and you haven’t enabled it yet, turn it on today. Enable new property detection while you’re there. Set up the Slack channel. Then make sure your engineering team knows the review process exists — that conversation alone will prevent half the governance headaches before they start.