
You launch a new website or product and immediately face questions like:
- Which buttons should we track?
- What forms matter?
- What pages should have custom events?
- Are we missing important interactions?
Many teams spend weeks creating tracking plans before collecting meaningful data.
The problem is that users are already interacting with your product while you’re still deciding what to measure.
That’s where Mixpanel Autocapture can help.
Instead of manually creating events for every interaction, Autocapture automatically captures common user actions such as clicks, form submissions, page views, and scrolling behavior.
When combined with Google Tag Manager, it becomes one of the fastest ways to start collecting behavioral data without building dozens of custom tracking tags.
In this guide, you’ll learn how to configure Mixpanel Autocapture using GTM, customize the data being collected, and avoid common implementation mistakes.
What Is Mixpanel Autocapture?
Autocapture is a Mixpanel feature that automatically tracks common user interactions without requiring manual event creation.
Once enabled, Mixpanel can collect information about:
- Page views
- Clicks
- Form submissions
- Scroll activity
- Input interactions
- User engagement patterns
Instead of creating a separate GTM trigger and tag for every button on your website, Mixpanel automatically records these interactions.
This gives teams immediate visibility into user behavior.
For new implementations, Autocapture can significantly reduce setup time.
Why Use Autocapture?
Most organizations don’t know every interaction they’ll want to analyze six months from now.
Autocapture helps solve this problem.
Rather than trying to predict every reporting requirement, you can collect a broad set of behavioral data from the beginning.
Benefits include:
- Faster implementation
- Reduced engineering effort
- Better behavioral visibility
- Easier discovery of user patterns
- Fewer missed tracking opportunities
It’s particularly useful during the early stages of analytics adoption.
When Should You Use Autocapture?
Autocapture works best when you want to understand general user behavior.
For example:
- Website engagement
- Feature discovery
- Navigation patterns
- User journeys
- Content interaction
However, it shouldn’t replace business-critical event tracking.
Events such as:
- Purchases
- Subscriptions
- Trial Starts
- Account Creation
- Revenue Events
should still be tracked intentionally.
The strongest implementations typically combine:
- Autocapture for behavioral analysis
- Custom events for business metrics
This provides the best of both worlds.
How Autocapture Works in GTM
The Mixpanel GTM template includes built-in support for Autocapture.
Rather than creating additional tracking tags, you’ll configure Autocapture through your Mixpanel initialization tag.
Once enabled, Mixpanel automatically begins collecting interactions according to the settings you define.
This makes deployment significantly simpler than manually creating dozens of click and form tracking triggers.
Step 1: Open Your Mixpanel Initialization Tag
In GTM:
Navigate to:
Tags → Mixpanel Init Tag
If you haven’t created an initialization tag yet, create one using the Mixpanel template.
Select:
Tag Type = init
This tag controls your Mixpanel configuration settings.
Step 2: Enable Autocapture
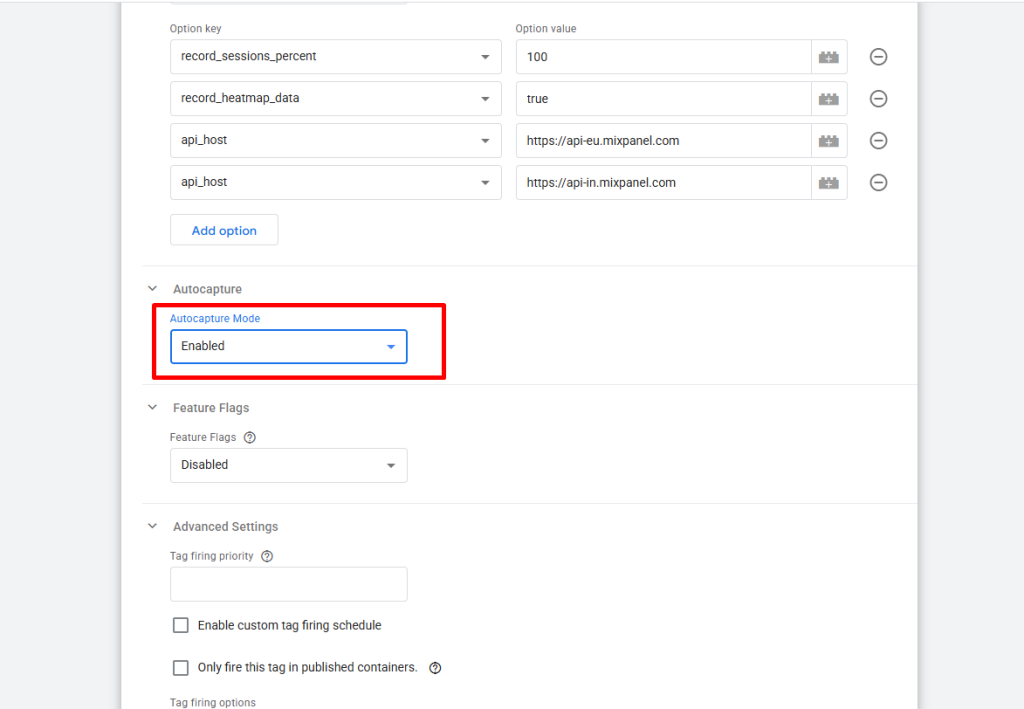
Within the Mixpanel initialization settings you’ll find the Autocapture option.
You can choose:
- Enabled
- Disabled
Select:
Enabled
Publish the changes.
At this point Mixpanel will begin collecting supported interactions automatically.
For many websites, this simple configuration is enough to get started.
What Does Autocapture Track?
Once enabled, Mixpanel can automatically collect:
Click Events
Interactions with:
- Buttons
- Links
- Navigation items
- Interactive elements
Form Submissions
Helpful for understanding:
- Lead generation
- Demo requests
- Newsletter signups
- Contact form performance
Scroll Behavior
Useful for:
- Blog engagement
- Landing page analysis
- Content consumption
Page Views
Allows you to understand:
- Navigation paths
- Entry pages
- Exit pages
This data becomes available without building separate tracking tags.
Why Basic Autocapture Isn’t Always Enough
While the default configuration works well, many organizations want additional context.
For example:
Imagine a website contains multiple call-to-action buttons.
Autocapture may detect the click.
But how do you know:
- Which CTA was clicked?
- Where it appeared?
- Which campaign generated the interaction?
This is where custom Autocapture configuration becomes useful.
Capturing Additional HTML Attributes
Mixpanel allows you to collect additional HTML attributes during Autocapture.
For example:
<button
data-cta-name=”Start Trial”
data-cta-position=”Hero”>
These attributes provide valuable business context.
Without them, every click may look similar.
With them, you can distinguish:
- Homepage CTA clicks
- Pricing page CTA clicks
- Footer CTA clicks
This leads to much richer analysis.
Creating a Custom JavaScript Variable
To customize Autocapture, create a Custom JavaScript Variable in GTM.
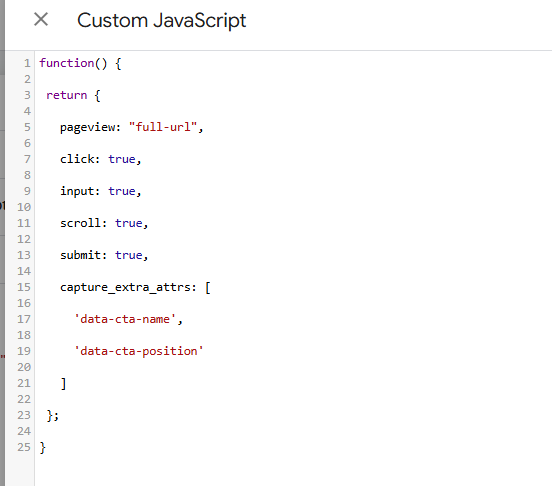
Navigate to:
Variables → New
Choose:
Custom JavaScript
Return an Autocapture configuration object.
Example:
function() {
return {
pageview: “full-url”,
click: true,
input: true,
scroll: true,
submit: true,
capture_extra_attrs: [
‘data-cta-name’,
‘data-cta-position’
]
};
}
This tells Mixpanel to capture additional custom attributes alongside user interactions.
Connecting the Variable to Mixpanel
Return to your Mixpanel initialization tag.
Instead of choosing:
Enabled
for Autocapture, select the Custom JavaScript Variable you created.
This allows Mixpanel to use your customized configuration.
Now events will include additional contextual information.
Verifying Your Configuration
Before publishing, test everything.
Use GTM Preview Mode and interact with:
- Buttons
- Links
- Forms
- Navigation elements
Verify that:
- The Mixpanel tag fires correctly
- Custom attributes are attached
- No JavaScript errors appear
Testing is especially important when custom attributes are involved.
A small typo in an attribute name can prevent valuable data from being collected.
Real-World Use Cases
Here are a few examples where customized Autocapture becomes extremely useful.
Marketing Landing Pages
Track:
- CTA Name
- CTA Position
- Campaign Variant
This helps determine which page elements generate conversions.
SaaS Products
Track:
- Feature Name
- Navigation Section
- Product Area
This reveals which features receive the most engagement.
Ecommerce Stores
Track:
- Product Category
- Product Position
- Promotional Banner
This provides visibility into shopping behavior.
The more context you capture, the more valuable your reports become.
Autocapture vs Custom Events
A common question is:
“Should I use Autocapture or custom events?”
The answer is both.
Autocapture helps answer:
- What are users clicking?
- How do users navigate?
- Which content gets engagement?
Custom events help answer:
- How many users purchased?
- How many trials started?
- How much revenue was generated?
Autocapture provides behavioral visibility.
Custom events provide business visibility.
Combining both creates a more complete analytics strategy.
Common Mistakes to Avoid
Relying Only on Autocapture
Autocapture is powerful, but it shouldn’t replace critical business events.
Revenue and conversion events should still be tracked intentionally.
Capturing Too Much Data
More data isn’t always better.
Only collect attributes that provide analytical value.
Ignoring Data Quality
Regularly review collected events.
Poor naming conventions and unnecessary attributes can create reporting clutter.
Skipping Testing
Always validate your implementation before publishing.
Fixing tracking issues later is much harder than catching them early.
Building a Strong Analytics Foundation
Autocapture is one of the fastest ways to start understanding user behavior in Mixpanel.
Instead of spending weeks building click triggers and event tags, teams can immediately begin collecting meaningful interaction data and discovering how users engage with their website or product.
When combined with carefully designed custom events, Autocapture helps create a balanced analytics implementation that captures both behavioral insights and business outcomes.
For organizations looking to accelerate their Mixpanel implementation while maintaining flexibility, Autocapture through Google Tag Manager is one of the easiest wins available.