
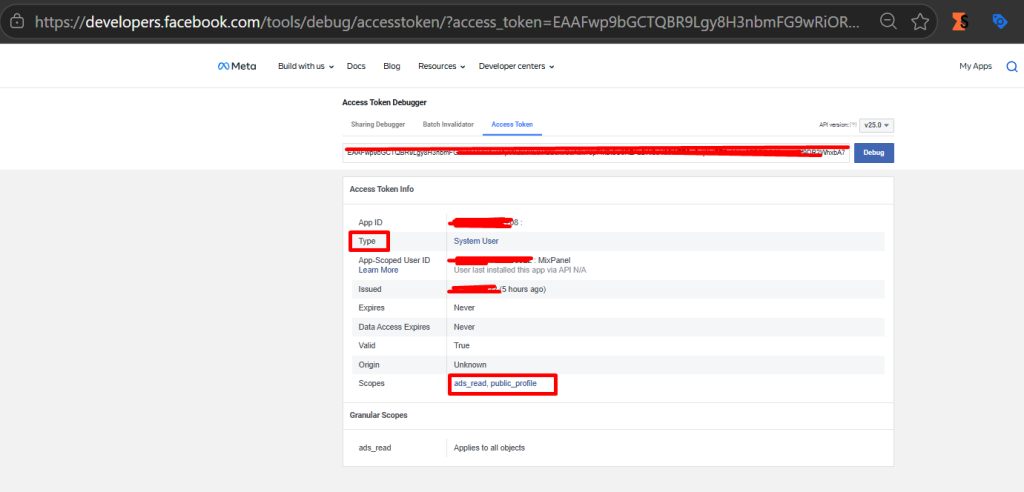
The Problem: Token Expiration Nightmares
Last month, one of my clients woke up to a broken ad spend integration. Their Meta ad data had stopped flowing into Mixpanel. No data for 3 days. By the time they reached out, their dashboard was a graveyard of red alerts, and they had no attribution insight on what was actually converting from paid campaigns.
The culprit? An API token that expired.
If you’re building a production analytics stack that pulls Meta ad spend data into Mixpanel, expiring tokens are your enemy. Every 60 days (or worse, when you least expect it), your pipeline breaks. You scramble to regenerate it. Your stakeholders lose confidence in the data.
The solution is simpler than you’d think: create a non-expiring system user token in Meta’s Business Manager, assign it the right app and permissions, and never worry about this again.
This guide walks you through exactly how to do it—step by step.
Why This Matters
Before we dive in, let’s be clear: non-expiring tokens are safe for production when used correctly. They should:
- Be assigned to a dedicated System User (not a personal account)
- Have minimal, scoped permissions (in this case, just ads_read for reading ad spend)
- Be stored securely in your integration environment
- Never be hardcoded in repositories or shared in Slack
When you follow these practices, a non-expiring token is actually more reliable than constantly rotating short-lived tokens, because you eliminate the “token expiration broke my integration” incident entirely.
Step-by-Step: Creating Your Non-Expiring Token
Step 1: Access Business Manager and Navigate to System Users
- Go to Meta Business Manager
- In the left sidebar, click Settings (the gear icon at the bottom)
- Click Users and Permissions → System Users

You’ll see a list of existing system users. If this is your first time, it will likely be empty.
Step 2: Add a New System User (Admin Level)
- Click the Add button
- Give your user a descriptive name. Something like:
- Mixpanel-AdSpend-Reader
- Analytics-Platform-Integration
- Or use your company name: Company-Meta-Token
- Set the Role to Admin

Why Admin? For now, we’re setting Admin during creation to ensure we have access to all apps. We’ll lock down the actual token permissions in the next steps.
Step 3: Assign Your App to the System User
- Once the system user is created, click on it to open its details
- Find the Apps section
- Click Add Apps and select the app you’ll be using—in this example, Mixpanel App (your website app where you’re tracking conversions)
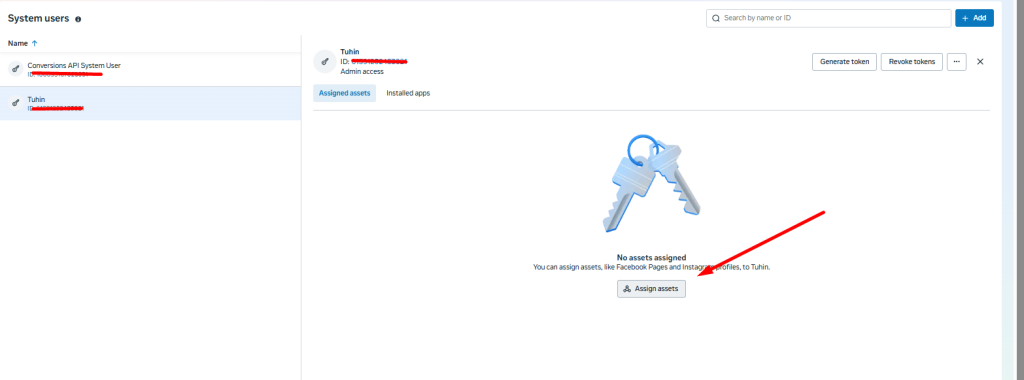
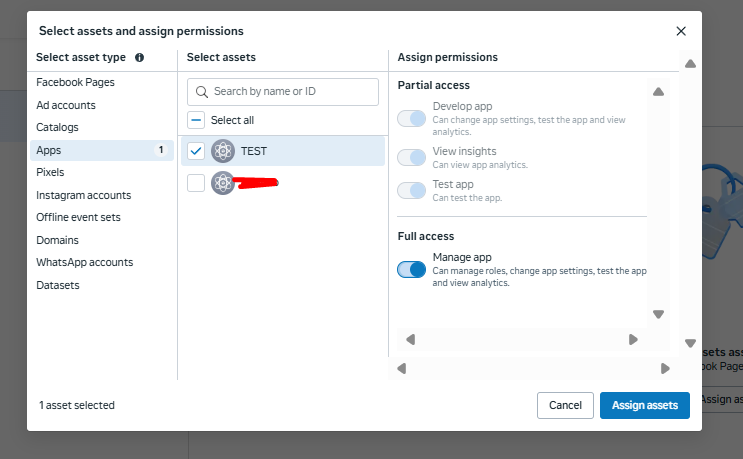
This is the app whose ad spend data we want to read into Mixpanel. Assign it and move forward.
Step 4: Generate the Token
- In the system user’s details, locate the Generate Token button
- Click it
A token generation dialog will appear.
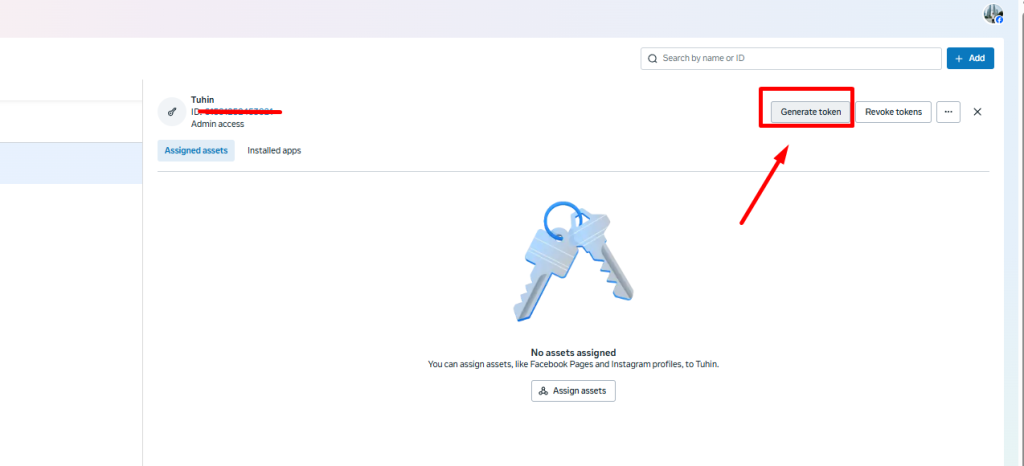
Step 5: Configure Token Settings (The Critical Part)
This is where most people make mistakes. You’ll see several options:
Select the App:
- Choose the app you just assigned (e.g., Mixpanel App)
- Confirm it’s the correct app—you should see it in the dropdown

Set Expiration:
- Look for the Expiration dropdown
- Select Never
- This is what keeps your integration alive permanently

Set Permissions:
- Find the Permissions dropdown
- Select ads_read
- This restricts the token to only reading ad data—perfect for a read-only analytics integration
- Do NOT select Admin or other broad permissions

Step 6: Generate and Copy Your Token
- Click Generate Token
- A long string of characters will appear—this is your API token

- Copy it immediately and store it securely:
- Add it to your integration environment (e.g., GitHub Secrets, your integration platform’s credential store, or a secure config)
- Do NOT paste it in Slack, email, or any unencrypted channel
- Do NOT commit it to version control
Once you navigate away, you cannot retrieve this token again. Meta doesn’t show it a second time.
Common Mistakes (Learn From My Clients’ Pain)
Mistake #1: Forgetting to Set Expiration to “Never”
What happens: You create the token, think you’re done, and 60 days later it stops working silently. Fix: Double-check the expiration dropdown before generating. Screenshot it if you’re prone to rushing.
Mistake #2: Setting Permissions Too Broad
What happens: Your token has more power than it needs. If it leaks, someone could modify ad campaigns, not just read spend. Fix: Stick to ads_read. That’s all Mixpanel needs.
Mistake #3: Assigning the Wrong App
What happens: Your token works, but it’s reading data from the wrong Meta app. You get confused about why your spend numbers don’t match. Fix: Verify the app is the same one you’ve been tracking conversions through. If in doubt, check your pixel ID or app domain first.
Mistake #4: Losing the Token
What happens: You generate it, copy it once, paste it into your integration, then close the window. Later, you need to regenerate it, but there’s no way to retrieve the old one. Fix: Store it in your password manager or secure secrets vault immediately. Write down the system user name so you can always regenerate if needed.
After You’ve Created It: Integration Tips
Once you have your token:
Test it immediately – Don’t wait. Make an API call to Meta’s Ads API to verify it works:
GET https://graph.instagram.com/v18.0/act_<your-ad-account-id>/adaccounts?access_token=<your-token>
- Document which system user it belongs to – Future you (or your team) will need to know which system user to regenerate from if you ever need to.
- Set a calendar reminder anyway – Even though it doesn’t expire, audit your integrations quarterly. Expired? Regenerate it. Not connected? Fix it.
- Monitor your Mixpanel integration – Add an alert if your ad spend data stops flowing for more than a few hours. Early warning beats disaster.
Final Thoughts
Non-expiring tokens get a bad reputation because they’re often implemented carelessly. But in a production analytics environment where reliability is non-negotiable, they’re a legitimate and necessary tool. The key is treating them with respect: assign them to system users, scope their permissions narrowly, and store them securely.
Your future self—and your stakeholders—will thank you when your ad spend attribution keeps flowing smoothly, no emergency regenerations required.
Quick Checklist Before You Launch
- System user created with a clear, descriptive name
- Correct app assigned to the system user
- Token generated with Expiration set to Never
- Permissions set to ads_read only
- Token copied and stored securely (not in chat, not in code)
- Token tested in your Mixpanel integration
- System user name documented for future reference
You’re all set. Your ad spend data is now on its way to Mixpanel, and you’ve just eliminated one of the most annoying integration headaches in analytics.
Happy tracking.