
In this guide, we’ll walk through how to build an automated integration using Google Cloud Functions, the Google Ads API, and the Mixpanel Import API.
Once set up, this pipeline will:
- Run every morning at 8 AM UTC
- Fetch yesterday’s Google Ads campaign metrics
- Transform them into Mixpanel events
- Import them into your Mixpanel project
Note:
If you manage multiple Google Ads MCC accounts, you’ll create one Cloud Function per account.
The code stays the same; only these values differ:
- Google Ads Developer Token
- Google Ads Customer ID
Overview of the Architecture
At a high level, the integration works like this:
- Google Cloud Function calls the Google Ads API to fetch campaign metrics from yesterday.
- The function transforms each campaign row into a Mixpanel
"Ad Data"event. - It sends these events to Mixpanel using the server-side import API.
- Cloud Scheduler triggers the function once a day at 8 AM UTC.
Everything is serverless and fully managed.
Step 1: Create OAuth Credentials
First, we need OAuth credentials so the function can access the Google Ads API.
- In your Google Cloud project, go to APIs & Services → Credentials.
- Click Create credentials → OAuth client ID.
- For Application type, select Web application.
- Under Authorized redirect URIs, add:
https://developers.google.com/oauthplayground
(This is only needed to generate a refresh token; you can remove it later.) - Click Create.
- Copy the Client ID and Client Secret — you’ll need them in the next step.
Step 2: Enable the Google Ads API
Next, allow your project to call the Google Ads API.
- Go to APIs & Services → Enabled APIs & services.
- Click Enable APIs and services.
- Search for Google Ads API.
- Click it, then press Enable.
Step 3: Generate a Refresh Token
We’ll use Google OAuth Playground to generate a refresh token for your OAuth client.
- Go to Google OAuth Playground.
- Click the Settings (⚙️) icon in the top-right.
- Set OAuth flow to Server-side.
- For Access type, select Offline
→ This ensures you receive a refresh token, not just a short-lived access token. - Check Use your own OAuth credentials.
- Enter the Client ID and Client Secret from Step 1.
- On the left side, find and select Google Ads API scopes.
- Click Authorize APIs.
- When prompted, sign in with the Google account that has access to your Google Ads account.
- Approve the request to manage your Google Ads campaigns.
- Once you get an authorization code, click Exchange authorization code for tokens.
- Copy the Refresh token — the Cloud Function will use this to access the Google Ads API.
Step 4: Create the Google Cloud Function
Now that we have all required credentials, we can set up the Cloud Function that fetches Google Ads data and sends it to Mixpanel.
4a) Function Configuration
- Go to Cloud Functions in your Google Cloud project.
- Click Create function → Write a function.
Use the following settings:
- Service name:
mixpanelgoogleads - Function name: e.g.
mixpanel-google-ads-importer - Region: Choose the region closest to you
- Runtime: Node.js 22
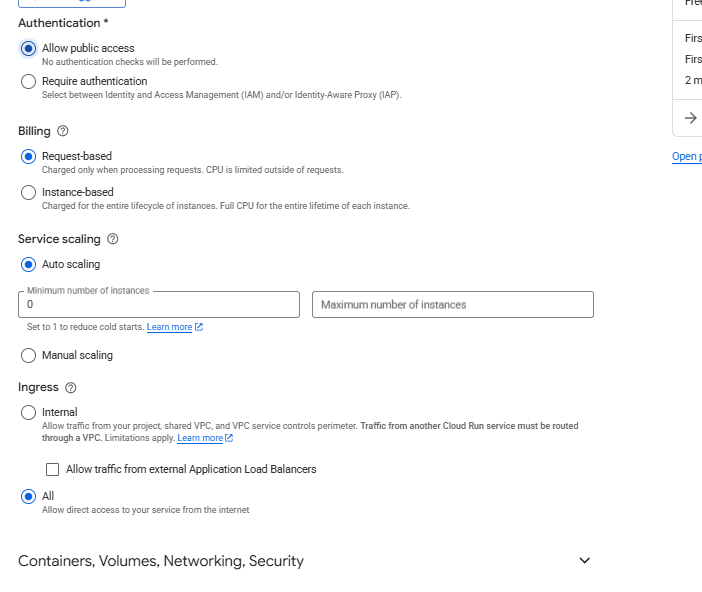
- Authentication: Allow public access (for simplicity) In production, you’ll typically protect this with IAM + OIDC instead.
- Billing: Request-based (pay-as-you-go)
- Autoscaling: Enabled
- Ingress: All
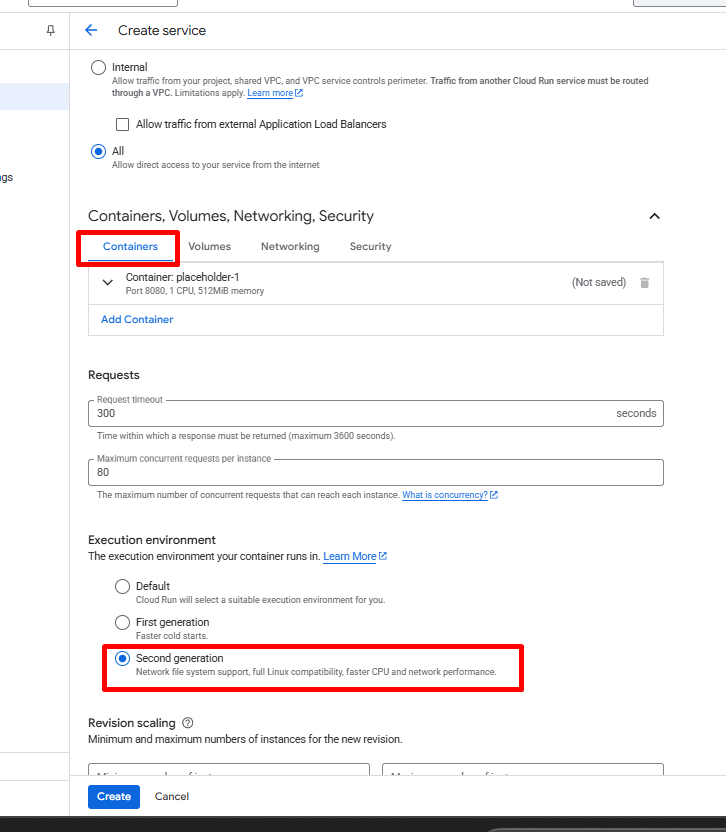
- Execution environment: Under Containers → Execution environment, select 2nd gen

4b) Add Dependencies (package.json)
In the inline editor:
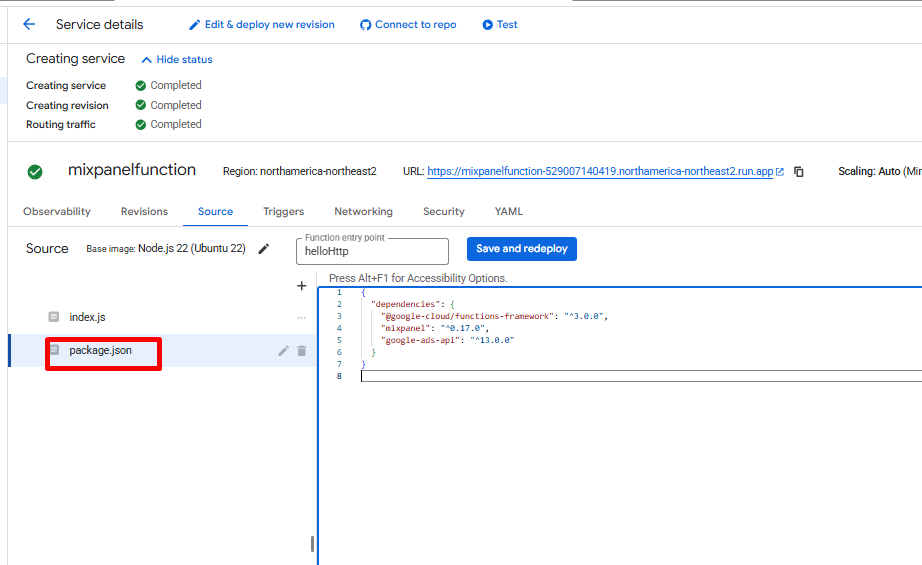
- Select
package.jsonfrom the left navigation. - Delete the default content.
- Paste:
{
  "dependencies": {
    "@google-cloud/functions-framework": "^3.0.0",
    "mixpanel": "^0.17.0",
    "google-ads-api": "^13.0.0"
  }
}
4c) Add the Function Code (index.js)
- Select
index.jsfrom the file tree. - Delete the default content.
- Paste the following code:
const functions = require('@google-cloud/functions-framework');
const { GoogleAdsApi } = require('google-ads-api');
const Mixpanel = require('mixpanel');

// Configuration:
// It's recommended to pass these values through Environment Variables
// and/or Secret Manager in production.

const MIXPANEL_TOKEN = 'MIXPANEL TOKEN';
const MIXPANEL_SECRET = 'MIXPANEL SECRET';
// For US Data Residency (default):
const MIXPANEL_HOST = 'api.mixpanel.com';
// For EU Data Residency:
// const MIXPANEL_HOST = 'api-eu.mixpanel.com';
// For India Data Residency:
// const MIXPANEL_HOST = 'api-in.mixpanel.com';

const GOOGLE_CLIENT_ID = 'GOOGLE CREDENTIAL CLIENT ID';
const GOOGLE_CLIENT_SECRET = 'GOOGLE CREDENTIAL CLIENT SECRET';
const GOOGLE_CLIENT_REFRESH_TOKEN = 'REFRESH TOKEN FOR YOUR GOOGLE CREDENTIAL';
const GOOGLE_ADS_DEVELOPER_TOKEN = 'GOOGLE ADS DEVELOPER TOKEN';
const GOOGLE_ADS_CUSTOMER_ID = 'GOOGLE CUSTOMER CLIENT ID WITHOUT HYPHENS'; // ex. 1234567890

// End of Configuration

const mixpanel = Mixpanel.init(MIXPANEL_TOKEN, {
  host: MIXPANEL_HOST,
  secret: MIXPANEL_SECRET
});

const client = new GoogleAdsApi({
  client_id: GOOGLE_CLIENT_ID,
  client_secret: GOOGLE_CLIENT_SECRET,
  developer_token: GOOGLE_ADS_DEVELOPER_TOKEN
});

/**
 * Gets campaign data from Google Ads.
 */
function fetchGoogleAdsCampaigns() {
  const customer = client.Customer({
    customer_id: GOOGLE_ADS_CUSTOMER_ID,
    refresh_token: GOOGLE_CLIENT_REFRESH_TOKEN
  });

  // Find metrics for all Google Ads campaigns that ran yesterday
  return customer.query(`
    SELECT
      segments.date,
      campaign.id,
      campaign.name,
      metrics.cost_micros,
      metrics.clicks,
      metrics.impressions
    FROM
      campaign
    WHERE
      metrics.cost_micros > 0
    AND
      segments.date DURING YESTERDAY
  `);
}

/**
 * Turns a Google Ads campaign result into a Mixpanel event.
 */
function transformCampaignToEvent(campaign) {
  return {
    event: 'Ad Data',
    properties: {
      $insert_id: `G-${campaign.segments.date}-${campaign.campaign.id}`,
      // We need to turn the date into a Unix timestamp
      time: new Date(campaign.segments.date).getTime(),
      source: 'Google',
      campaign_id: campaign.campaign.id,

      // metadata about the campaign; matches client-side events
      utm_source: 'google',
      utm_campaign: campaign.campaign.name,

      // Google's cost metric is 1 millionth of the fundamental currency
      cost: campaign.metrics.cost_micros / 1_000_000,
      impressions: campaign.metrics.impressions,
      clicks: campaign.metrics.clicks
    }
  };
}

/**
 * Our function's handler.
 */
functions.http('handler', async (req, res) => {
  try {
    // Get the raw campaign metrics
    const campaigns = await fetchGoogleAdsCampaigns();

    // Transform our raw metrics into Mixpanel events
    const events = campaigns.map(transformCampaignToEvent);

    // Send them to Mixpanel
    mixpanel.import_batch(events, (err) => {
      if (err) {
        throw err;
      }

      res.status(200).send(`Imported ${events.length} events.`);
    });
  } catch (err) {
    res.status(500).send(err);
  }
});
Set the Entry point to:
handler
Before pressing Deploy, replace all placeholder strings (tokens, IDs, secrets) with your actual credentials.
After deployment, copy the trigger URL from the Function details page — you’ll use this when scheduling.
At this point, your function is ready. When triggered, it will:
- Query Google Ads for yesterday’s campaign performance.
- Convert each row into a Mixpanel
"Ad Data"event. - Import all events into your Mixpanel project.
Step 5: Schedule the Function to Run Daily
To keep your Mixpanel data fresh, you’ll want this function to run automatically once a day.
We’ll use Google Cloud Scheduler to trigger the Cloud Function every morning at 8 AM UTC.
- Go to Cloud Scheduler in your project
(or visit:https://console.cloud.google.com/cloudscheduler) - Enable the Cloud Scheduler API if prompted.
- Click Schedule a job.
Job Details
- Name: e.g.
gcf-mixpanel-ads-google-daily - Region: Same region as your Cloud Function
- Frequency:
0 8 * * *This cron expression runs the job every day at 8:00 AM. - Timezone:
Select Coordinated Universal Time (UTC), or your preferred timezone.
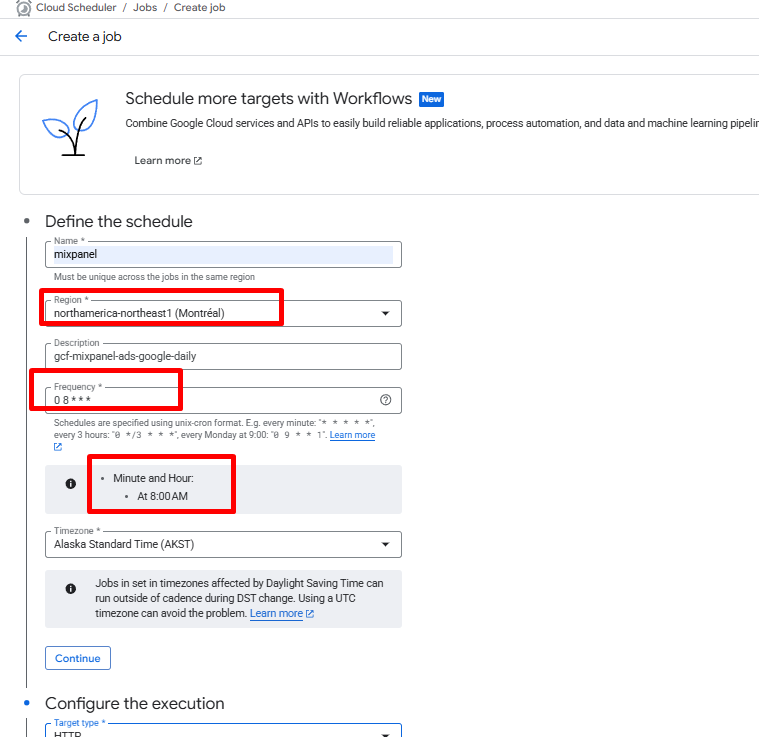
Click Continue.
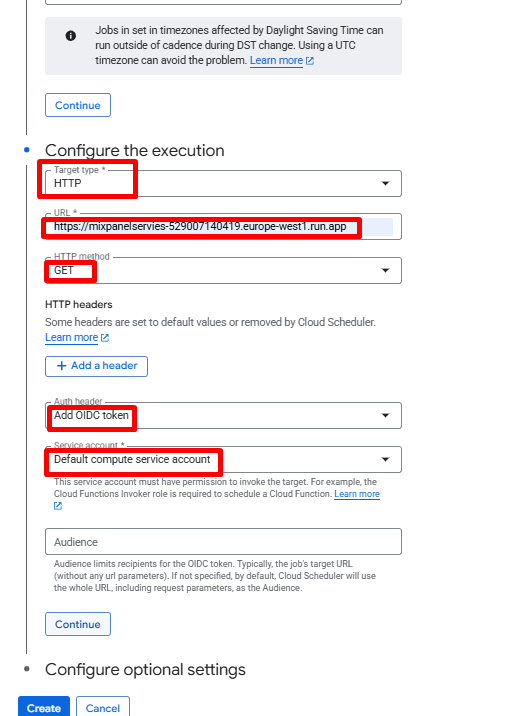
Execution Configuration
- Target type: HTTP
- URL: Paste the Cloud Function trigger URL you saved earlier.
- HTTP method:
GET - Auth header: Select Add OIDC token
- Service account: Choose a service account with permission to invoke the Cloud Function
(i.e. it has the Cloud Functions Invoker role).
Click Create.
Your scheduled job is now live.
Thats it!! Google Ads → Mixpanel Sync Is Automated
Your setup is now complete:
- Every morning at 8 AM UTC, Cloud Scheduler triggers your Cloud Function.
- The function calls the Google Ads API to fetch the previous day’s campaign metrics.
- It transforms them into Mixpanel
"Ad Data"events and imports them using the Mixpanel Import API. - Mixpanel now has daily, campaign-level Google Ads data you can join with in-product events.
This integration gives you a single place to analyze:
- Spend, clicks, impressions
- CPC, CPM, CTR
- Campaign performance tied to signups, activations, and conversions
Integrating Google Ads with Mixpanel through a scheduled Google Cloud Function gives you a fully automated, reliable way to bring campaign performance into your analytics stack. By pulling daily spend, impressions, and click data directly from the Google Ads API and importing it into Mixpanel, you unlock the ability to analyze marketing performance alongside in-product behavior — without manual exports or spreadsheets.
Need help with Mixpanel Ad Spend Integration? Email us at support@optizent.com or fill out the contact us form.