
A client I worked with had a solid Mixpanel implementation — clean events, good governance, Lexicon maintained properly. But their data science team couldn’t use any of it. Every time they needed to run a SQL query on user behavior, join Mixpanel data with their CRM records, or build a custom retention model, they had to either export a CSV manually or use the Mixpanel API in ways it wasn’t designed for.
What they needed was a continuous, reliable export of their Mixpanel event data into BigQuery, where their data team actually lived. That’s exactly what Data Pipelines does.
If your analytics stack has outgrown what Mixpanel’s UI can do on its own — or if you have a data team that works in SQL and needs Mixpanel data in your warehouse — this is the feature that connects those two worlds. Here’s how to set it up properly.
What Data Pipelines Actually Does
Data Pipelines continuously exports data from your Mixpanel project to a destination of your choice — either a cloud storage bucket or a data warehouse. Once it’s running, your Mixpanel event data, user profile data, and identity mappings flow into your destination automatically on a schedule, without any manual intervention.
The destinations currently supported are:
For cloud storage: AWS S3, Google Cloud Storage, and Azure Blob Storage.
For data warehouses: BigQuery, Databricks, Redshift Spectrum, and Snowflake.
The feature is available as an add-on on Enterprise and Growth plans. Mixpanel also offers a 30-day free trial that lets you create one pipeline per data source per project — useful for testing the setup before committing to it. The trial has some limitations (daily exports only, no data sync, one-day backfill limit) but it’s enough to validate the end-to-end flow.
You need an Admin or Owner project role to create and manage pipelines.
The Two-Step Setup Process
Setting up Data Pipelines involves two distinct steps that happen in a specific order. The first happens in your destination environment. The second happens in Mixpanel. Skipping the first step or reversing the order is the most common reason setups fail on the first attempt.
Step 1: Configure Your Destination to Accept Data from Mixpanel
Before you touch anything in Mixpanel, your destination needs to be ready to receive writes from Mixpanel’s export service. What “ready” means is different depending on whether you’re writing to cloud storage or a data warehouse.
For cloud storage destinations (S3, GCS, Azure Blob):
The core task is granting Mixpanel’s service the permissions it needs to write to your bucket. For AWS S3, this means creating an IAM policy and role that allows Mixpanel’s account to put objects into your bucket. For Google Cloud Storage, you’re granting the Mixpanel service account the Storage Object Creator role on your bucket. For Azure, you’re setting up the appropriate access controls on your Blob Storage container.
The exact steps vary by provider and Mixpanel has detailed guides for each. Follow the provider-specific guide carefully — permissions issues at this stage are the most common cause of pipelines that create successfully but export nothing.
Once set up, data exports to these structured paths in your bucket:
- Events land at
<BUCKET_NAME>/<MIXPANEL_PROJECT_ID>/mp_master_event/<YEAR>/<MONTH>/<DAY>/ - User profiles land at
<BUCKET_NAME>/<MIXPANEL_PROJECT_ID>/mp_people_data/ - Identity mappings land at
<BUCKET_NAME>/<MIXPANEL_PROJECT_ID>/mp_identity_mappings_data/
That path structure matters when you’re building downstream processes that read from the bucket — know it before you build anything that depends on file paths.
For data warehouse destinations (BigQuery, Snowflake, Databricks, Redshift):
The setup is more involved. For BigQuery, you’re creating a dataset and granting Mixpanel’s service account the BigQuery Data Editor role. For Snowflake, you’re creating a storage integration, a stage, and a file format, then granting the appropriate privileges. Databricks and Redshift Spectrum each have their own configuration steps.
Two Snowflake-specific settings that trip people up: the Account Name should be your unique account identifier in the format example1234.us-west-2, not just your account name. The Storage Integration should be the name of the integration object you created in Snowflake, such as MIXPANEL_EXPORT_STORAGE_INTEGRATION. Getting either of these wrong causes the pipeline creation to fail or the exports to error silently.
For warehouse destinations, Mixpanel infers the schema from your event data and creates tables accordingly. This is convenient but worth understanding — the schema is derived from what’s actually in your events, so events with inconsistent property types can create schema inference issues downstream.
Step 2: Create the Pipeline in Mixpanel
Once your destination is configured and ready to accept writes, go to your Mixpanel project and navigate to the Destinations page. You’ll find it through the settings button.
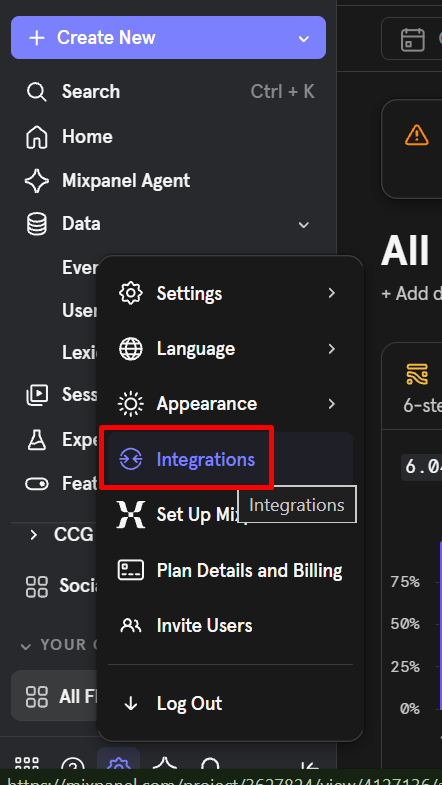
Click Create Pipeline and walk through the configuration:
Select your destination provider. Choose the warehouse or storage provider you configured in Step 1.
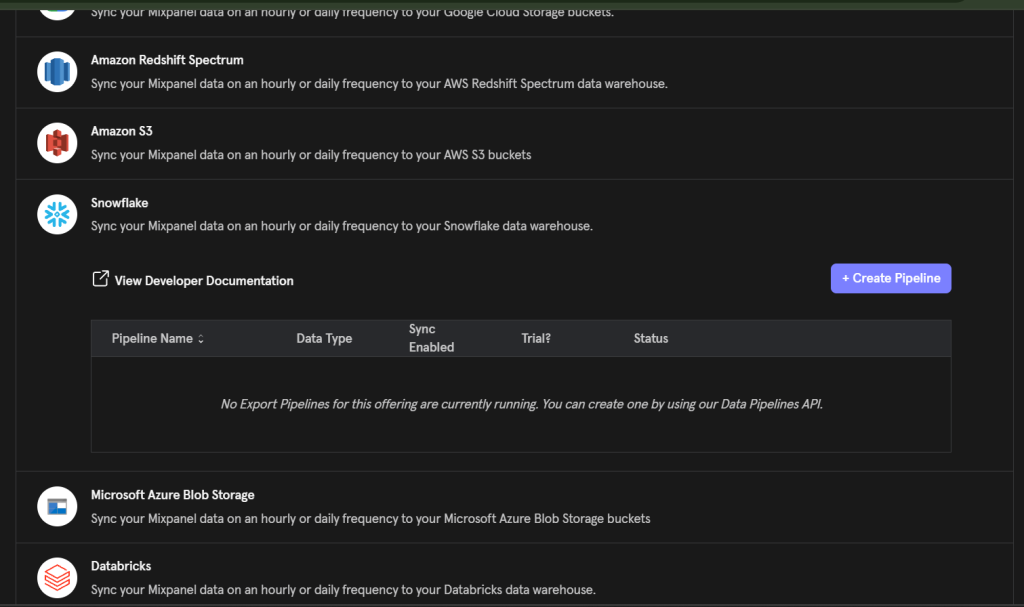
Choose your data sources. You can export events, user profiles, identity mappings, or a combination. Most teams start with events and add profiles once the event pipeline is stable. Identity mappings are important if you’re doing any kind of user stitching or cross-device analysis in your warehouse.
Set your export frequency. Hourly or daily. Hourly exports give you fresher data but create more files and more load on your pipeline infrastructure. Daily is simpler and often sufficient for most analytical use cases. You can’t specify the exact time exports run — hourly pipelines target 30 minutes past each hour, and daily pipelines target 00:30 AM in your project’s timezone.
Configure historical backfill. If you want historical data in your warehouse, not just data going forward from today, enable the backfill option and set your from_date. The backfill date can go back up to 6 months. Be realistic about timing here — large backfills covering months of high-volume data can take multiple weeks to complete. The pipeline will process the backfill before starting regular incremental exports, so plan accordingly.
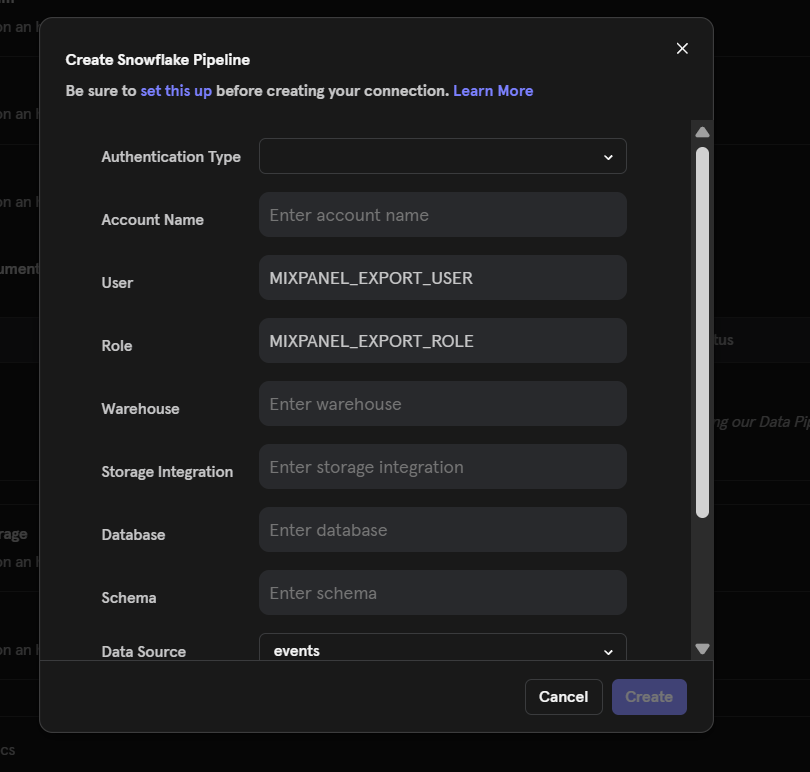
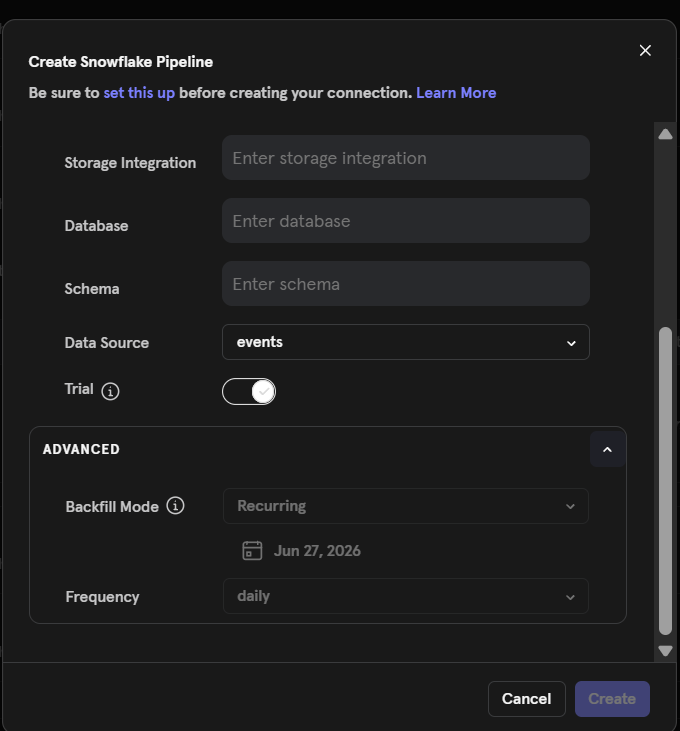
Review and create. Once the pipeline is created, it will start running on its configured schedule.
Managing Pipelines After Creation
All pipeline management happens in the Destinations page. Find the pipeline you want to manage, click the three-dot menu on the right, and you’ll see options to pause, unpause, view configuration, or delete the pipeline.
A few things worth knowing about pipeline management:
You can’t change the destination of an existing pipeline. If you need to point a pipeline at a different bucket or warehouse, create a new pipeline and delete the old one. There’s no edit-in-place for the destination.
The trial pipeline can’t be deleted. If you created a pipeline during the 30-day free trial, it persists even after you upgrade to a paid plan. This is intentional — Mixpanel uses it to track that the trial was used for that project. It won’t cause any problems in practice, but don’t expect to be able to clean it up.
Active pipeline limits. Each project can have two recurring pipelines and one date-ranged backfill pipeline active at a time. Multiple pipelines can’t write to the same destination or for the same date range. Recurring pipelines must have different frequencies from each other.
Pipeline steps are sequential per project. Only one pipeline step runs at a time per project. If you have a large backfill running and a daily incremental export scheduled, the incremental export waits for the backfill step to complete before running. This is a fair scheduling constraint that prevents any single project from monopolizing export resources.
The SLA and What to Expect on Timing
The Data Pipelines SLA guarantees up to 24 hours of end-to-end latency for exported events, with an additional 24-hour allowance for late-arriving data.
For hourly pipelines, data that arrives on time should be exported within 24 hours of being ingested by Mixpanel. For daily pipelines, the 24-hour window starts at the beginning of the next calendar day based on project time — so data ingested on January 1st is scheduled to be exported starting January 2nd at midnight.
Late-arriving data — anything that reaches Mixpanel more than two hours after the end of an export window — is handled in a daily sync process, but only if you have the sync option enabled on your pipeline. Without sync, late-arriving data doesn’t make it into your warehouse automatically and requires manual intervention. If your implementation has any meaningful ingestion lag (common with server-side tracking that batches events), make sure sync is enabled.
Why Your Event Counts Might Not Match
This is the question that comes up almost immediately after a pipeline is running. You compare event counts in Mixpanel’s UI against counts in your warehouse table and they don’t match. Before assuming something is broken, here are the most common reasons for discrepancies:
Timezone differences. Mixpanel’s UI displays data in your project’s configured timezone. Pipeline exports write data in UTC. If you’re counting events by day, a query in your warehouse using UTC dates will produce different daily totals than what Mixpanel shows in your project timezone. Convert to your project timezone in your warehouse queries before comparing.
Hidden events are included in exports. Events you’ve hidden in Lexicon are still exported to your warehouse. They don’t appear in the Mixpanel UI but they’re in your warehouse tables. If you’re comparing UI counts against warehouse counts, hidden events will create a discrepancy in the warehouse’s favor.
Late-arriving data. Data that arrived late in Mixpanel may appear in the UI before it’s been exported to your warehouse, or may appear in your warehouse in a different day’s export than you expect. If sync is enabled, late data catches up the following day.
Data sync not enabled. If sync is off, some late-arriving events simply don’t make it into your warehouse exports at all, creating a permanent undercount in the warehouse relative to Mixpanel.
Counting methodology for warehouses. Each warehouse partitions and stores data slightly differently. Mixpanel has specific SQL examples for BigQuery and Snowflake showing how to correctly count events per day for each warehouse’s table structure. Use those examples as your starting point rather than generic COUNT queries, which can double-count or miss events depending on how partitioning works.
Practical Notes for Getting the Most Out of Pipelines
Start with events only, then add profiles. Getting your event pipeline stable and validated before layering in user profile exports simplifies troubleshooting. Events are the foundation — once those counts reconcile correctly with your Mixpanel UI, add the profile and identity mapping pipelines.
Set your backfill window thoughtfully. A 6-month backfill on a high-volume project can take weeks. If you only need 30 days of history to start, set the from_date to 30 days ago instead of the maximum. You can always run additional backfills later.
Account for UTC in all your warehouse queries. Build the timezone conversion into your data models from day one rather than adding it later. Every analyst who queries raw pipeline data in UTC without accounting for your project’s timezone will produce subtly wrong numbers.
Don’t use the Export API and Data Pipelines for the same purpose. APIs using Project Token or Secret authenticate at the project level and ignore Data View filters. If you have teams using the Query API with OAuth and expecting Data View-scoped results, know that pipeline exports always contain all project data regardless of any Data View configuration.
Plan for schema evolution. As your product adds new events or new properties on existing events, the schema Mixpanel infers for your warehouse tables will change. Some warehouses handle schema evolution more gracefully than others. BigQuery is generally permissive about adding new columns. Snowflake and Redshift may require more explicit schema management as your event structure evolves. Build this into your data engineering workflow from the start.
Summary
Data Pipelines is the feature that turns Mixpanel from an analytics UI into a data source that your entire data organization can build on. Once it’s running, your data scientists can write SQL against your event data, your data engineers can join Mixpanel events with your CRM or transaction data, and your ML team can build models on behavioral features — all without anyone manually exporting CSVs or hitting API rate limits.
The setup investment is front-loaded. Getting permissions right on your destination, understanding the SLA and sync behavior, and reconciling your timezone handling are the main friction points. But once those are sorted and your first export validates correctly, the ongoing operational overhead is minimal.
If you’re on Growth or Enterprise and your data team has been working around the absence of Mixpanel data in your warehouse, the 30-day free trial is the right place to start. Set up a single events pipeline, validate the output, and you’ll have everything you need to decide whether the full add-on makes sense for your stack.