
The data layer is a JavaScript object used by Google Tag Manager (GTM) to store, organize, and pass information from your website to your marketing and analytics tags.
Instead of forcing GTM to scan your website’s visual layout—like button text, CSS classes, or HTML IDs—to figure out what a user is doing, the data layer acts as a clean, structured messenger. When a user completes an action (such as submitting a form or buying a product), your website pushes specific details into the data layer, and GTM reads those details to fire the right tags at the exact right moment.
Why Use a Data Layer?
Relying on visual page elements (DOM scraping) to trigger tags is fragile. If a web developer changes a button’s color, renames a CSS class, or updates a page template, your tracking breaks silently.
Using a data layer solves this problem and provides several core benefits:
- Tracking Resilience: Because GTM listens for explicit events pushed by your website’s code rather than visual button labels, frontend design updates won’t break your analytics.
- Cleaner, Richer Data: You can pass complex details—like product SKUs, order totals, user login status, or form categories—that aren’t visible on the screen.
- Single Source of Truth: Once information is in the data layer, multiple tools (GA4, Google Ads, Meta Pixel, LinkedIn Insight Tag) can all read from the exact same data without duplicating tracking code on your site.
- Faster Page Performance: Instead of running heavy custom JavaScript across your site to hunt for page values, GTM simply listens for structured data pushes.
How the Data Layer Works
Technically, the data layer is an array named dataLayer that lives in your browser’s window object.
When your GTM container snippet loads on a page, it automatically initializes this array if it doesn’t already exist. From there, your website sends information to it using the dataLayer.push() method.
Here is a simple example of what a data layer push looks like when someone submits a lead form:
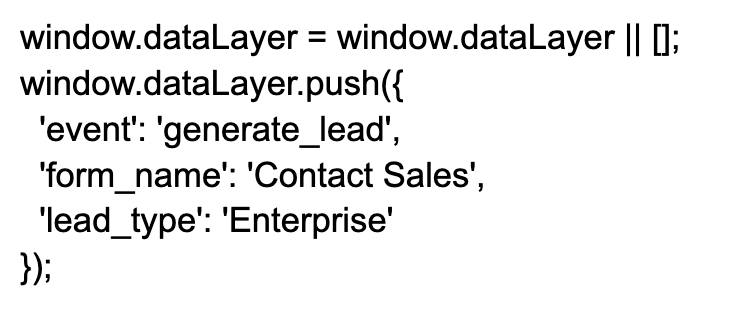
In this snippet:
- event: Tells GTM that a specific interaction just happened (generate_lead). GTM uses this to trigger tags.
- form_name & lead_type: Key-value pairs containing context about that interaction. GTM captures these as variables to send along to GA4 or ad platforms.
Step-by-Step: How to Use the Data Layer in GTM
Once your developer adds a dataLayer.push() snippet to your website, you need to configure GTM to listen for it and forward the data to Google Analytics 4.
Step 1: Verify the Push in GTM Preview Mode
- Open your GTM container and click Preview in the top-right corner.
- Enter your website URL and perform the action (e.g., submit your form).
- In the Tag Assistant summary panel on the left, look for your custom event name (e.g., generate_lead).
- Click the event and open the Data Layer tab to confirm your parameters (form_name, lead_type) appear properly.
Step 2: Create Data Layer Variables
To capture the extra details attached to the event, create variables in GTM:
- Go to Variables in the left menu and scroll down to User-Defined Variables.
- Click New > Data Layer Variable.
- In the Data Layer Variable Name field, enter the exact key name from your code (e.g., form_name). (Note: This is case-sensitive).
- Name your variable (e.g., DLV – form_name) and click Save.
- Repeat this for any other parameters you want to capture (like lead_type).
Step 3: Create a Custom Event Trigger
Next, tell GTM when to fire your tag:
- Go to Triggers in the left menu and click New.
- Choose Custom Event as the trigger type.
- In the Event name field, enter the exact event value from your push (generate_lead).
- Name your trigger (e.g., CE – generate_lead) and click Save.
Step 4: Connect Everything in a GA4 Event Tag
Finally, send the data to Google Analytics 4:
- Go to Tags > New > Google Analytics: GA4 Event.
- Select your Measurement ID and enter generate_lead as the Event Name.
- Expand Event Parameters and click Add parameter:
- Event Parameter: form_name | Value: {{DLV – form_name}}
- Event Parameter: lead_type | Value: {{DLV – lead_type}}
- Under Triggering, attach your CE – generate_lead trigger.
- Save your tag, test it in Preview mode to confirm it fires on the event, and click Submit to publish.
3 Best Practices for Managing Your Data Layer
- Always initialize safely: Use window.dataLayer = window.dataLayer || []; before pushing data. This prevents JavaScript errors if a push runs before the main GTM snippet finishes loading.
- Clear previous e-commerce objects: In single-page applications (SPAs), data from a previous action can accidentally carry over into the next event. Push { ecommerce: null } right before pushing new e-commerce data to keep payloads clean.
- Keep naming consistent: Use lowercase and underscores (snake_case) for event names and keys (e.g., plan_selected rather than Plan Selected) to align cleanly with GA4’s standard naming conventions.
By shifting your tracking foundation from fragile page scraping to a structured data layer, you give your analytics setup long-term stability and make scaling new marketing tags straightforward.
GET EXPERT ANALYTICS HELP
Need help with your analytics?
Tell us what you want to measure or what is getting in the way. Optizent can help with analytics implementation, audits, reporting, and training.
We will use these details to respond to your request. Please do not include passwords, account access, or customer data.