
When building automated data pipelines in Google Cloud, one of the most common requirements is making a Cloud Function run on a fixed schedule. Whether you’re syncing data from external APIs, running nightly cleanup tasks, or importing campaign metrics into Mixpanel, manually triggering a function is inefficient and unnecessary.
In this guide, we’ll walk through exactly how to schedule a Google Cloud Function using Google Cloud Scheduler.
We’ll use a real example: triggering a function every morning at 8 AM UTC to sync Meta Ads data into Mixpanel.
Why Schedule a Cloud Function?
Cloud Functions are stateless and event-driven. But not all workflows are triggered by external events. Some need to run on a predictable cadence:
- Daily imports
- Hourly sync jobs
- Nightly ETL tasks
- Weekly cleanup scripts
- Periodic API calls
For our Meta Ads → Mixpanel integration, we needed the function to run once per day to fetch and import the previous day’s ad performance.
Cloud Scheduler solves this by providing a fully managed cron service that can trigger Cloud Functions via authenticated HTTP calls.
Step 1: Navigate to Cloud Scheduler
Go to:
Google Cloud Console → Cloud Scheduler
If this is your first time using it, Google Cloud will prompt you to enable the Cloud Scheduler API.
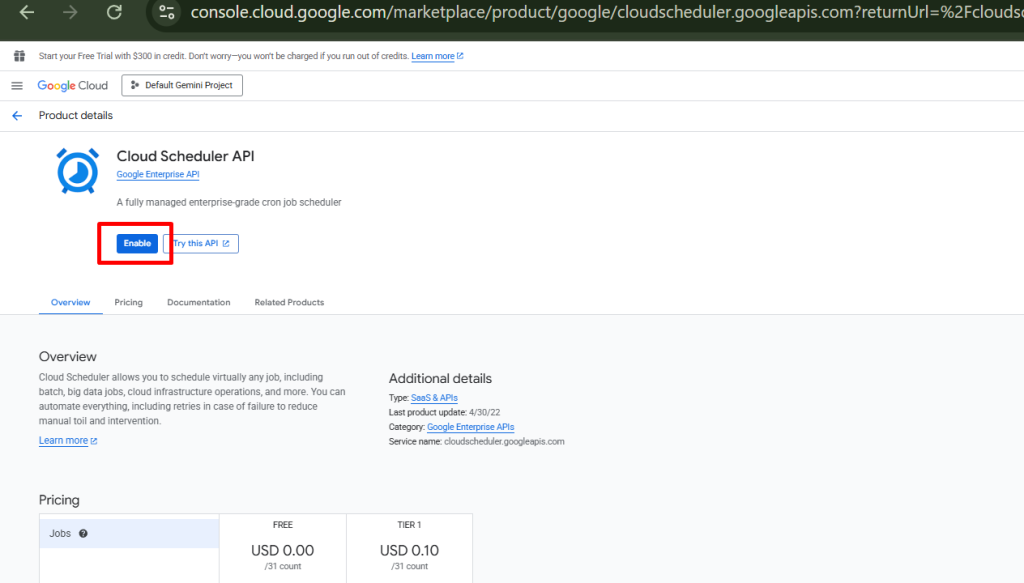
Enable it to proceed.
Once the service is active, click:
→ “Schedule a job”
This opens the configuration panel.
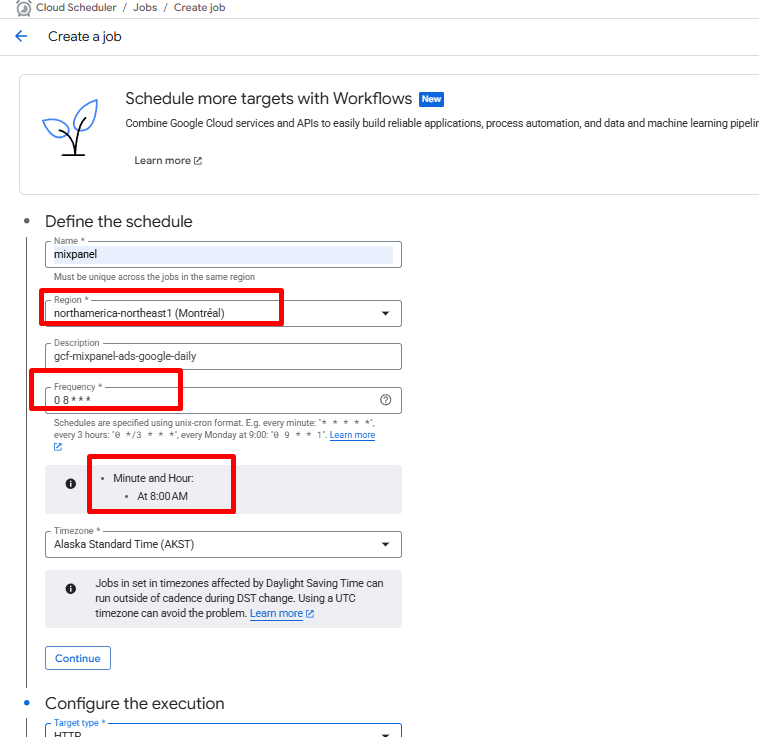
Step 2: Configure the Job Details
You’ll now define the schedule for the function.
Job Configuration:
- Name:
gcf-mixpanel-ads-fb-daily - Region:
Select the same region you used when creating the Cloud Function.
Using mismatched regions can cause unnecessary cross-region latency. - Frequency (CRON expression):
0 8 * * *This tells Cloud Scheduler to run the job every day at 08:00 UTC. - Timezone:
Select UTC, or whichever timezone fits your operational requirements.
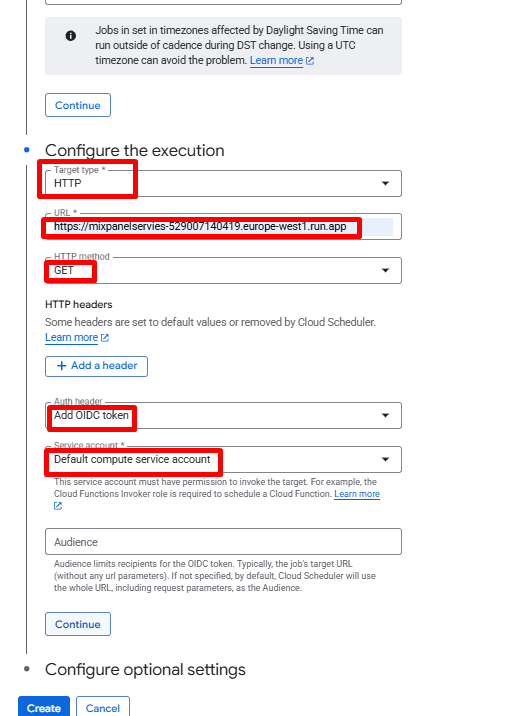
Step 3: Configure How the Job Invokes the Function
Click Continue to move to the execution settings.
This is where you tell Cloud Scheduler what to trigger.
Execution Settings
- Target type:
HTTP - URL:
Paste the Cloud Function trigger URL you saved after deployment. It looks like:https://<region>-<project-id>.cloudfunctions.net/<function-name> - HTTP method:
GET - Auth header:
Choose:Add OIDC tokenThis ensures your Cloud Function is invoked securely using a signed service account token, not a public call. - Service account:
Select a service account that has:roles/cloudfunctions.invokerThis grants Cloud Scheduler permission to call your function.
Click Create.
Your job is now scheduled.
Step 4: Validate the Job
Once created:
- In Cloud Scheduler, click the three dots next to your job.
- Select Run now.
- Open → Cloud Functions → Logs to confirm the function executed.
If everything is configured correctly, you’ll see logs showing that the function ran and executed your logic (e.g., syncing Meta Ads data).
You’re Done — Your Cloud Function Now Runs Automatically
With Cloud Scheduler configured, your Cloud Function will now run every morning at 8 AM UTC, fetch Meta Ads metrics, and push them directly into Mixpanel — no manual effort needed.
This setup is fully serverless, secure, and requires no ongoing maintenance. It’s an essential pattern for:
- Marketing analytics automation
- ETL scheduling
- Periodic API ingestion
- Daily reporting
- Any recurring task that needs predictable execution
If you’d like a complete end-to-end guide (function code, environment setup, IAM roles, error handling, retries, etc.), just let me know — I can package the entire workflow into a single document.
Need help with Mixpanel? Email us at support@optizent.com or fill out the contact us form.