
Installing the Mixpanel GTM template is the easy part.
The real challenge is knowing which tag to use and when to use it.
I often see teams successfully tracking events with Mixpanel, but months later they run into reporting issues because they never configured Identify, User Profiles, Super Properties, or Group Analytics correctly.
The result?
- Anonymous users everywhere
- Broken customer journeys
- Missing attribution data
- Duplicate user profiles
- Reports nobody trusts
The good news is that the Mixpanel GTM template exposes most of the Mixpanel JavaScript SDK directly inside Google Tag Manager.
You don’t need to write custom code for every action.
Instead, you simply choose the appropriate tag type and configure it inside GTM.
In this guide, you’ll learn:
- Which Mixpanel GTM tags you should use
- How each command works
- When to use them
- Common implementation mistakes
- My recommendations from real-world implementations
Before You Start
Before configuring any Mixpanel command, you need a Mixpanel Init tag.
Inside GTM:
Tags → New
Select:
Mixpanel → Init
Add:
- Project Token
- Data Residency Settings
- Optional Custom Configuration
Trigger:
Initialization – All Pages
Without an Init tag, none of the other Mixpanel tags will work.
Understanding How Mixpanel GTM Tags Work
Every Mixpanel GTM tag maps directly to a Mixpanel JavaScript SDK method.
For example:
| GTM Tag Type | Mixpanel SDK Method | Purpose |
| Track | track() | Sends events |
| Identify | identify() | Identifies users |
| Register | register() | Stores super properties |
| Reset | reset() | Clears user identity |
| People.Set | people.set() | Updates user profiles |
Think of GTM as a visual layer on top of the Mixpanel SDK.
Instead of writing JavaScript manually, GTM handles everything for you.
Step 1: Configure Event Tracking with the Track Tag
The Track tag is the most important Mixpanel command.
Every meaningful user action eventually becomes a Track event.
Examples:
signup_completed
trial_started
purchase_completed
feature_used
How to Create a Track Tag
Inside GTM:
Tags → New
Select:
Mixpanel → Track
Enter your event name:
purchase_completed
Add event properties:
{
revenue: 99,
currency: “USD”,
plan: “Pro”
}
Choose your trigger.
Example:
Purchase Success
Save and publish.
That’s it.
My Recommendation
Don’t create events for every click.
I’ve audited Mixpanel projects with hundreds of events like:
button_clicked
link_clicked
menu_clicked
footer_clicked
Very little business value.
Instead, track actions that matter.
Ask yourself:
If this event disappeared tomorrow, would anyone miss it?
If the answer is no, don’t track it.
Step 2: Track Page Views
If you’re running a content site, blog, or marketing website, you’ll probably want page view tracking.
Mixpanel includes a dedicated:
Track Pageview
tag.
How to Configure Track Pageview
Create a new tag.
Choose:
Mixpanel → Track Pageview
Trigger:
All Pages
Publish.
Mixpanel will automatically record page views.
When I Use It
I usually enable page view tracking for:
- Blogs
- Marketing websites
- Documentation portals
- Resource centers
When I Don’t
For SaaS applications, feature usage events are often more valuable than page views.
Step 3: Identify Logged-In Users
This is where most implementations improve dramatically.
Without Identify:
Anonymous User
↓
Visited Pricing
↓
Started Trial
↓
Used Product
With Identify:
Customer 12345
↓
Visited Pricing
↓
Started Trial
↓
Used Product
Now Mixpanel can connect the entire customer journey.
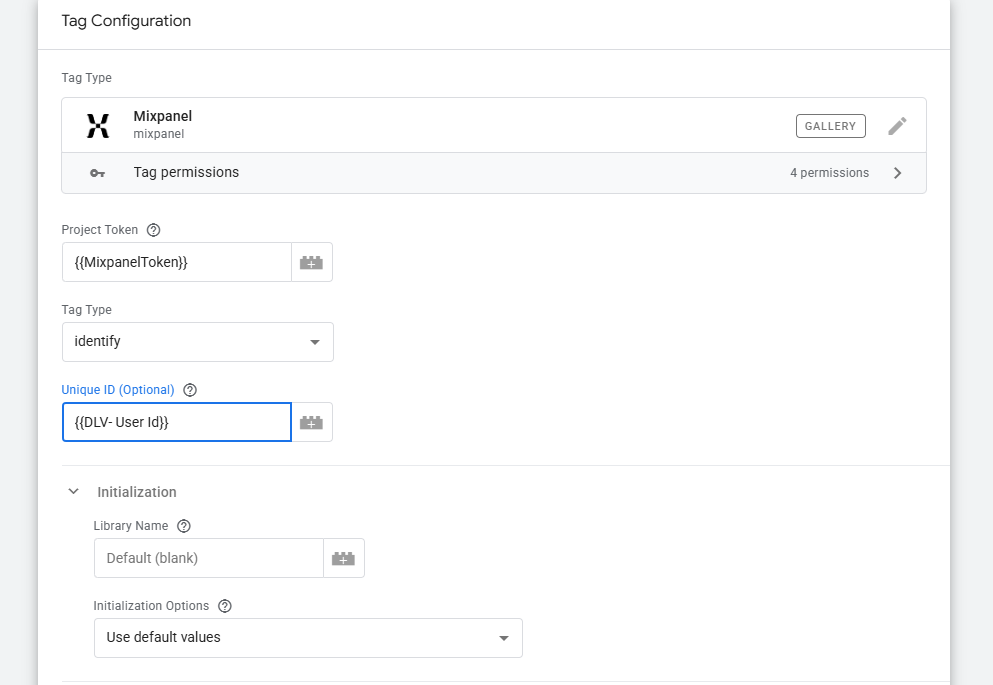
How to Configure Identify
Create a new tag.
Select:
Mixpanel → Identify
Provide:
user_id
from your GTM variable.
Example:
{{User ID}}
Trigger:
Login Success
or
Account Created
Important Recommendation
Use:
customer_id
user_id
account_id
Avoid using:
People change email addresses.
User IDs typically remain permanent.
Common Mistake
Waiting until payment to identify users.
I’ve seen SaaS companies do this.
Mixpanel knew who paid.
But it had no visibility into what happened before payment.
Identify users as soon as authentication succeeds.
Step 4: Store Attribution Data with Register
Register creates Super Properties.
Super Properties automatically attach themselves to future events.
Example
A visitor arrives from Google Ads.
Store:
{
utm_source: “google”,
utm_medium: “cpc”
}
Now every future event contains attribution information.
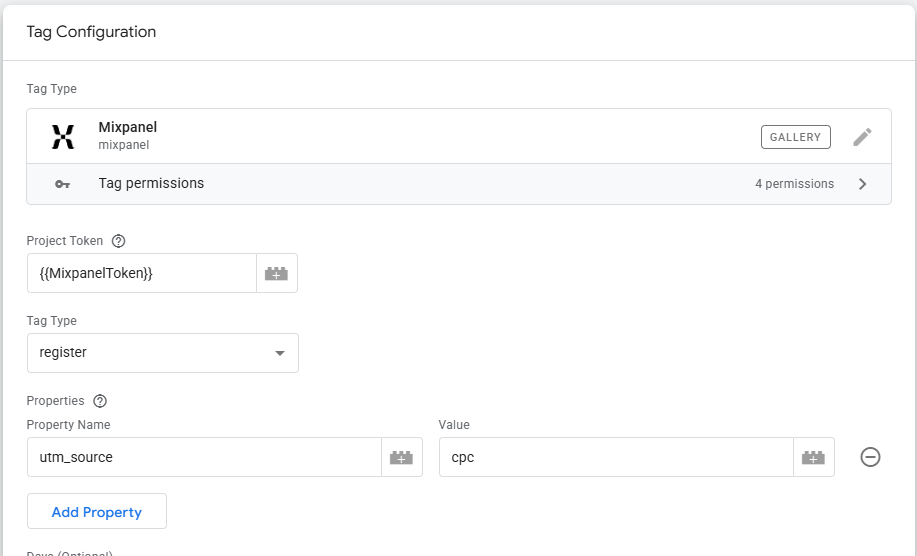
How to Configure Register
Create a tag.
Choose:
Mixpanel → Register
Add properties:
{
utm_source: {{utm_source}},
utm_medium: {{utm_medium}},
utm_campaign: {{utm_campaign}}
}
Trigger:
All Pages
or
First Page View
When I Use Register
- Campaign Attribution
- Landing Pages
- Marketing Channels
- Referral Sources
Common Mistake
Using Register for user profile data.
This is wrong:
{
plan: “Pro”,
company_size: “50”
}
These belong in User Profiles.
Not Super Properties.
Step 5: Preserve First-Touch Attribution with Register Once
Sometimes you only want to store a value once.
Example:
first_utm_source
If a user first arrived through Google Ads, you may want to preserve that forever.
That’s where Register Once comes in.
How to Configure Register Once
Create:
Mixpanel → Register Once
Store:
{
first_utm_source: {{utm_source}}
}
Unlike Register, future visits won’t overwrite the original value.
Step 6: Create User Profiles with People.Set
Tracking events is only half the story.
Mixpanel also supports user profiles.
Example:
{
plan: “Pro”,
country: “USA”,
industry: “SaaS”
}
Now you can build reports based on user attributes.
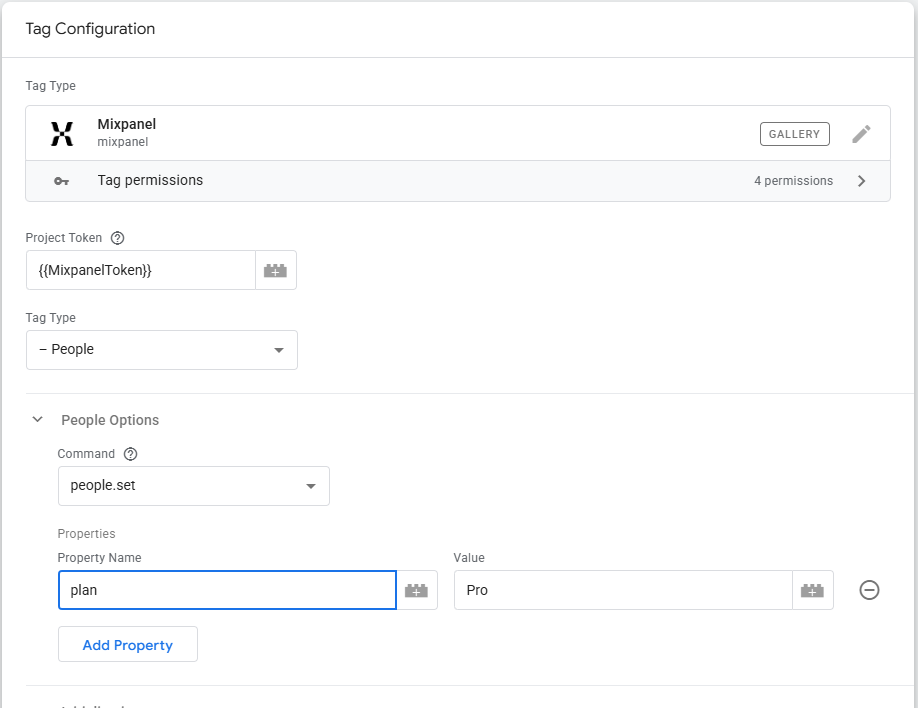
How to Configure People.Set
Create:
Mixpanel → People.Set
Add profile properties.
Trigger:
Signup Completed
or
Account Updated
When I Use It
- User Plans
- Company Information
- Subscription Status
- Customer Segments
My Recommendation
Only send properties you’ll actually use.
I frequently see user profiles with 50+ fields.
Most never appear in reports.
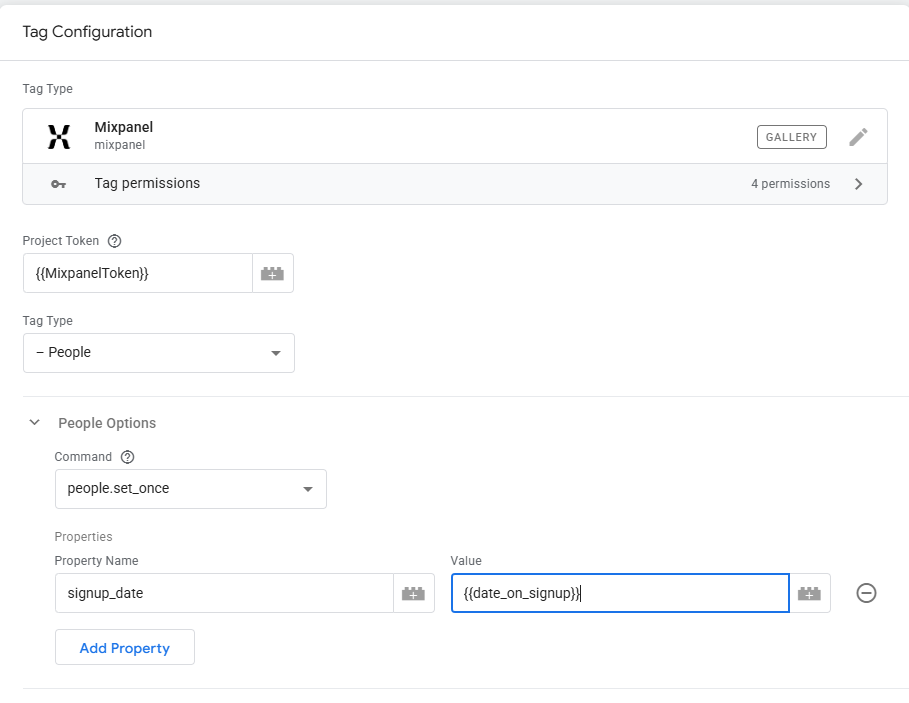
Step 7: Store Permanent Values with People.Set Once
Some profile properties should never change.
Examples:
signup_date
first_plan
first_campaign
For those properties:
Use:
Mixpanel → People.Set Once
This prevents accidental overwrites later.
Step 8: Increment Numeric User Properties
Mixpanel can automatically increase numeric values.
Example:
orders_count
Every purchase:
+1
How to Configure People.Increment
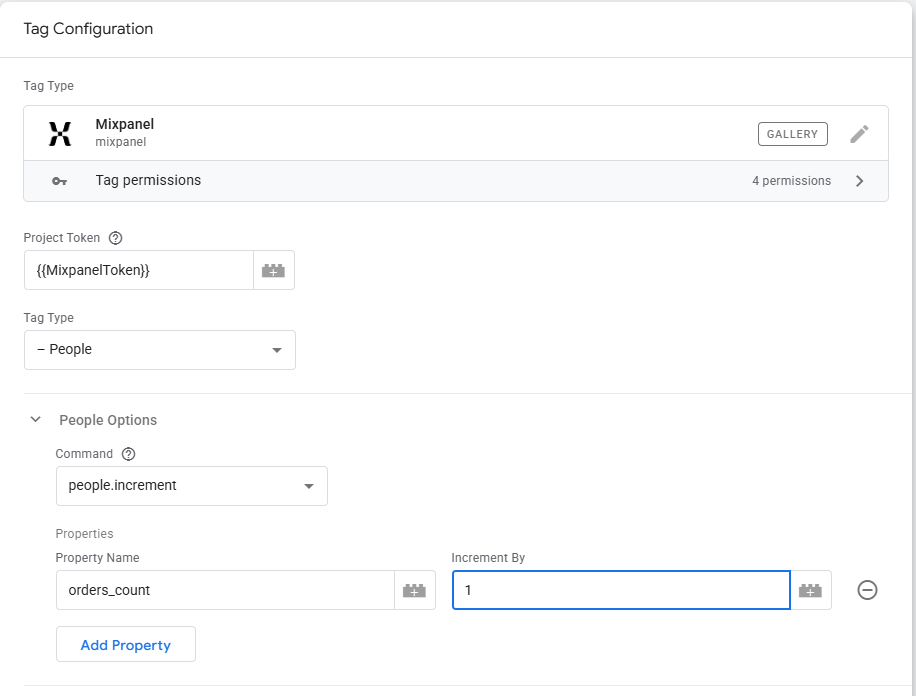
Create:
Mixpanel → People.Increment
Property:
orders_count
Increment:
1
Trigger:
Purchase Completed
Great Use Cases
- Orders Count
- Login Count
- Subscription Renewals
- Credits Used
Step 9: Configure Group Analytics for B2B Products
Most ecommerce stores won’t need this.
Most SaaS companies eventually will.
Group Analytics allows you to analyze:
Companies
Organizations
Workspaces
Accounts
instead of individual users.
Available Group Tags
| GTM Tag Type | Purpose |
| add_group | Add user to group |
| remove_group | Remove user from group |
| set_group | Assign user to group |
| group.set | Update group properties |
| group.set_once | Set group properties once |
| group.union | Merge group values |
| group.unset | Remove properties |
| group.remove | Remove list values |
Example
Instead of:
John used Feature A
Sarah used Feature A
Mike used Feature A
You can answer:
Acme Inc. used Feature A
That’s incredibly useful for B2B reporting.
When I Wouldn’t Use Group Analytics
If you’re running:
- Ecommerce
- Lead Generation
- Blogs
- Content Sites
You probably don’t need it.
Step 10: Reset Users on Logout
One of the most overlooked Mixpanel commands.
When users log out:
Create:
Mixpanel → Reset
Trigger:
Logout
Reset clears:
- User Identity
- Distinct ID
- Super Properties
Without Reset, multiple users can accidentally share the same profile.
Step 11: Measure Duration with Time Event
This command is massively underused.
Example
Start timing:
checkout_process
Later:
Track:
checkout_process
Mixpanel automatically calculates:
$duration
Now you know how long checkout took.
Great Use Cases
- Checkout Flows
- Onboarding
- Account Setup
- Form Completion
Step 12: Test Your Mixpanel Tags
Before publishing:
Open:
GTM Preview Mode
Perform:
- Logins
- Signups
- Purchases
- Form Submissions
Verify:
GTM
Tags fire correctly.
Browser Console
No JavaScript errors.
Mixpanel Live View
Events arrive successfully.
Event Properties
Values are populated correctly.
Never assume a tag works because GTM says it fired.
Always verify that Mixpanel received the event.
Troubleshooting Common Issues
My Mixpanel Tag Isn’t Firing
Check:
- Project Token
- Trigger Conditions
- Variables
- GTM Preview Mode
- Browser Console
Events Are Missing in Mixpanel
Verify:
- Correct Project Token
- Tags Are Firing
- Variables Return Values
- Ad Blockers Are Disabled
- Mixpanel Debug Mode Is Enabled
Does the GTM Template Work with Server Containers?
No.
The Mixpanel GTM template currently works only with Web Containers.
It does not support:
- Server Containers
- iOS Containers
- Android Containers
- AMP Containers
My Recommended Setup
If you’re implementing Mixpanel for the first time, focus on these commands:
Init
↓
Track
↓
Identify
↓
Register
↓
People.Set
↓
Reset
Those six commands power the majority of Mixpanel reporting.
Once they’re working properly, then explore:
- Group Analytics
- Session Replay
- Feature Flags
- Advanced Profile Operations
Most Mixpanel reporting problems aren’t caused by missing advanced features.
They’re caused by incorrect implementations of the fundamentals.