
Every Mixpanel project I’ve audited has the same story. It started clean. Someone built a solid tracking plan, events were named consistently, and for about six months everything made sense. Then the product expanded, a new engineer joined and didn’t know the conventions, a bot hit the site and flooded an event with garbage, and somewhere along the way a form field accidentally started sending email addresses as a property value.
Now it’s eighteen months later and the project is a mess. Analysts have stopped trusting half the events. The event dropdown has 400 entries and nobody knows what 200 of them do. And there’s a nagging compliance concern about that PII property that’s been sitting in the data for eight months.
Data clean-up in Mixpanel comes in two distinct flavors, and the tools for each are different. The first is routine maintenance — the kind of gradual cleaning you do when data accumulates noise over time. The second is incident response — when something acute goes wrong and you need to remove problematic data urgently. Mixpanel has specific tools for both, and knowing which to reach for in which situation saves you from making costly mistakes.
Part One: Cleaning Up Data That Gets Messy Over Time
This is the category most teams neglect until it becomes a crisis. The project didn’t break overnight. It just drifted — slowly enough that nobody noticed until the event list became genuinely unnavigable.
Step 1: Run a Lexicon Spot Check
The fastest way to assess the state of a Mixpanel project is to open Lexicon and sort the event list by two different columns, one after the other.
First, sort by 30-Day Volume descending. Look at your highest-volume events. Are they being queried? If an event is firing half a million times a month and nobody has queried it in 30 days, that’s your first candidate for blocking. Blocking stops ingestion going forward — no new events with that name will be stored. This matters especially on the events plan, where high-volume unused events are eating into your monthly utilization without providing any analytical value.
One thing to check before you block: does anything downstream depend on this event? Some teams have data pipelines pulling from Mixpanel into a warehouse. An event that nobody queries in the Mixpanel UI might still be feeding a downstream report or model. Confirm with your data engineering team before blocking anything that has significant volume.
If you confirm the event is genuinely unneeded in Mixpanel but still needed elsewhere, the right approach isn’t to block it and hope — it’s to stop sending it to Mixpanel entirely and route it directly to your warehouse instead. If you’re using Mixpanel’s JavaScript SDK and want to keep leveraging its ID management and default properties, you can proxy SDK traffic through your own domain and selectively filter which events reach Mixpanel versus which go to your warehouse.
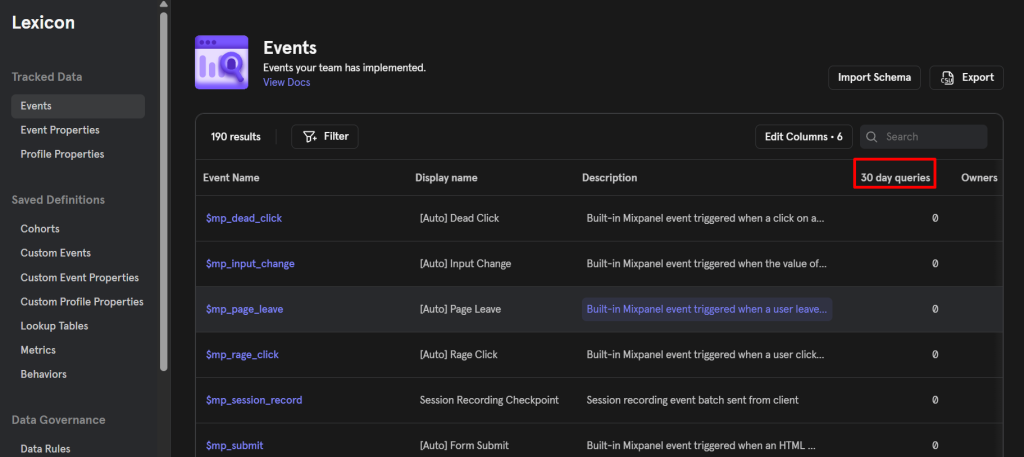
Second, sort by 30-Day Queries ascending. Zero-query events with ongoing volume are the clearest candidates for hiding or blocking. Zero-query events that also have near-zero volume are probably dormant and can be ignored.
Step 2: Clean Up Display Names and Add Descriptions
Every event that doesn’t have a description is a trap for the next analyst who joins your team. They’ll see ev_cta_v3_FINAL in the dropdown and have no idea whether it’s a button click, a form submission, or a deprecated test event from two years ago.
The most efficient way to fix this at scale is the export-edit-import cycle. Export your Lexicon as a CSV, open it in a spreadsheet, fill in display names and descriptions for every undocumented event, and import it back. You can update hundreds of events in one pass rather than clicking through each one individually in the UI.
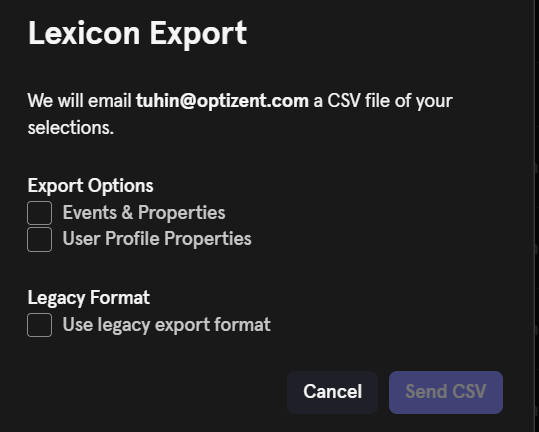
For events where the original database name is locked in legacy code and can’t be changed, set a clean Display Name that reflects what the event actually does. The underlying data stays as-is, but everyone working in Mixpanel reports sees the human-readable version.
If your team uses Figma for product design, some teams add Figma links directly into event descriptions — a link to the specific screen or component where the event fires. It sounds minor but it dramatically speeds up investigations when someone asks “where exactly does this trigger?”
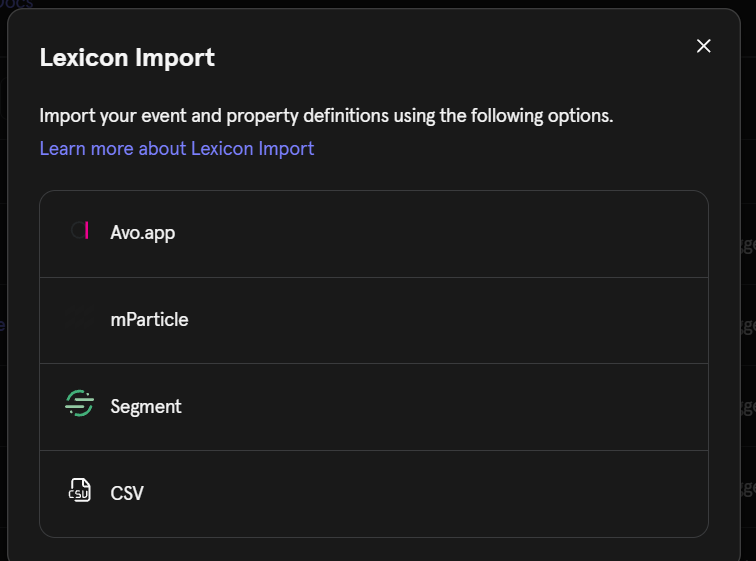
If you use Segment, mParticle, or Avo.app to manage your tracking plan, you can import your event names and descriptions from those tools directly into Lexicon rather than managing documentation in two places.
Step 3: Add Tags to Events
Tags let you organize events into meaningful categories — things like “checkout,” “onboarding,” “engagement,” “internal,” or “deprecated.” Once tagged, you can filter the Lexicon event list by tag rather than scrolling through a flat list of 400 events.
This is especially useful in multi-product or multi-team environments where different groups own different parts of the event taxonomy. A tag like “mobile-only” or “web-only” tells analysts at a glance which platform an event is relevant to without them needing to dig into the description.
Step 4: Use Custom Events to Combine Fragmented Events
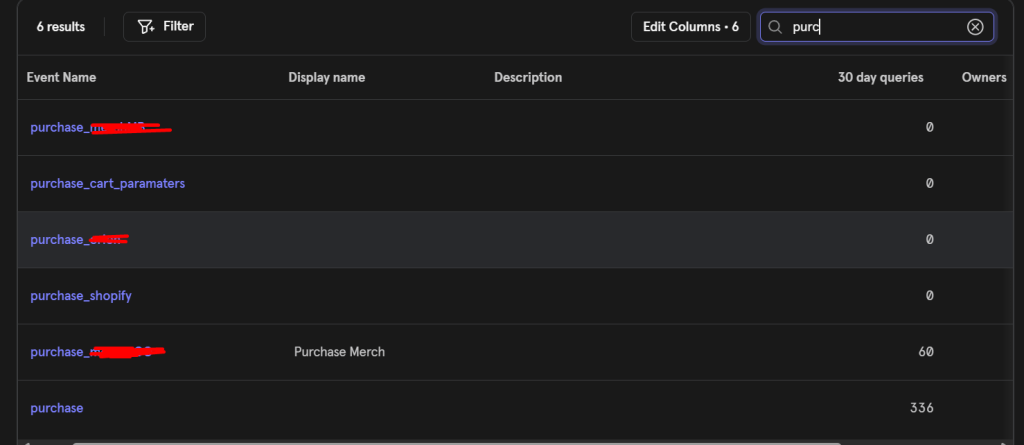
If your iOS app sends Purchase and your Android app sends purchase_item and your web app sends checkout_complete — and all three represent the same business action — you have two options: merge them in Lexicon, or create a Custom Event that combines them.
Custom Events are particularly useful when you want to keep the original events intact in the raw data but present a unified version for analysis. You define the custom event as “any of these three events” and analysts can use it in reports without having to remember to select all three every time.
Step 5: Clean Up Old User Profile Properties
Profile properties accumulate over time too. Properties that tracked a feature nobody uses anymore, test properties from a development sprint two years ago, or properties that were renamed and the old name left in place — these clutter the profile dropdown in the same way old events clutter the event list.
The way to remove these is through Mixpanel’s Engage API using the profile_delete_property endpoint, or through the people_unset method in the Mixpanel Utils library on GitHub. There’s no UI-based bulk property deletion for profiles, so this requires a bit of scripting — but it’s straightforward if you have a list of the properties you want to remove.
Part Two: Deleting Problematic Data
This is the incident response category. Something went wrong — a bot attack, a PII leak in a property value, duplicate events from an implementation bug, events sent with wrong timestamps — and you need to remove specific data from your Mixpanel project permanently.
Before reaching for the Data Deletion tool, it’s worth confirming you’re dealing with a scenario that actually warrants it. The decision table below covers the most common cases.
Use Data Deletion when:
- A bot attack sent spam events you can’t analyze around
- An implementation bug caused duplicate events to be ingested
- Events were sent with incorrect timestamps and you need to delete them before re-uploading with corrected ones
- You accidentally ingested PII — email addresses, phone numbers, payment data — in a property and have a legal obligation to remove it
Don’t use Data Deletion when:
- You just want to stop an event from appearing in the query builder — use Hiding in Lexicon instead
- You want to restrict certain users from seeing sensitive property data — use Data Classification instead
- You want to delete data tied to a specific user — use the Distinct ID Deletion API instead, because Data Deletion doesn’t support filtering by distinct ID
- The event is no longer relevant but there’s no urgency — blocking and hiding handle this without consuming your limited Data Deletion requests
Understanding the Constraints Before You Start
Data Deletion has hard limits worth knowing before you plan around it:
- You must be an Owner or Admin in the project
- The data you’re targeting cannot be older than 180 days (based on event time, not ingestion time)
- Your project must be under 5 billion events per month across the trailing 3 months
- You can submit a maximum of 10 deletion requests per calendar month
If your incident involves data older than 180 days, or if you’ve already used your monthly deletion requests, you’ll need to work with Mixpanel support directly.
How to Submit a Data Deletion Request
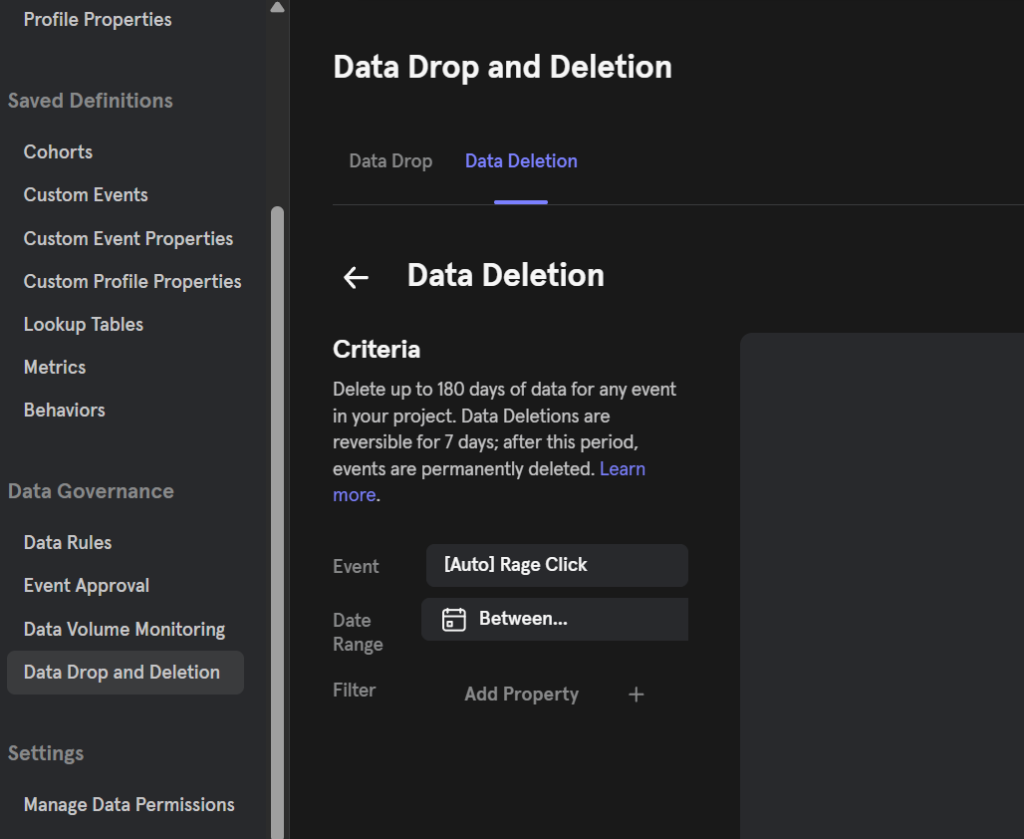
Navigate to Lexicon → Data Governance → Data Deletion and click “Request an Event Deletion.”
Walk through these steps:
- Select the event you want to delete
- Set the time range — this is event time, and it cannot go back more than 180 days
- Add event property filters if you only want to delete a subset of events with that name, not all of them. This is critical for surgical deletions — for example, if only events where
env = "test"should be deleted, or wherebot_flag = true, add those filters here rather than wiping the entire event - Review the preview carefully. The preview shows you what will be deleted before you confirm
- Submit the deletion request
After submission, two things happen simultaneously. First, the targeted data is immediately hidden from your project — analysts can’t see or query it during the review window. Second, a 7-day countdown starts before the deletion becomes permanent.
That 7-day window is your safety net. If you review the impact and realize the filters were wrong, or the time range was too broad, you can undo the request within those 7 days. After day 7, the deletion is permanent and irreversible.
How to Undo a Deletion Request
Go back to Lexicon → Data Governance → Data Drop And Deletion, find the deletion request in the table, and click the Undo button in the Deletion Data column. This must be done within 7 days of submission. After that, there is no undo.
If You Need to Re-Import Data After Deletion (The ETL Approach)
Sometimes the right workflow after deleting problematic data is to clean it up and re-import the corrected version — for example, when you had events with wrong timestamps, or when you deleted events containing PII and need to reimport them with that property stripped out.
Two things to know before you do this:
If your project was created before January 1, 2023, your data is stored in project time and you’ll need to adjust timestamp offsets before reimporting. You can’t just clean the data and send it back with the same timestamps — the offset calculation is a required step.
Regenerate your $insert_id values when you reimport. Mixpanel uses $insert_id for deduplication. When you submit a deletion request, the data enters a “soft deleted” state — hidden but not yet permanently gone. If you reimport events with the same $insert_id values while the original data is in soft deletion, Mixpanel’s deduplication system may retain the old soft-deleted event and discard your new import. Regenerating $insert_id values for all reimported events avoids this collision.
What About Deleting Specific Properties, Not Entire Events?
Property deletion isn’t currently supported natively in the Data Deletion tool. If you need to remove a specific property from an event while keeping the rest of the event data, the path is an ETL workflow:
- Run a raw export of the affected event
- Delete the original event data using Data Deletion
- Transform the exported data — remove the problematic property
- Reimport the cleaned data under a slightly different event name
- Hide the original event name in Lexicon
It’s not elegant, but it works. Refer to the ETL reminders above about timestamp offsets and $insert_id regeneration before you start.
Part Three: Drop Filters
Drop Filters solve a different problem than Data Deletion. Where Data Deletion addresses data that’s already in your project, Drop Filters prevent unwanted data from being ingested in the first place.
Think of Drop Filters as a gate at ingestion. Events matching your filter rules are dropped the moment they arrive — never stored, never queryable, never counted against your event volume. This is the right tool when you have an ongoing problem rather than a one-time incident.
Common scenarios where Drop Filters are the right answer:
- Staging or test environment events leaking into your production Mixpanel project
- A high-volume internal event that fires constantly but has zero analytical value
- A specific bot signature that keeps sending events even after you tried blocking them
- Events from a specific property value — an internal user flag, a test account identifier — that you never want stored
Understanding What Drop Filters Can and Can’t Target
Every Drop Filter requires three components: an event name, at least one event property, and one or more values for that property. Filtering by event name alone is not supported — you must narrow to specific property values.
This means Drop Filters are designed for surgical removal of a subset of an event, not wholesale event blocking. If you want to drop an entire event with no property filtering, use Lexicon to mark it as Blocked instead — that’s the right tool for that job. In Lexicon, blocked events show a status of Blocked, while events narrowed by a Drop Filter show a status of Filtered.
You can combine multiple property conditions within a single filter to get as precise as you need. For example: drop page_view events where environment = "staging" AND user_type = "internal".
How to Create a Drop Filter
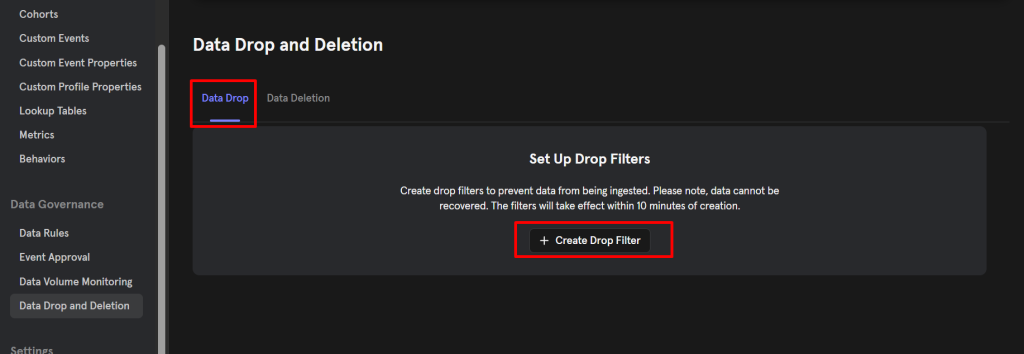
Only project Owners can create Drop Filters — not Admins. Navigate to Lexicon → Data Governance → Data Drop and Deletion and click Create Drop Filter.
- Select the event you want to filter
- Add one or more property and value conditions
- Review the filter carefully — dropped events cannot be recovered
- Save the filter
The filter takes effect on newly ingested events within about 10 minutes of creation. It has no effect on data already in your project. If you need to remove existing data that matches your filter, you’ll need a separate Data Deletion request for the historical data.
Removing a Drop Filter
When you no longer need the filter — the staging environment is fixed, the bot stopped, the internal events are now being properly excluded at the source — go back to Lexicon → Data Governance → Data Drop and Deletion, find the filter in the list, and delete it. Events sent after deletion resumes normal ingestion.
One thing to know: deleting a Drop Filter doesn’t recover any events that were dropped while it was active. Those events are gone. If you need them for historical analysis, you’ll need to re-send them to Mixpanel.
Drop Filters and Billing
Dropped events are discarded at ingestion and do not count toward your monthly event volume. This makes Drop Filters particularly useful if you have a high-volume noise source — a staging environment, a monitoring script, an internal health check event — that’s inflating your event count without any analytical benefit.
Choosing the Right Tool for the Job
These three tools — Lexicon cleanup, Data Deletion, and Drop Filters — cover the full spectrum of data clean-up scenarios but they’re not interchangeable. Here’s the quick decision logic:
The data is messy but not wrong: Use Lexicon. Hide stale events, add descriptions, block high-volume unused events, tag things properly, clean up profile properties via the Engage API. This is routine maintenance.
Something went wrong and bad data is already in the project: Use Data Deletion. Bot traffic, duplicate events, PII in a property, wrong timestamps. Submit a targeted deletion request with property filters, review the preview carefully, and use the 7-day undo window if you catch a mistake.
Something is still coming in and you need to stop it now: Use Drop Filters. Staging events leaking into production, ongoing bot traffic, internal events you never should have been sending. Create a filter targeting the specific event and property values you want to block. It’s active within 10 minutes.
You want to stop a full event from ever coming in again: Block it in Lexicon. No Drop Filter needed — the Blocked status in Lexicon handles this at the event name level.
Summary
Data clean-up isn’t a one-time project. It’s a recurring operational task that reflects how seriously your organization takes its analytics infrastructure. The teams I’ve seen maintain the cleanest Mixpanel projects are the ones who treat Lexicon as a living document, who have a process for responding to data incidents rather than discovering them three months later, and who use Drop Filters proactively before noise accumulates rather than reactively after it already has.
Start with the Lexicon spot check if you haven’t done one in a while. The sort-by-volume and sort-by-queries exercise takes ten minutes and will immediately show you where your biggest clean-up opportunities are. From there, the right tool for each problem will be clear.