
Proper user identification allows Mixpanel to connect events across sessions, devices, and user journeys, giving you a complete picture of how people interact with your product.If every visitor remains anonymous, you’ll only see disconnected events.
You’ll know that someone signed up.
Someone started a trial.
Someone made a purchase.
But you won’t know whether it was the same person.
That’s where user identification comes in.
Why User Identification Matters
Imagine a user visits your website for the first time.
They:
- Read your pricing page
- Browse product features
- Leave without signing up
Three days later, they return.
This time they:
- Create an account
- Start a free trial
- Complete onboarding
A week later, they:
- Upgrade to a paid plan
Without user identification, Mixpanel sees these as separate interactions.
With proper identification, Mixpanel connects everything into a single customer journey.
Now you can answer questions like:
- What content influenced conversions?
- Which onboarding steps drive activation?
- What actions predict upgrades?
- Which acquisition channels produce the highest-value customers?
This is why identification is one of the most important parts of any Mixpanel implementation.
Understanding Anonymous Users
Before users log in or create an account, Mixpanel automatically assigns them a random identifier.
This allows Mixpanel to track activity such as:
- Page views
- Button clicks
- Product interactions
- Form submissions
Even though the user is anonymous, their activity is still recorded.
For example:
Page Viewed
Pricing Page Viewed
CTA Clicked
All of these events are tied to a temporary anonymous profile.
Once the user authenticates, Mixpanel can connect this anonymous history to their permanent profile.
This creates a seamless view of the entire customer journey.
Understanding Identified Users
An identified user is someone who has been assigned a permanent unique identifier.
Examples include:
- User ID
- Customer ID
- Account ID
- Member ID
When Mixpanel receives this identifier, it knows exactly which user performed future actions.
Instead of tracking anonymous activity only, Mixpanel can now associate events with a real customer profile.
For example:
User ID: 12345
Events:
Sign Up Completed
Trial Started
Project Created
Subscription Purchased
Now every event belongs to the same user.
This makes funnels, retention reports, and lifecycle analysis significantly more accurate.
What Is the Identify Function?
The Identify function tells Mixpanel:
“This user is no longer anonymous. Associate future activity with this unique ID.”
In Google Tag Manager, the Identify tag performs this action.
Once triggered, Mixpanel updates the user’s identity and links future activity to that profile.
Think of Identify as the bridge between anonymous browsing and known customer behavior.
When Should You Identify Users?
One of the most common implementation mistakes is identifying users too late.
Many teams wait until a purchase occurs.
Others wait until onboarding is complete.
In most cases, identification should happen as soon as a user authenticates.
Common triggers include:
- Account Created
- Sign Up Completed
- Login Successful
- Authentication Completed
The earlier you identify users, the more complete your customer journey data becomes.
Finding the Right User ID
Before setting up identification in GTM, you need a stable user identifier.
Good examples:
user_id
customer_id
account_id
member_id
Poor examples:
full_name
first_name
User IDs should be:
- Unique
- Stable
- Permanent
A customer may change their email address.
A user ID typically remains unchanged.
That’s why internal IDs are generally preferred.
Passing User IDs Through the Data Layer
The easiest way to identify users in GTM is through the data layer.
When a user logs in, your website can push their ID into GTM.
Example:
dataLayer.push({
event: “user_login”,
user_id: “12345”
});
Now GTM has access to the user ID.
You can create a Data Layer Variable that captures:
user_id
This variable can then be used inside Mixpanel tags.
Using the data layer creates a cleaner and more scalable implementation than hardcoding values.
Creating a User ID Variable in GTM
Inside GTM:
Navigate to:
Variables → New
Choose:
Data Layer Variable
Configure:
Variable Name = user_id
Save the variable.
You can now reference this variable throughout your Mixpanel implementation.
This approach keeps identification centralized and easier to maintain.
Creating the Mixpanel Identify Tag
Once your User ID variable is available, create a new Mixpanel tag.
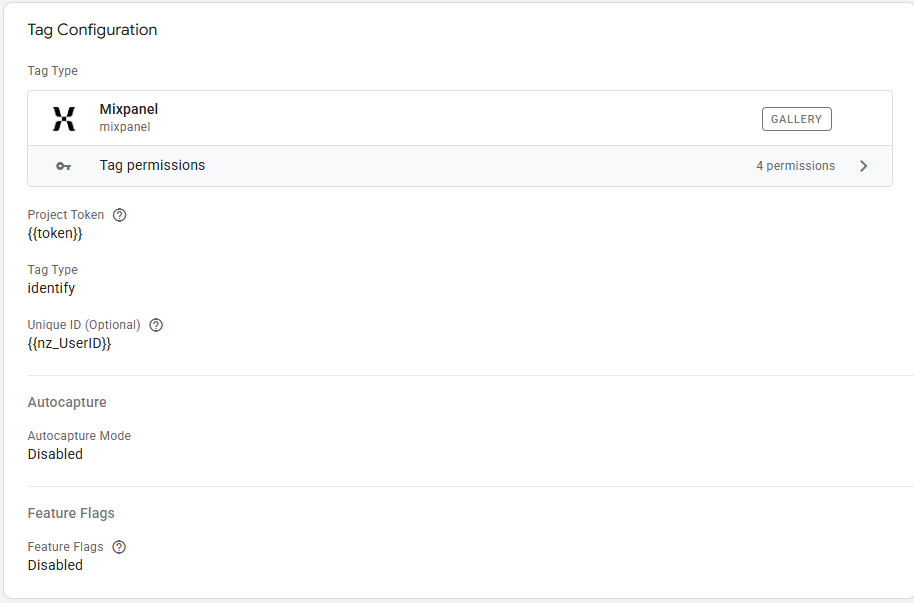
Choose:
Mixpanel Template
For Tag Type select:
identify
For Distinct ID:
Select your GTM variable:
{{user_id}}
This tells Mixpanel which user should be associated with future events.
Choosing the Right Trigger
The Identify tag should fire when authentication succeeds.
Examples:
Login Success
event = login_success
Account Created
event = signup_completed
Authentication Event
event = user_authenticated
Avoid firing Identify on every page load.
Only trigger it when you’re confident the user has been authenticated.
Verifying Identification Is Working
After configuring the tag, open GTM Preview Mode.
Complete a login or signup flow.
Verify:
- The Identify tag fired
- The correct user ID was passed
- No GTM errors occurred
Next, open Mixpanel.
Navigate to:
Users
Search for the user.
You should see:
- The user profile
- Associated events
- Historical activity
This confirms identification is working correctly.
Creating User Profiles
Identifying users is only the first step.
The next step is enriching their profiles with useful information.
Mixpanel supports user profile properties through People tags.
Examples include:
- Name
- Company
- Subscription Plan
- Industry
- Country
A profile might look like:
{
“plan”: “Pro”,
“industry”: “SaaS”,
“country”: “United States”
}
This allows you to build cohorts and segmentation reports based on user attributes.
Identify vs People.Set
This is one of the most common areas of confusion.
Identify
Associates future activity with a specific user.
Example:
User ID = 12345
People.Set
Adds information to that user’s profile.
Example:
{
“plan”: “Enterprise”,
“country”: “Canada”
}
You typically use both together.
Identify tells Mixpanel who the user is.
People.Set describes the user.
Common User Properties Worth Tracking
Depending on your business, useful properties might include:
SaaS Products
- Plan Type
- Trial Status
- Account Size
- Industry
Ecommerce
- Customer Tier
- Lifetime Value
- Country
B2B Products
- Company Name
- Employee Count
- Subscription Level
Avoid collecting unnecessary information.
Focus on attributes that will actually help with analysis.
Common Identification Mistakes
Using Email as Distinct ID
Emails can change.
Internal IDs are usually more reliable.
Identifying Users Too Late
Waiting until checkout or purchase often means losing valuable journey data.
Multiple User IDs
Avoid situations where different systems use different identifiers for the same user.
Consistency is critical.
Missing Login Events
If identification only occurs during signup, returning users may not be identified properly.
Ensure login flows also trigger identification.
Failing to Test
Always verify identity stitching before publishing changes.
Identity issues are much harder to fix after data has already been collected.
How Identification Improves Analysis
Once users are properly identified, Mixpanel becomes significantly more powerful.
You can build reports that answer questions such as:
- Which marketing channels create the highest-value users?
- What actions predict subscription upgrades?
- Which onboarding steps improve retention?
- How do enterprise customers behave differently from free users?
Without identification, these insights are difficult—or impossible—to generate.
Recommended Identification Workflow
For most businesses, a simple workflow works best:
- Track anonymous visitors.
- Capture user IDs after authentication.
- Fire Identify.
- Update profile properties using People.Set.
- Continue tracking user activity.
This structure keeps your implementation clean while ensuring customer journeys remain connected.
Build User-Centric Analytics
The real power of Mixpanel comes from understanding people, not just events.
Page views, button clicks, and purchases become much more valuable when they can be tied back to individual users and customer journeys.
By implementing Identify correctly through Google Tag Manager, you’ll create a foundation for more accurate funnels, stronger retention analysis, better user segmentation, and deeper product insights.
For many Mixpanel implementations, proper identity management is the difference between collecting data and actually understanding customers.