
Events like,
- Button Click
- Link Click
- Form Submit
- User Action
might tell you that something happened, but they rarely tell you anything useful about your business.
The real value of product analytics comes from tracking meaningful user actions.
Questions like:
- How many users completed onboarding?
- How many visitors started a free trial?
- Which CTA drives the most signups?
- What actions lead to purchases?
- Which features increase retention?
can only be answered if you’re tracking the right events.
The good news is that if you’re already using Google Tag Manager, creating custom Mixpanel events is relatively straightforward.
In this guide, you’ll learn how to create custom Mixpanel events using GTM, pass event properties, structure event names correctly, and avoid common implementation mistakes.
What Is a Custom Event in Mixpanel?
A custom event represents a meaningful action performed by a user.
Unlike automatically collected data, custom events are designed around your business goals and customer journey.
Examples include:
- Sign Up Completed
- Trial Started
- Product Viewed
- Checkout Started
- Purchase Completed
- File Uploaded
- Team Member Invited
These events help transform raw activity into business insights.
For example, knowing that a user clicked a button isn’t particularly useful.
Knowing that a user completed onboarding is much more valuable.
That’s why event design matters.
Before Creating Events, Define Your Tracking Plan
The easiest ways to create a messy analytics implementation is to start tracking events without a plan.
Before opening GTM, spend a few minutes answering these questions:
What are your key business goals?
Examples:
- Generate leads
- Increase subscriptions
- Improve retention
- Drive purchases
What actions indicate success?
Examples:
- Account Created
- Trial Started
- Purchase Completed
- Feature Activated
What user actions matter most?
Focus on actions that move users closer to business outcomes.
Not every click deserves its own event.
A good rule of thumb is:
If the action wouldn’t appear in a business report, it probably doesn’t need its own event.
Understanding Event Structure
Every Mixpanel event contains two parts:
Event Name
This describes what happened.
Examples:
signup_completed
trial_started
purchase_completed
Event Properties
These provide additional context.
Example:
{
“plan”: “Pro”,
“price”: 99,
“billing_cycle”: “monthly”
}
The event tells Mixpanel what happened.
The properties explain the details.
Most of your reporting power comes from combining these two pieces together.
Creating Your First Custom Event in GTM
Let’s walk through a practical example.
Imagine you want to track when users click your “Start Free Trial” button.
Step 1: Create a Trigger
In GTM:
Navigate to:
Triggers → New
Choose:
Click – All Elements
Configure the trigger to fire only when your trial button is clicked.
For example:
Click Text equals Start Free Trial
or
Click ID equals trial-button
The goal is to ensure the trigger fires only when the desired action occurs.
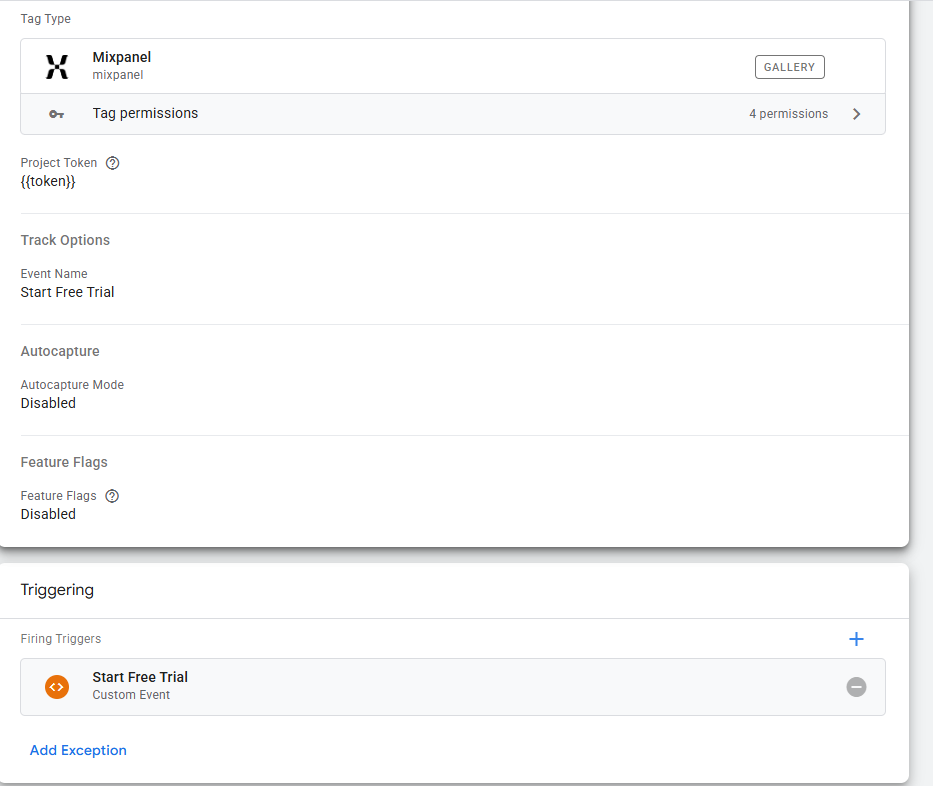
Step 2: Create a Mixpanel Track Tag
Create a new tag.
Choose:
Mixpanel Template
For Tag Type select:
Track
This is the most commonly used Mixpanel tag in GTM.
Choosing the Right Event Name
The event name should clearly describe the user action.
Good examples:
trial_started
signup_completed
checkout_started
purchase_completed
Poor examples:
button_clicked
cta_clicked
event_1
conversion
Imagine another analyst looking at your data six months from now.
Would they immediately understand what happened?
If not, rename the event.
Descriptive event names make analysis much easier.
Adding Event Properties
This is where many implementations become powerful.
Instead of only tracking:
trial_started
you can add valuable context.
Examples:
{
“plan”: “Pro”,
“page”: “Pricing”,
“source”: “Homepage CTA”
}
Now you can answer questions like:
- Which plan generates the most trial starts?
- Which page drives the most conversions?
- Which CTA performs best?
Properties often provide more insight than the event itself.
Examples of Useful Event Properties
SaaS Products
For Trial Started:
{
“plan_type”: “Pro”,
“billing_frequency”: “Monthly”
}
For User Invited:
{
“team_size”: 5
}
Ecommerce Stores
For Product Viewed:
{
“product_name”: “Running Shoes”,
“category”: “Footwear”
}
For Purchase Completed:
{
“revenue”: 120,
“currency”: “USD”
}
Lead Generation Sites
For Form Submitted:
{
“form_name”: “Contact Form”,
“service_interest”: “Analytics Consulting”
}
These properties allow you to create deeper reports later.
Tracking Form Submissions
Forms are often one of the most important conversion points on a website.
Examples:
- Contact forms
- Demo requests
- Newsletter signups
- Lead generation forms
Create a Form Submission trigger in GTM.
Then create a Mixpanel Track tag.
Event example:
demo_requested
Properties:
{
“form_type”: “Enterprise Demo”
}
Now you’ll know exactly how many qualified leads are entering your pipeline.
Tracking CTA Clicks
Marketing teams often want to understand which calls-to-action drive conversions.
Instead of tracking every button click separately, use properties.
For example:
Event:
cta_clicked
Properties:
{
“cta_name”: “Start Free Trial”,
“location”: “Homepage Hero”
}
This keeps your event structure clean while preserving important context.
Tracking Ecommerce Events
If you’re running an ecommerce business, focus on key shopping milestones.
Recommended events:
product_viewed
add_to_cart
checkout_started
purchase_completed
For purchase events, always include:
{
“product_name”: “Product A”,
“revenue”: 99,
“quantity”: 1
}
Without revenue properties, your ecommerce analysis will be limited.
Using Data Layer Variables
The best Mixpanel implementations rely heavily on the data layer.
Instead of hardcoding values inside GTM, push information from your website.
Example:
dataLayer.push({
event: “purchase_completed”,
revenue: 99,
plan_type: “Pro”
});
Then create GTM variables to capture these values.
Benefits include:
- Cleaner implementation
- Better scalability
- Easier maintenance
- Improved accuracy
If you’re planning a long-term analytics strategy, using the data layer is strongly recommended.
Testing Your Events
Before publishing anything, always test.
Open:
GTM Preview Mode
Trigger the event.
Verify:
- Trigger fired correctly
- Mixpanel tag fired
- Event properties populated
- No JavaScript errors occurred
Afterward, check Mixpanel’s Live View or Events section to confirm data is arriving.
Never assume tracking is working simply because the GTM tag fired.
Always validate inside Mixpanel.
Common Event Tracking Mistakes
Tracking Every Click
Not every interaction deserves an event.
Focus on actions that matter.
Inconsistent Naming
Avoid:
Signup Complete
signup_completed
SignUp
Choose one naming convention and stick to it.
Missing Properties
Properties provide context.
Without them, analysis becomes much more limited.
Generic Events
Events like:
button_clicked
usually don’t provide much value.
Make events meaningful.
Skipping QA
Always test before publishing.
Most analytics problems originate during implementation rather than reporting.
Recommended Events for Most Businesses
If you’re unsure where to start, these events work well for many websites and products.
SaaS
signup_completed
trial_started
onboarding_completed
subscription_started
subscription_upgraded
Ecommerce
product_viewed
add_to_cart
checkout_started
purchase_completed
Lead Generation
contact_form_submitted
demo_requested
ebook_downloaded
newsletter_subscribed
Start small.
You can always expand later.
Build Around Business Outcomes
The best event tracking strategy isn’t about collecting more data.
It’s about collecting the right data.
Every event should help answer an important business question.
Before creating a new event, ask:
“What decision will this event help us make?”
If you can’t answer that question, you probably don’t need the event.
When implemented correctly, custom Mixpanel events become the foundation of funnels, retention reports, user journeys, cohort analysis, and conversion optimization.
That’s why spending time designing your events properly is one of the highest-impact investments you can make in your analytics implementation.