
If you’re already using Google Tag Manager (GTM), the last thing you want is another JavaScript snippet added directly to your website.That’s one reason many teams choose to implement Mixpanel through GTM.Instead of asking developers to deploy tracking updates every time you want to create a new event, GTM allows marketers, analysts, and product teams to manage much of the implementation themselves.
The process has become even easier thanks to Mixpanel’s native Google Tag Manager template.
In this guide, you’ll learn how to install Mixpanel in GTM, configure your first tags, track page views and events, identify users, and verify that everything is working correctly.
Why Use Google Tag Manager With Mixpanel?
Before jumping into the setup, it’s worth understanding why so many teams choose GTM for Mixpanel implementations.
Without GTM, every tracking update often requires:
- Developer resources
- Website deployments
- QA testing
- Release cycles
That can quickly slow down analytics projects.
With GTM, you can:
- Deploy tracking faster
- Create new events without code releases
- Manage tracking centrally
- Test changes before publishing
- Maintain greater control over analytics implementation
For organizations with marketing, analytics, and product teams, GTM significantly reduces the friction involved in tracking user behavior.
How the Mixpanel GTM Integration Works
The Mixpanel GTM template brings much of the functionality of the Mixpanel JavaScript SDK directly into Google Tag Manager.
Instead of manually writing JavaScript code, you can use predefined Mixpanel tags inside GTM.
These tags correspond to common Mixpanel functions such as:
- Track events
- Track page views
- Identify users
- Create user profiles
- Register properties
- Manage groups
- Configure session replay
- Enable feature flags
When a Mixpanel tag fires, the template automatically initializes Mixpanel if it hasn’t already been initialized on the page.
This means you don’t need to worry about manually loading the SDK before every tag.
Before You Begin
Before setting up Mixpanel inside GTM, make sure you have:
- A Mixpanel account
- A Mixpanel project
- Access to Google Tag Manager
- Publish permissions in GTM
- Your Mixpanel Project Token
You can find your Project Token inside your Mixpanel project settings.
Keep it handy because you’ll need it during setup.
Step 1: Install the Mixpanel GTM Template
The easiest way to install Mixpanel is through the Google Tag Manager Community Template Gallery.
Inside GTM:
- Navigate to Templates
- Under Tag Templates click Search Gallery
- Search for Mixpanel
- Select the official Mixpanel template
- Add it to your container
Once installed, Mixpanel becomes available alongside your other GTM tag templates.
This is generally preferred over manually importing templates because you’ll receive future template updates more easily.
Step 2: Create Your Mixpanel Initialization Tag

The initialization tag is the foundation of your implementation.
Although Mixpanel automatically attempts initialization when tags fire, creating a dedicated initialization tag provides greater control and consistency.
Create a new tag and select the Mixpanel template.
For Tag Type, choose:
init
Next, enter your:
- Project Token
- Data Residency configuration (if applicable)
- Additional initialization settings
For most implementations, your Project Token is all that’s required initially.
Step 3: Configure Your Trigger
The initialization tag should fire as early as possible.
Recommended triggers include:
- Initialization – All Pages
- Consent Initialization – All Pages
This ensures Mixpanel loads before your tracking events begin firing.
If your site uses a consent management platform, Consent Initialization is often the better option because it allows consent handling before analytics execution.
Step 4: Track Page Views
Once initialization is complete, the next step is tracking page views.
Create another Mixpanel tag.
For Tag Type select:
Track Pageview
This automatically sends Mixpanel’s page view event whenever the tag fires.
Attach an:
All Pages
trigger.
After publishing, every page load will generate a Mixpanel page view event.
While page views aren’t always the most important metric in product analytics, they provide useful context for user journeys and navigation analysis.
Step 5: Verify Events Are Reaching Mixpanel
Before creating additional tracking, verify your setup.
Open GTM Preview Mode.
Visit your website.
Check:
- The initialization tag fired
- The page view tag fired
- No GTM errors occurred
Next, open Mixpanel and navigate to:
Events
You should begin seeing page view events arriving.
If data isn’t appearing:
- Confirm the Project Token is correct
- Verify triggers are firing
- Disable ad blockers during testing
- Enable Mixpanel debug mode
It’s much easier to troubleshoot early than after dozens of events have been added.
Step 6: Create Your First Custom Event
Page views are useful, but product analytics becomes powerful when you track meaningful user actions.
Examples include:
- Sign Up
- Login
- Add To Cart
- Purchase
- Trial Started
- Form Submitted
- Subscription Upgraded
Let’s create a button click event.
Inside GTM:
- Create a Click Trigger
- Select the target button
- Create a new Mixpanel tag
- Choose Tag Type: Track
For Event Name, enter something descriptive:
signup_button_clicked
Avoid generic names like:
button_click
Specific event names make reporting significantly easier later.
Event Naming Best Practices
One of the most common mistakes in analytics implementations is inconsistent naming.
Good examples:
signup_completed
purchase_completed
trial_started
checkout_started
Poor examples:
Button Click
Event 1
User Action
Clicked CTA
Try to use action-oriented names that clearly describe what happened.
Consistency becomes increasingly important as your tracking grows.
Step 7: Add Event Properties
Events become far more valuable when accompanied by context.
Mixpanel allows you to attach properties to every event.
For example:
Event:
purchase_completed
Properties:
{
“product”: “Pro Plan”,
“price”: 99,
“billing_cycle”: “monthly”
}
Now you can analyze:
- Revenue by product
- Revenue by billing cycle
- Conversion by plan type
Whenever possible, include useful context that may help future analysis.
One of the biggest mistakes teams make is only tracking event names and forgetting properties.
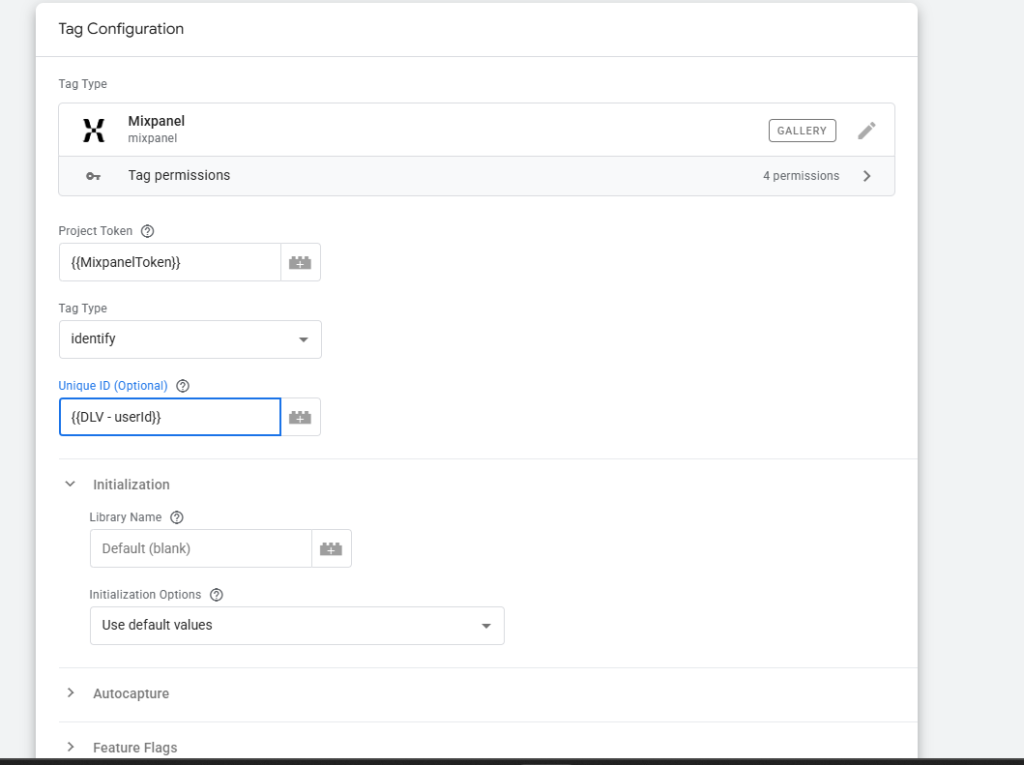
Step 8: Identify Logged-In Users
Initially, Mixpanel tracks anonymous visitors.
However, product analytics becomes much more powerful when users are identified.
Create a new Mixpanel tag.
Select:
identify
Pass your user ID variable from GTM.
Examples:
user_id
customer_id
account_id
Avoid using email addresses as your primary identifier whenever possible.
Stable internal IDs are generally safer and more scalable.
Once identification occurs, Mixpanel can connect user activity across sessions and devices.
This allows you to build complete customer journeys instead of analyzing isolated visits.
Step 9: Create User Profiles
After identifying users, you can enrich their profiles.
Create a Mixpanel tag:
people.set
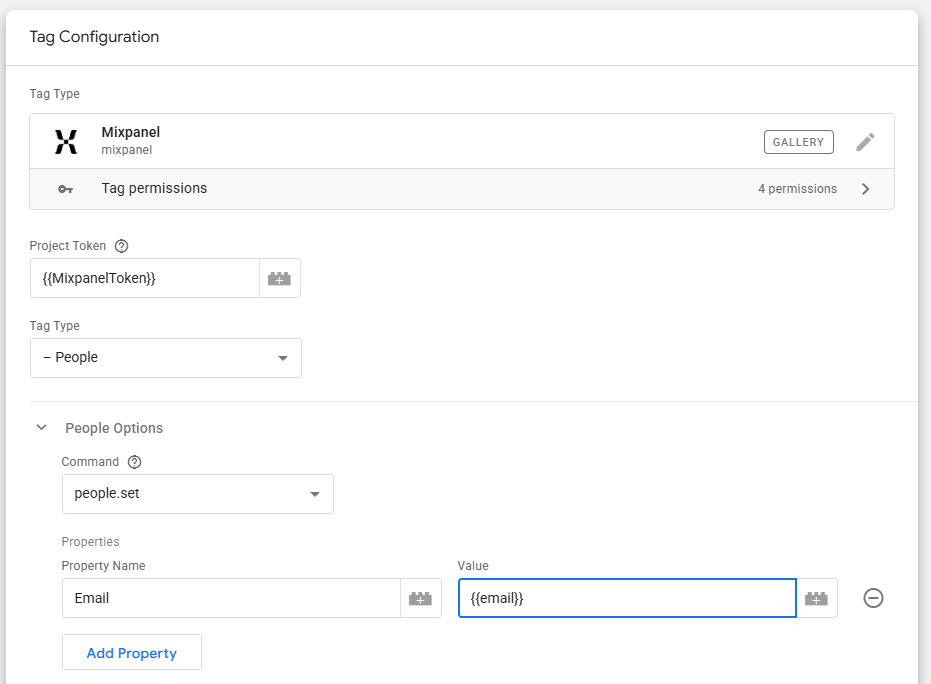
Common profile properties include:
- Name
- Plan Type
- Company
- Industry
- Country
For example:
{
“plan”: “Pro”,
“company_size”: “50-100”,
“country”: “United States”
}
These properties become extremely useful when building cohorts and segmentation reports.
Step 10: Enable Debug Mode
Before publishing to production, enable Mixpanel Debug Mode.
Inside your initialization tag:
Add:
debug = true
This displays useful logging information in the browser console.
Debug mode helps verify:
- Events firing correctly
- Properties being attached
- User identification working properly
It’s one of the easiest ways to troubleshoot implementation issues.
Common GTM and Mixpanel Mistakes
Using Different Project Tokens
One incorrect character in a Project Token can send data to the wrong project.
Always verify you’re working with the correct environment.
Identifying Users Too Late
Many implementations wait until deep in the customer journey before identifying users.
The earlier you identify authenticated users, the more complete your analytics becomes.
Tracking Too Many Events
More events doesn’t always mean better analytics.
Start with key business actions:
- Sign Up
- Login
- Purchase
- Upgrade
- Onboarding Completed
Then expand gradually.
Ignoring Event Properties
Properties often provide more analytical value than the event itself.
Track context whenever possible.
Publishing Without Testing
Always use GTM Preview Mode before publishing changes.
A five-minute validation can prevent weeks of inaccurate data.
What Should You Track First?
If you’re starting from scratch, focus on your product’s most important milestones.
For SaaS businesses:
- Sign Up
- Login
- Onboarding Completed
- Trial Started
- Subscription Created
- Subscription Upgraded
For Ecommerce:
- Product Viewed
- Add To Cart
- Checkout Started
- Purchase Completed
For Mobile Apps:
- App Installed
- Account Created
- Key Feature Used
- Subscription Started
These core events typically provide enough data to begin meaningful analysis.
Where to Go Next
Once your basic Mixpanel setup is working, you can expand into more advanced features such as:
- Session Replay
- Heatmaps
- Autocapture
- Feature Flags
- Group Analytics
- User Profiles
- Cohorts
- Funnels
- Retention Reports
These features build on the foundation you’ve created with your GTM implementation.
The key is getting your core tracking right first.
A clean implementation with a handful of high-quality events will almost always outperform a messy implementation with hundreds of poorly defined events.
Conclusion
Implementing Mixpanel through Google Tag Manager is one of the fastest ways to get product analytics up and running without relying heavily on engineering resources.
By installing the Mixpanel GTM template, configuring initialization, tracking page views, creating custom events, identifying users, and validating your setup, you can establish a scalable analytics foundation for your business.
Once the basics are working, you’ll be in a strong position to expand your implementation and start answering the questions that matter most: how users engage with your product, what drives conversions, and what keeps customers coming back.